Tondeuses Lawn-mowers Cortadoras de pasto MBE 1135P MBE 1339P FR EN ES - MANUEL D’UTILISATION - OPERATOR’S MANUAL - MANUAL DE INSTRUCCIONES
FR - SOMMAIRE EN - TABLE OF CONTENTS 1. 2. 3. 4. 1. 2. 3. 4. CONSIGNES DE SECURITE...................... 2 PRESCRIPTIONS DE SECURITÉ ............. 4 NOMENCLATURE ..................................... 4 DESCRIPTIONS DES SYMBOLES SUR LES COMMANDES ....................................5 5. CARACTERISTIQUES TECHNIQUES ....... 5 6. MONTAGE ................................................ 6 6.1 Montage du pare-pierres .................... 6 6.2 Montage du guidon ........................... 6 6.
Nous nous félicitons de vous avoir aujourd'hui comme client et nous avons mis tout en oeuvre pour vous offrir un produit performant et conforme aux directives en vigueur. Ce manuel vous aidera à monter et mettre en service le produit que vous venait d'acquérir. Nous restons à tout moment à votre service.
1. CONSIGNES DE SÉCURITÉ A) FORMATION 1) Lire attentivement les instructions du présent manuel. Se familiariser avec l’utilisation correcte et les commandes avant d’utiliser la tondeuse. Savoir arrêter le moteur rapidement. 2) N’utiliser la tondeuse que pour le but auquel elle est destinée, c’est-à-dire pour couper l’herbe et la recueillir. Toute autre utilisation peut s’avérer dangereuse et causer des dommages aux personnes et/ou aux choses.
excès de graisse. Ne pas laisser de conteneurs de débris végétaux dans ou à proximité d’un local. 3) Vérifier fréquemment que le déflecteur et le sac de ramassage ne présentent aucune trace d’usure ou de détérioration. 4) Vérifier périodiquement les câbles d’alimentation et les remplacer s’ils sont détériorés ou que leur isolation est défectueuse. Ne jamais toucher un câble électrique mal isolé s’il est sous tension. Le débrancher avant toute manipulation.
2. PRESCRIPTIONS DE SECURITÉ Votre tondeuse doit être utilisée avec prudence. Dans ce but, des pictogrammes destinés à vous rappeler les principales précautions d’utilisation ont été placés sur la machine. Leur signification est donnée ci-dessous. Nous vous recommandons également de lire attentivement les consignes de sécurité données au chapitre correspondant du présent manuel. Attention: Lire le manuel d’utilisateur avant d’utiliser la tondeuse. Risque de projection.
4. DESCRIPTIONS DES SYMBOLES SUR LES COMMANDES (là où ils sont prévus) 1 1. 2. 2 Arrêt Marce 5.
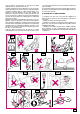
6. MONTAGE 6.1 MONTAGE DU PARE-PIERRES 1 Monter le pare-pierres en introduisant l'axe (1) et le ressort (2) comme il est indiqué. 2 3 Introduire d’abord l'axe dans le trou à droite (4), introduire le terminal à oeillet (3) du ressort dans la fente centrale, puis insérer l’autre extrémité dans sa loge (5). 4 3 5 6.
6.3 MONTAGE DU BAC Introduire le bâti (11) dans le bac (12) et accrocher tous les profils en plastique (13) à l’aide d’un tournevis, comme il est indiqué sur la figure. 6.4 MONTAGE DES ROUES 2 Pour fixer les roues, suivre la séquence indiquée.
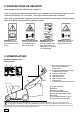
7. DESCRIPTION DES COMMANDES 7.1 INTERRUPTEUR À DOUBLE ACTION START 1 STOP Le moteur est commandé par un interrupteur à double action, afin de prévenir un démarrage accidentel. 2 Pour démarrer, presser le bouton (2) et tirer le levier (1). Le moteur s’arrête automatiquement dès que le levier (1) est relâché. 7.2 REGLAGE DE COUPE 2 Le réglage de la hauteur de coupe est obtenue en positionnant les roues dans le trou correspondant, en serrant à fond le pivot (1) à l’aide de la clé (2) fournie.
8. TONTE DE L’HERBE 8.1 ACCROCHAGE DU BAC Soulever le pare-pierres et accrocher correctement le bac (1), comme indiqué sur la figure. 1 1 8.2 DEMARRAGE Accrocher correctement le câble de rallonge comme indiqué. Pour le démarrage, appuyer sur le bouton de blocage (2) et tirer sur le levier (1) de l'interrupteur. 2 8.3 CONSEILS POUR UNE BONNE TONTE 1 2 Pendant la tonte, faire en sorte que le câble électrique se trouve toujours derrière soi et dans une partie du terrain déjà tondue.
9. MAINTENANCE IMPORTANT – Il est indispensable d’effectuer des opérations d’entretien régulières et soignées pour maintenir pendant longtemps les niveaux de sécurité et les performances originelles de la machine. Garder la tondeuse dans un endroit sec. 1) Porter des gants de travail résistants avant d'effectuer toute intervention de nettoyage, d'entretien ou bien de réglage sur la machine.
10. DIAGNOSTIC Quels problèmes? Les constats à faire: Nous vous conseillons de: La tondeuse électrique ne fonctionne pas – Le courant arrive-t-il à la tondeuse? – Vérifier votre branchement électrique. – Contrôler le fusible ou contacter le Service Après Vente de votre magasin. La tondeuse électrique fait disjoncter mon habitation L’herbe coupée n’est plus rejetée dans le panier L’herbe est difficilement coupée – L’ampérage de la prise est-il suffisant? – Essayer une prise à ampérage suffisant.
First of all we would like to thank you for being among our customers. We have prepared everything needed to offer you an efficient product conforming with the directives currently in force. This manual will help you assemble and use the machine you have just bought. We are always at your disposal.
1. SAFETY REGULATIONS A) TRAINING 1) Read the instructions carefully. Get familiar with the controls and the proper use of the equipment. Learn how to stop the engine quickly. 2) Only use the lawnmower for the purpose for which it was designed, i.e. for cutting and collecting grass. Any other use can be hazardous, causing injury or damage to people and/or property. 3) Never allow children or people unfamiliar with these instructions to use the lawnmower.
sive grease. Do not leave containers with grass cuttings in rooms. 3) Check the stone-guard and grass-catcher frequently for wear and deterioration. 4) Periodically check the electric cables and replace them if they are damaged or if the insulation has been damaged. Never touch a badly insulated cable if it still connected to the power supply. Remove the cable from the socket before taking any action. 5) Wear strong work gloves when removing and reassembling the blade.
2. SAFETY REQUIREMENTS Your lawnmower should be used with due care and attention. Symbols have therefore been placed on various parts of the machine to remind you of the main precautions to be taken. Their full meanings are explained later on. You are also asked to carefully read the safety regulations in the applicable chapter of this handbook. Important: Read the instruction handbook before using the machine. Danger of thrown objects. Keep other people at a safe distance whilst working.
4. DESCRIPTION OF THE SYMBOLS SHOWN ON THE CONTROLS (where present) 1 1. 2. 2 Off On 5.
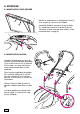
6. ASSEMBLY 6.1 STONE-GUARD ASSEMBLY 1 Attach the stone-guard by inserting the pin (1) and the spring (2) as shown. 2 3 First, insert the pin into the right-hand housing (4). Next fit the eyelet end (3) of the spring into the central slot, and lastly insert the other end of the pin in place (5). 4 3 5 6.
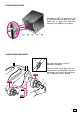
6.3 GRASS-CATCHER ASSEMBLY Insert the frame (11) into the sack (12) and attach the plastic bars (13) using a screwdriver, as shown in the drawing. 6.4 WHEELS ASSEMBLY 2 To attach the wheels, follow the steps shown. ttach the wheels selecting one of the holes for the preferred cutting heights, fully tightening the pin (1) using the wrench (2) provided.
7. DESCRIPTION OF CONTROLS 7.1 DUAL ACTION SWITCH START STOP 1 2 The engine is controlled by a dual action switch to prevent starting it accidentally. To start, press the button (2) and pull the lever (1). The engine automatically stops when the lever (1) is released. 7.2 CUTTING HEIGHT ADJUSTMENT The cutting height is adjusted by attaching the wheels to the required hole, fully tightening the pin (1) using the wrench (2) provided. 2 All the wheels must be at the same height.
8. GRASS CUTTING 8.1 FITTING THE GRASS-CATCHER Lift the stone-guard and attach the grass-catcher (1) correctly as shown in the drawing. 1 1 8.2 STARTING Connect the extension cable correctly as indicated according to the different types of clips. Start the engine by pressing the safety push-button (2) and pulling the switchgear lever (1). 2 8.3 ADVICE FOR CORRECT CUTTING 1 2 While cutting, ensure that the electric cable is always behind you and on the area of grass already cut.
9. MAINTENANCE IMPORTANT – Regular, careful maintenance is essential for keeping the safety level and original performance of the machine unchanged in time. Store the lawnmower in a dry place. 1) Wear strong working gloves during any cleaning, maintenance or adjustment operation on the machine. 2) Remove the grass debris after each cut and mud accumulated inside the chassis to avoid their drying and thus making the next start-up difficult. 9.
10. TROUBLESHOOTING Problem? What to Check: What to do: Electric mower does not work – Is there power to the mower? – Check your mower is plugged in. – Check the fuse or contact your store’s After-Sales Service Dept. Electric mower trips my mains circuit-breakers Cut grass is not blown into the gras box Mower struggles to cut grass – Is the amperage of the socket’s contact breaker sufficient? – Try a socket of sufficient amperage.
Queremos agradecerle sobre todo por encontrarse entre nuestros clientes y hemos predispuesto todo lo necesario para ofrecerle un producto eficiente y conforme a las directivas actualmente en vigor. Este manual le ayudará a montar y usar la máquina que acaba de comprar. Estamos siempre a su disposición.
1. NORMAS DE SEGURIDAD A) APRENDIZAJE 1) Leer atentamente las instrucciones. Familiarizarse con los mandos y con el uso correcto de la cortadora de pasto. Aprender a parar rápidamente el motor. 2) Utilizar la cortadora de pasto para el uso al que está destinado, es decir, el corte y la recogida de hierba. Cualquier otro uso puede resultar peligroso y provocar daños a personas y/o cosas.
ra de pasto, y sobre todo del motor, los residuos de hierba, hojas o grasa excesiva. No dejar los contenedores con la hierba cortada en el interior de un local. 3) Controlar frecuentemente el parapiedras y el saco para verificar su usura o deterioro. 4) Verificar periódicamente el estado de los cables eléctricos y sustituirlos en el caso en que estén deteriorados o su aislamiento esté dañado. No tocar nunca un cable eléctrico con corriente si está mal aislado. Desenchufarlo antes de las intervenciones.
2. REQUISITOS DE SEGURIDAD Su cortacésped debe ser utilizado con prudencia. Con este fin se han colocado en la máquina pictogramas destinados a recordarle las principales precauciones de uso. Su significado se explica a continuación. Le recomendamos además que lea atentamente las normas de seguridad que hallará en el capítulo correspondiente del presente libro. Atención: Leer el libro de instrucciones antes de usar la máquina. Riesgo de expulsión.
4. DESCRIPCIONES DE LOS SÍMBOLOS INDICADOS EN LOS MANDOS (donde estuvieran previstos) 1 1. 2. 2 Parada Marcha 5.
6. MONTAJE 6.1 MONTAJE DEL PARAPIEDRAS 1 Montar el parapiedras introduciendo el perno (1) y el muelle (2) como se indica. 2 3 Introducir el perno antes en su ubicación derecha (4), introducir el terminal de argolla (3) del muelle en la ranura central, y por último introducir el otro extremo en su alojamiento (5). 4 3 5 6.
6.3 MONTAJE DEL SACO Introducir el armazón (11) en el saco (12) y enganchar todos los perfiles de plástico (13) con la ayuda de un destornillador, como muestra la figura. 6.4 MONTAJE DE LAS RUEDAS 2 Para fijar las ruedas, seguir la secuencia indicada. Fijar las ruedas en uno de los orificios predispuestos para las distintas alturas de corte, apretando correctamente el perno (1) con la llave (2) en dotación.
7. DESCRIPCIÓN DE LOS MANDOS 7.1 INTERRUPTOR DE DOBLE ACCIÓN START STOP 1 2 El motor está comandado por un interruptor de doble acción, con la finalidad de evitar un arranque accidental. Para el arranque, apretar el pulsador (2) y tirar de la palanca (1). El motor se para automáticamente cuando se suelta la palanca (1). 7.
8. CORTE DE LA HIERBA 8.1 ENGANCHE DEL SACO Levantar el parapiedras y enganchar correctamente el saco (1) como se indica en la figura. 1 8.2 ARRANQUE 1 Enganchar correctamente el cable de prolongación como se indica para los diferentes tipos de enganche. Para arrancar el motor, apretar el pulsador de seguridad (2) y tirar de la palanca (1) del interruptor. 2 8.
9. MANUTENCIÓN IMPORTANTE – El mantenimiento regular y preciso es indispensable para mantener a lo largo del tiempo los niveles de seguridad y las prestaciones originales de la máquina. Guardar la cortadora de pasto en un lugar seco. 1) Llevar guantes robustos de trabajo antes de cada intervención de limpieza, mantenimiento o regulación en la máquina.
10. DIAGNÓSTICO Problemas? Comprobaciones: Le aconsejamos: El cortacésped eléctrico no funciona – ¿La corriente llega al contacésped? – Verifique la conexión eléctrica – Controle el fusible o conyacte el Servicio Postventa de su supermercado. El cortacésped eléctrico hace saltar la corriente de la vivienda La hierba cortada no es echada a la cesta La hierba se corta con dificultad – ¿El amperaje de la toma es suficiente? – Pruebe con una toma de un amperaje suficiente.
71505220/0 Pour tout renseignement consulter notre site internet www.mr-bricolage.fr ou appeler notre Service consommateurs au 0 811 90 20 11 GROUPE MR. BRICOLAGE/CATENA 1, Rue Montaigne 45380 La Chappelle St.