User Manual / Manual de Usuario Coffeemaker / Cafetera Models / Modelos AR12, AR13, ARX20, ARX23
IMPORTANT SAFEGUARDS When using electrical appliances, basic safety precautions should always be followed to reduce the risk of fire, electric shock and/or injury to persons, including the following: • Read all instructions before using the coffeemaker. • Do not touch the coffeemaker’s hot surfaces. • To protect against electric shock, do not immerse the power cord, power plug or coffeemaker in water or other liquid. • Close adult supervision is necessary when this appliance is used by or near children.
Decanter Use and Care Follow the instructions below to reduce or eliminate the chance of breaking the decanter: – This decanter is designed for use with your MR. COFFEE® coffeemaker and therefore must never be used on a rangetop or in any oven, including a microwave oven. – Do not set a hot decanter on a wet or cold surface. – Do not use a cracked decanter or a decanter having a loose or weakened handle. – Do not clean the decanter with abrasive cleansers, steel wool pads or other abrasive materials.
Table of Contents Important Safeguards . . . . . . . . . . . . . . . . . . . . . . . . . . . . . . . . . . . . . . . . 2 Decanter Use and Care . . . . . . . . . . . . . . . . . . . . . . . . . . . . . . . . . . . . 3 Special Cord Set Instructions . . . . . . . . . . . . . . . . . . . . . . . . . . . . . . . . 3 Setting Up Your Coffeemaker . . . . . . . . . . . . . . . . . . . . . . . . . . . . . . . . . . 5 Coffeemaker Features . . . . . . . . . . . . . . . . . . . . . . . . . . . . . . . . . . . . .
Setting Up Your Coffeemaker Congratulations on the purchase of your new MR. COFFEE® coffeemaker! Please read these instructions carefully before using your new coffeemaker. Proper use, care and maintenance will ensure trouble-free operation and the long life of this appliance. Save these instructions for cleaning and, if necessary, replacement parts information. Coffeemaker Features Your new MR.
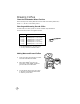
Coffeemaker Features f 1 MODELS AR12 AND g a b (Models AR12 and AR13 Only) 2. Control Panel (Models ARX20 and ARX23 Only) a. b. c. d. e. f. g. Hour Button Minute Button Brew Button On-Off Indicator Auto Indicator PM Indicator Clock Display d e AR13 2 MODELS ARX20 1. ON/OFF Switch c 3. 4. 5. 6. 7. AND ARX23 Removable Brew Basket 9. MR. COFFEE® Brand Permanent Filter Brew Basket Lid (not included) Water Reservoir 10. Warming Plate Water Window 11. Decanter Power Cord 8. MR.
Adjusting the Power Cord Length You can customize the length of the power cord so that it is the exact length you desire. To increase the length of the power cord: Grasp the power cord (not the power plug) and gently pull it away from the coffeemaker. To decrease the length of the power cord: Grasp the power cord and feed into the coffeemaker. Setting the Clock (Models ARX20 and ARX23 only) The clock flashes on the control panel to indicate that it has not been set.
Brewing Coffee Clean the Coffeemaker Before First Use Follow the steps under “Adding Water and Ground Coffee” and “Brewing Coffee Now,” (Pages 4 – 7) but do not add coffee grounds. Selecting and Measuring Ground Coffee For best results, use coffee ground for use with automatic drip coffeemakers. The amounts shown below are suggested amounts.
4) Be certain that the filter is centered in the filter basket. Close the brew basket. 5) Fill the water reservoir with the desired amount of tap water. Use the water window marks to measure the water, not the decanter marks. The decanter marks measure brewed coffee only.
6) Place the decanter on the warming plate. Make sure the decanter is accurately centered on the warming plate or the water and grounds will overflow from the brew basket. An overflow may cause personal injury or damage to property. To reduce the risk of damaging the decanter and/or the risk of personal injury, do not add cold water to the decanter if the decanter is already hot. Allow the decanter to cool before using. Do not brew coffee while the brew basket lid is open.
Brewing Coffee Later For Models ARX20 and ARX23: You must set the time for when you would like the coffeemaker to begin brewing your coffee. 1) While the switch is in the Off position, press and hold the BREW button. 2) While still pressing and holding the brew button, press and hold the HOUR button until the clock displays the hour you desire. The PM indicator will light to indicate a PM time; if the PM indicator is not lit, the time is AM.
Cleaning the Coffeemaker Between Brew Cycles To clean the used coffee grounds and filter: 1) Discard the grounds and paper filter and, if necessary, rinse the filter basket. You may also wash the filter basket in the dishwasher. 2) Rinse the decanter with warm water. You may also wash the decanter in the dishwasher (top rack dishwasher safe only). Make sure the coffeemaker is turned Off when the decanter is empty. Brewed coffee and grounds are both very hot.
Maintaining Your Coffeemaker Maintaining your coffeemaker and its parts will help extend the life of the appliance. Cleaning the Coffeemaker Your coffeemaker must be cleaned when you notice any of the follow conditions: • excessive steaming • increased brew cycle times • the pumping action stops before all of the water has been pumped from the water reservoir These conditions are caused by lime or other mineral deposits most commonly found in tap water.
2) Place a paper filter into the removable filter basket and close the brew basket lid. 3) Place the empty decanter on the warming plate. Make sure to accurately place the decanter on the warming plate to avoid the possibility of overflow. 4) Start the brew cycle: For Models: • AR12 and AR13 a. Push the ON/OFF switch to ON to begin the brew cycle. • ARX20 and ARX23 a. Turn the switch to On. Then, press the brew button to begin the brew cycle. b.
d. Discard both the vinegar and filter. Fill the decanter with tap water and pour it into the water reservoir. e. Place the decanter on the warming plate and begin the brew cycle. f. Discard the water in the decanter and turn the coffeemaker Off. If necessary, repeat steps d through f to flush all traces of vinegar from the coffeemaker. Cleaning the Decanter Hard water can leave a whitish stain on the decanter. Coffee and tea may then turn this stain brown.
Service and Maintenance Replacement Parts • Filters For better tasting coffee and tea, we recommend that you use MR. COFFEE® brand 8-12 cup paper filters or MR. COFFEE® brand permanent filters. These filters are available at most grocery stores. • Decanters You can usually purchase a replacement decanter from the store where you purchased your coffeemaker. If you are unable to find a replacement, please call 1-800 MR COFFEE (1-800-672-6333) in the U.S.
One-Year Limited Warranty Sunbeam Products, Inc. (“Sunbeam”) warrants that for a period of one year from the date of purchase, this product will be free from defects in material and workmanship. Sunbeam, at its option, will repair or replace this product or any component of the product found to be defective during the warranty period. Replacement will be made with a new or remanufactured product or component.
PRECAUCIONES IMPORTANTES Cuando use algún aparato eléctrico siempre deben de seguirse precauciones básicas de seguridad incluyendo las siguientes para reducir el riesgo de incendio o descargas eléctricas, y /o daños a personas: • Lea todas las instrucciones cuidadosamente antes de usar la cafetera. • No toque las superficies calientes de la cafetera. • Para protegerse contra una descarga eléctrica, no sumerja el cordón, el enchufe o la cafetera en agua o en otros líquidos.
Cuidado y Uso de la Jarra Siga las siguientes instrucciones para reducir o eliminar el riesgo de romper la jarra: – Esta jarra está diseñada para ser utilizada con su cafetera MR. COFFEE®, por lo tanto nunca debe ser usada sobre las hornillas de una estufa, horno ni tampoco en un horno microondas. – No coloque la jarra de vidrio caliente en una superficie fría o mojada. – No utilice una jarra quebrada o con un asa debilitada.
Índice Precauciones Importantes . . . . . . . . . . . . . . . . . . . . . . . . . . . . . . . . . . . . . 18 Cuidado y Uso de la Jarra . . . . . . . . . . . . . . . . . . . . . . . . . . . . . . . . . . 19 Instrucciones Especiales del Cordón Eléctrico . . . . . . . . . . . . . . . . . . . 19 Preparando Su Cafetera . . . . . . . . . . . . . . . . . . . . . . . . . . . . . . . . . . . . . . . 21 Características de Su Cafetera . . . . . . . . . . . . . . . . . . . . . . . . . . . . . . .
Preparando Su Cafetera ¡Felicitaciones por la compra de su nueva cafetera MR. COFFEE®! Por favor lea estas instrucciones cuidadosamente antes de usar su nueva cafetera. El uso, cuidado y mantenimiento adecuado asegurarán una operación sin problemas y una larga duración de este aparato. Guarde estas instrucciones para la información de limpieza y si es necesario para la información de partes de repuesto. Características de Su Cafetera Su nueva cafetera MR.
Características de Su Cafetera f MODELOS AR12 1 Y 1. Interruptor de Encendido / Apagado ON/OFF (Modelos AR12 y AR13 únicamente) ARX20 y ARX23 únicamente) a. Botón de Hora b. Botón de Minutos c. Indicador de Retraso de Preparación d. Indicador de Encendido-Apagado ON-OFF a c b d e AR13 2 2. Panel de Control (Modelos g 3. 4. 5. 6. 7. MODELOS ARX20 Y ARX23 8. Filtros Marca MR. e. Indicador de Automático COFFEE® Estilo Canasta, para 8 – 12 Tazas f. Indicador PM (no incluidos) g. Cronómetro 9.
Ajustando la Longitud del Cable Eléctrico Usted puede ajustar la longitud del cable eléctrico de manera que tenga la longitud exacta que usted desea: Para aumentar la longitud del cable eléctrico: Tome el cable eléctrico (no el enchufe) y jale suavemente alejando de la cafetera. Para reducir la longitud del cable eléctrico: Tome el cable eléctrico y lentamente alimente el cable al interior de la cafetera.
Preparando Café Limpieza de la cafetera antes de usar por primera vez Siga los pasos indicados en la sección “Añadiendo Agua y Café Molido” y en “Preparando Café Ahora”, (Páginas ?? – ??) pero no agregue los granos de café. Seleccionando y midiendo el café molido Para mejores resultados, use granos de café para cafeteras de goteo automático. Las cantidades que se muestran a continuación son cantidades sugeridas.
4) Asegúrese de que el filtro esté centrado en la canasta para filtro y después cierre la tapa de la canasta de preparación. 5) Llene el tanque de agua con la cantidad deseada de agua de grifo. Use las marcas en la ventana de visibilidad para medir el agua, no las marcas de la jarra. Las marcas de la jarra miden la cantidad de café preparada únicamente.
6) Coloque la jarra sobre el plato calefactor. Asegúrese de que la jarra esté correctamente colocada en el centro del plato calefactor o el agua y el café se desbordarán de la canasta de preparación. Un desbordamiento puede causar lesión personal o daños. Para reducir el riesgo de dañar la jarra y/o el riesgo de lesión personal, no agregue agua fría a la jarra si ésta ya está caliente. Permita que la jarra se enfríe antes de utilizar.
Preparando Café Más Tarde Para Modelos ARX20 y ARX23: Usted debe programar el tiempo en el que le gustaría que la cafetera inicie a preparar su café. 1) Mientras que el interruptor se encuentra en la posición Off, presione y detenga el botón para preparar café BREW. 2) Mientras sigue presionando el botón de preparación, presione y detenga el botón de hora HOUR hasta que la pantalla en el reloj muestre la hora que usted desea.
Limpieza de la Cafetera Entre Ciclos de Preparación Para limpiar los granos de café utilizados y el filtro: 1) Deseche los granos y el filtro de papel que utilizó, y si es necesario, enjuague la canasta del filtro. Usted puede también lavar la canasta del filtro en la lavadora de platos. 2) Enjuague la jarra con agua tibia. Usted puede también lavar la jarra en la lavadora de platos (solamente en la rejilla superior de la lavadora de platos para lavarla de una forma segura).
Mantenimiento para Su Cafetera El mantenimiento para la cafetera y las partes de ésta le ayudarán a extender la vida del aparato.
2) Coloque un filtro de papel en la canasta del filtro removible y cierre la tapa de la canasta de preparación. 3) Coloque la jarra vacía sobre el plato calefactor. Asegúrese de que coloque correctamente la jarra sobre el plato calefactor, para evitar la posibilidad de derramamientos. 4) Inicie el ciclo de preparación: Para Modelos: • AR12 y AR13 a. Coloque el interruptor de encendido / apagado ON/OFF en la posición de encendido ON para encender la cafetera. • ARX20 y ARX23 a.
d. Deseche el agua (y la mezcla de vinagre). Llene la jarra con agua de grifo y vierta en el tanque de agua. e. Coloque la jarra sobre el plato calefactor y encienda la cafetera y permita que el ciclo se complete. f. Deseche el agua en la jarra y encienda apague la cafetera. Repita los pasos del d al f para enjuagar todos los residuos de vinagre de la cafetera. Limpieza de la Jarra El agua dura puede dejar manchas blancas en la jarra. El café y el te puede tornar estas manchas color café.
Servicio y Mantenimiento Partes de Repuesto • Filters Para un café o te con mejor sabor, recomendamos que utilice los filtros de papel para preparar de 8 a 10 tazas, marca MR. COFFEE® o los filtros permanentes marca MR. COFFEE®. Estos filtros están disponibles en casi todos los supermercados. • Jarras Usted puede generalmente comprar una jarra de repuesto de la tienda donde compró su cafetera.
Garantía Limitada de 1 Año Sunbeam Products Inc. (“Sunbeam”) garantiza que, por un período de un año a partir de la fecha de compra, este producto estará libre de defectos en el material y en la mano de obra. Sunbeam a su criterio, reparará o remplazará este producto o cualquiera de los componentes del mismo que estén defectuosos durante el período de garantía. El remplazo será hecho con un producto o componente nuevo o reconstruido.
Notes 34
Notes 35
©2001 Sunbeam Products, Inc. All rights reserved. MR. C FFEE ® is a registered trademark of Sunbeam Products, Inc. Distributed by Sunbeam Products, Inc., Boca Raton, Florida 33431. ©2001 Sunbeam Products, Inc. Todos los derechos reservados. MR. C FFEE ® es una marca registrada de Sunbeam Products, Inc. Distribuido por Sunbeam Products, Inc., Boca Raton, Florida 33431. Made in China / Hecho en China P. N.