INSTRUCTION MANUAL Automatic Breadmaker BMR 200
IMPORTANT SAFEGUARDS When using electrical appliances, basic safety precautions should always be followed to reduce the risk of fire, electrical shock, and/or injury to persons including the following: 1. Read all instructions before using the machine. 2. Do not touch hot surfaces. Use-handles or knobs. 3. To protect against electrical shock do not immerse cor d, plugs or breadmaker in water or other liquid. 4. Close supervision is necessary when any appliance is, used by or near children. 5.
BEFORE Y O U R FIRST USE Carefully unpack the breadmaker and remove all packaging materials. To remove any dust that may have accumulated during packaging, wipe the inner pot, kneader blade and the outside of the breadmaker with a clean, damp cloth. Do not use harsh or abrasive cleaners on any part of the breadmaker. Warning: Do not immerse the cord, plug, inner pot or base in water or other liquid.
TABLE OF CONTENTS Important Safeguards ......................................................... 2 Card Set Instructions . . . . . . . . . . . . . . . . . . . . . . . . . . . . . . . . . . . . . . . . . . . . . . . . . . . . . . . . 2 Before Your First Use . . . . . . . . . . . . . . . . . . . . . . . . . . . . . . . . . . . . . . . . . . . . . . . . . . . . . . ...3 Important Safety Tips from Mr. Coffee* . . . . . . . . . . . . . . . . Welcome to The Dreadmaker’“by . .. ..................... I Mr.
WELCOME T O THE BREADMAKER’” BY MR. COFFEE” Thank you for purchasing The Breadmaker’“by MrCoffee? Your new breadmaker is an exciting appliance because it mixes, kneads and bakes the bread by itself after you measure and add the ingredients-in the correct order. Please try several loaves of bread from the accompanying Recipe Book to familiarize yourself with the breadmaker, specific breadmaker recipes, and the shape and quality of loaves your b r e a d m a k e r w i l l give.
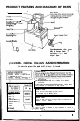
PRODUCT FEATURES AND DIAGRAM OF PARTS . Glass Window Inner Pot Pot Iwcrl Ihc. innrf pul -1 until ynnc hear it “click” inln place. I VeIlI I Conlrol Kl i%=a Panel Knraclcr Rlatlc h\ounlinR Shall Kllcwicr Rlaclr 7 / Your Breadmaker Also omes With A Recipe Book. Includes recipes and helpful lips. CONTRO L P AN EL N AME S AAND OPERATION Be sure-to press the pad until a beep is heard. l l l Indicates number of course. indicates amount of time left 10 t c mpletion of course.
HOW YOUR BREADMAKER WORKS 1. BASIC, FRENCH, SWEET, AND DOUGH SETTINGS BASIC Settings 1 - 3 FRENCH Setting 6 SWEET Setting 7 1 1 I I 2. WHOLE WHEAT SETTINGS Setting 4 and 5 Rest First Second Knead Knead \ U KNEAD During the first knead, the dough ingredienls are mixed together for a few minutes with the kneader blade pulsing on/off. During all knead stages. the dough is manipulated continuously.
‘HOW TO USE YOUR BREADMAKER The breadmaker can be programmed to perform various functions within the different settings. The BAKE settings make bread from start IO finish. The DOUGH setting makes dough for a variety of recipes, but you must shape it yourself, then bake it in a regular oven. For the Delayed Finish feature, the breadmaker can be programmed to make bread or dough while you are at work or asleep.
BEFORE BAKING (Use For All Settings) CONT. 6. Assemble ingredients on your kitchen counter in order of use before adding them to the inner pot. Measure ingredients into the inner pot in the order given in the recipe. Once all ingredients have been-added lo the inner pot, recheck the recipe lo be sure each one was used, and in the correct quantity and order. l The correct order of adding ingredients is: 1. Water and other liquids (including eggs) 2. Flour, shortening, sugar, salt, elc. I 3.
A. BAKE SETTINGS - IMMEDIATE START This section explains how to set the breadmaker using one of the various BAKE settings. Make sure that the setting you select is the correct setting for the recipe you are making. Follow steps 1 through 10 on pages 8 and 9. 11. Press the START pad. l The-display window will show the time remaining until the completion of the selected setting. The time will “count down” in one-minute increments.
CUTTING AND STORING BREAD LOAVES CUTTING . . . , . , Because loaves baked in a breadmaker are s h rped differently from traditional bread loaves, below are several ways to’ cut them:‘ l Use an electric knife for best results when cutting . .hot bread loaves. Otherwise, a sharo serrated or sawtooth breadkni ife works well . and slice across the loaf. We find this l For square slices place the loaf on its side is the easiest way to cut loaves. .
‘.. C. BAKE AND DOUGH SETTINGS DELAYED FINISH l l l This section explains how to set the Delayed Finish feature so that you can have a loaf of bread or dough whenever you want. When using the timer, always set it before pressing the START pad. The Delayed Finish feature can be used to delay the finish of settings up to 12 hours. To program the machine for Delayed Finisb: follow steps 1 through 10 on pages selecting and selling BAKE or DOUGH. ‘* Lq To enter 9:30 In the display window.
BREAD A N D DOUGH INGREDIENTS FLOURS l Dread flour is the highest in gluten of the readily available flours. It gives the tallest results and is the most tolerant of adverse conditions, high temperatures, high humidity, etc. l Whole wheat flour still contains the bran and germ from the wheat kernel. It is lower in gluten and needs to be used only with the WHOLE WHEAT BAKE settings. l All- purpose flour is used only In some of the DOUGH recipes. I t is not a substitute for bread flour in a recipe.
TROUBLESHOOTING GUIDE: BREADMAKER Problem Solution Flour spilled out of inner pot into inner case Wipe out inner case with a clean cloth. Use care when cleaning around heating element. For BAKE selling, use a maximum of 4-2/ 3 cups flour at a time. For DOUGH setting, use a maximum of 4-1/2 cups flour. Bread not baking properly Check kneader blade mounting shaft for free rotation. If the rolation of the shaft Is binding or tight, please contact Mr.
TROUBLESHOOTING GUIDE: BREAD LOAVES CONT. Problem Causes Overrising Usually indicates that ingredient quantities are out of proportion. Too much yeast, sugar, flour, liquid or a combination may result in exceeding the capacity of the inner pot. l Open, coarse or holey texture Excess water or yeast was used, or yeast action was accelerated by hot, humid weather or overheated ingredients. Salt omitted. l l Not enough water or too much flour was used. .. Not enough sugar or yeast was used.
PROPER CARE AND CLEANING OF THE BREADMAKER BY MR. COFFEE l Unplug the power cord and allow the breadmaker TO cool completely, Caution: Do not pour water into the inner case or submerge the breadmaker in water. l Use only a mild detergent tO clean the breadmaker.
COMMONLY ASKED QUESTIONS What has happened to the kneader bl ade? I t may have been baked into the bottom of the loaf of bread. See step 12 on page 10 for how to remove the kneader blade from the loaf. Why is bread flour used in most of the recipes? Bread flour is high in protein. When kneaded the protein produces gluten that gives bread a strong structure more tolerant of variations in the recipe, weather conditions etc., than all-purpose flour.
31
31
MR.