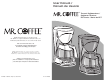
User Manual / Manual de Usuario Thermal Coffeemakers / Cafeteras Térmicas ECT Series / Serie de ECT ©2003 Sunbeam Products, Inc. All rights reserved. MR. COFFEE® is a registered trademark of Sunbeam Products, Inc. Distributed by Sunbeam Products, Inc., Boca Raton, Florida 33431. Visit us at www.mrcoffee.com. You will find exciting entertaining tips and ideas including great recipes! ©2003 Sunbeam Products, Inc. Todos los derechos reservados. MR. COFFEE ® es una marca registrada de Sunbeam Products, Inc.
IMPORTANT SAFEGUARDS When using electrical appliances, basic safety precautions should always be followed to reduce the risk of fire, electric shock and/or injury to persons, including the following: • Read all instructions before using the coffeemaker. • Do not touch the coffeemaker’s hot surfaces. • To protect against electric shock, do not immerse the power cord, power plug or coffeemaker in water or other liquid. • Close adult supervision is necessary when this appliance is used by or near children.
Setting Up Your Coffeemaker Table of Contents Coffeemaker Features . . . . . . . . . . . . . . . . . . . . . . . . . . . . . . . . . . . . . . . . 5 Congratulations on your new MR. COFFEE® Thermal Carafe Coffeemaker purchase! Please read these instructions carefully before using your new coffeemaker. Proper use, care and maintenance will ensure trouble-free operation and the long life of this appliance. Save these instructions for cleaning and, if necessary, replacement parts information.
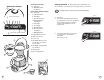
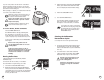
Models ECT84 and ECT85 1. Control Panel a. BREW NOW Switch and Indicator Models ECTX81, ECTX84 & ECTX85 Coffeemaker Features a Setting the Clock (Models ECTX81, ECTX84 and ECTX85 only) The clock flashes on the control panel to indicate that it has not been set. You must set the clock if you want to use the timer feature. 2. Control Panel a. PRESS/HOLD Button 1 Models ECT84 and ECT85 b c a d e f Figure A b. Hour Button To set the clock: c. Min. (minute) Button 1) d.
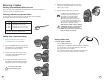
Brewing Coffee 5) Open the reservoir lid and fill the reservoir with cold water to the desired cup level on the water window (up to 8 cups). 6) Place the empty thermal carafe on the base. Cleaning the Coffeemaker Before First Use Follow the steps under “Adding Water and Ground Coffee” and “Brewing Coffee Now,” (Pages 8-9) but do not add ground coffee. Selecting and Measuring Ground Coffee For best results, use coffee ground for use with automatic drip coffeemakers.
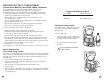
Once pouring is complete, be sure the Brew-Thru lid is closed to seal in heat and flavor. While the coffee is brewing, the Pause ‘n Serve feature allows you to sneak a cup of coffee from the thermal carafe. Replace the thermal carafe on the base within 30 seconds to prevent overflow and possible injury. 3) While still pressing and holding the PRESS/HOLD button, press and hold the MIN. button until the clock displays the desired minute setting. 4) Release the PRESS/HOLD button.
Maintaining Your Coffeemaker To Clean Mineral Deposits from Your MR. COFFEE® Coffeemaker Your coffeemaker may be cleaned by using MR. COFFEE ® Cleaner or vinegar. MR. COFFEE ® Cleaner is available at many retail stores or by calling the MR. COFFEE ® Consumer Service Department at 1-800-MR COFFEE (1-800-672-6333). Suggested Cleaning Interval 1. Follow package instructions to prepare one batch of MR. COFFEE® Coffeemaker Cleaner. Pour the mixture into the water reservoir.
TROUBLESHOOTING P OTENTIAL P ROBLEMS P ROBABLE C AUSE “ON” LIGHT DOES NOT ILLUMINATE • Unplugged Service and Maintenance Replacement Parts • Filters For better tasting coffee, we recommend that you use a MR. COFFEE® brand 8-12 cup #4 Cone Style paper filter or a MR. COFFEE® brand permanent filter. These filters are available at most grocery stores. • Thermal Carafe You can usually purchase a replacement thermal carafe from the store where you purchased your coffeemaker.
1-YEAR LIMITED WARRANTY Sunbeam Products, Inc, or if in Canada, Sunbeam Corporation (Canada) Limited (collectively “Sunbeam”) warrants that for a period of one year from the date of purchase, this product will be free from defects in material and workmanship. Sunbeam, at its option, will repair or replace this product or any component of the product found to be defective during the warranty period. Replacement will be made with a new or remanufactured product or component.
Uso y Cuidado de la Jarra Térmica Se puede romper la Jarra Térmica si no se siguen las siguientes instrucciones: Use sólamente la Jarra Térmica diseñada específicamente para los modelos MR. COFFEE®. – Esta Jarra Térmica está diseñada para usarse con su Cafetera MR. COFFEE®, por lo que nunca se deberá usar en la hornilla de la estufa, el horno, ni el horno de microondas. – No limpie la Jarra Térmica con limpiadores, fibras ni otros materiales Índice Preparando Su Cafetera . . . . . . . . . . . . . . . . .
Preparando Su Cafetera ¡Felicitaciones por la compra de su nueva Cafetera MR. COFFEE®! Por favor lea estas instrucciones cuidadosamente antes de usar su nueva cafetera. El uso, cuidado y mantenimiento adecuado asegurarán una operación sin problemas y una larga duración de este aparato. Guarde estas instrucciones para la información de limpieza y si es necesario para la información de partes de repuesto. a Características de la Cafetera 1 Su nueva cafetera MR.
Ajuste del Reloj Preparación de Café (Modelos ECTX81, ECTX84 y ECTX85 únicamente) El reloj parpadea en el tablero de control para indicar que no ha sido ajustado. Limpieza de la Cafetera Antes de Usarla por Primera Vez Siga los pasos de abajo “Agregando Agua y Café Molido” y “Preparación Inmediata de Café” (las Páginas 23 – 24), pero no le agregue el café molido. Usted deberá ajustar el reloj si quiere usar la característica del temporizador.
Para servir el café, asegúrese de que la flecha de la tapa Brew–Thru (con agujero de paso) esté alienada con el pico. Con el fin de evitar que la tapa se caiga al servir, no gire la flecha de la tapa más allá del pico. 6) Coloque la jarra térmica vacía sobre la base. Una vez que haya servido, asegúrese de que la tapa Brew–Thru (con agujero de paso) esté cerrada para conservar el calor y el sabor. Para obtener el mejor rendimiento, enjuague la jarra térmica con agua tibia.
3) Mientras que está oprimiendo y sosteniendo el botón de PRESS/HOLD (OPRIMIR/SOSTENER), oprima y sostenga el botón de MIN. (MINUTOS) hasta que el reloj muestre los minutos deseados. 4) Suelte el botón de PRESS/HOLD (OPRIMIR/SOSTENER). Mantenimiento de la Cafetera Para Limpiar los Depósitos Minerales de Su Cafetera MR. COFFEE®: Su Cafetera puede ser limpiada usando Limpiador MR. COFFEE® o vinagre. El Limpiador MR.
PROBLEMAS Intervalos de Limpieza Sugeridos Tipos de Agua Frecuencia de Limpieza Agua Suave Cada 80 Ciclos de Preparación Agua Dura Cada 40 Ciclos de Preparación Y SOLUCIONES PROBLEMAS POTENCIALES CAUSAS PROBABLES LA LUZ DE ENCENDIDO “ON” NO SE ILUMINA • Está desconectada • Interrupción de la energía eléctrica NO PREPARA CAFÉ • Está desconectada • Interrupción de la energía eléctrica • No hay agua en el tanque, revise la ventana de visibilidad • La canasta del filtro no está correctamente insert
Servicio y Mantenimiento Partes de Repuesto • Filtros Para un café o te con mejor sabor, recomendamos que utilice los filtros de papel #4 Estilo de el Cono para preparar de 8 a 12 tazas, marca MR. COFFEE® o los filtros permanentes marca MR. COFFEE®. Estos filtros están disponibles en casi todos los supermercados. • Jarras Usted puede generalmente comprar una jarra de repuesto de la tienda donde compró su cafetera.