
Installation Guide


7
OperatingInstructionsandOwner’sManualMr. Heater | Portable Buddy Radiant Heater
NEVER LEAVE THE HEATER UNATTENDED WHILE BURNING!NEVER LEAVE THE HEATER UNATTENDED WHILE BURNING!NEVER LEAVE THE HEATER UNATTENDED WHILE BURNING!
Figure 6
MAINTENANCE
Pulse Ignition
The Pulse Ignition Button is located to
the left of the control knob. Refer to
Figure 4 on page 5.
Open the battery cover located inside
the accessory compartment to install
the“AAA”battery(included).
See Figure 5.
Accessory Mode Pre-Lighting
NOTE: Only approved Mr. Heater
accessories may be used with this heater.
Accessories are also available to use
with this heater. They may be attached
to the quick connect fitting in the side
compartment of the heater with the
hose included with the accessory.
IMPORTANT: Quick connect fitting is
designed for GAS OUTLET ONLY.
To pre-light accessory:
IMPORTANT: These steps explain how
to provide a gas supply to the accessory.
Refer to the Lighting Instructions in the
manual provided with your accessory to
ignite the accessory.
1. Makesurecontrolknobisin“OFF”
position. See Figure 1 on previous
page.
2. Attach accessory hose onto the
quick connect fitting in the side
compartment of heater. See Figure 5.
3. Check hose connection for leaks
with soapy water at the threaded
connection where the hose connector
screws into the regulator. DO NOT USE
ANY EXPOSED FLAME TO CHECK FOR
LEAKS. DO NOT OVERTIGHTEN.
4. Push control knob down slightly
and rotate clockwise to Accessory
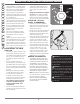
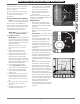
“Ignition/PILOT”position.SeeFigure6.
5. Push and hold control knob down
while holding down ignition button
until pilot is lit.
6. Release ignition button and continue
to hold down control knob down for
30-60 seconds and release. (If pilot
does not sustain flame, return to step
#4.
7. With pilot lit, push control knob down
androtatetoACC.“ON”setting
position.
8. Proceed to the lighting instructions
included with your accessory.
To shut down the accessory:
1. To shut off accessory, shut off heater
gas supply first, then turn accessory
controlknobto“OFF”position.
• Do not operate, store or remove
cylinder near flammable items or
ignition sources.
Refertoowner’smanualincludedwith
accessory for more detailed operation and
maintenance instructions.
Maintenance
• Always keep the heater area clear
and free from combustible materials,
gasoline and other flammable vapors
and liquids.
• Keep the vent areas (slots in the
bottom and top of the heater) clear at
all times.
IMPORTANT: The heater and its
surroundings should be kept clean and
free of dust.
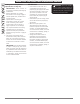
• Visually inspect the pilot flame and
burner periodically during use. The
pilot flame should be blue in color
(not yellow) and will extend to the
thermocouple. The flame will surround
the thermocouple just below the tip.
See Figure 7.
• A slight yellow flame may occur where
the pilot flame and main burner flame
meet. The burner should be bright
orange (with a slight blue color around
the border, a red-orange haze that
is visible on the burner material is
acceptable) and without a noticeable
flame.
• A blue flame that rolls out at the top
of the burner material indicates an
accumulation of dust, lint or spider
webs inside the housing assembly and
main burner assembly. If the pilot is
yellow or the burner has a noticeable
flame, cleaning may be required.
• It is necessary to periodically check the
burner orifice and burner venturi to
make sure that they are clear of things
such as insect nests and spider webs
that may accumulate over time. A
clogged tube can lead to a fire.
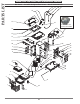
• Use the following procedure to inspect
the casing assembly and main burner
assembly.
Figure 5
Battery Cover
Quick Connect Fitting
LO
HI
ACC
ON
Ignition
Pilot
Acc
Ignition
Pilot
Figure 7
Electrode
Thermocouple