
Full Product Manual


5
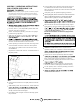
Control Knob
Once the pilot has lit, hold the Control Knob down for
an additional 30 seconds to heat the thermocouple.
After 30 seconds, release the Control Knob and the pilot
should remain lit.
If the pilot goes out repeat the lighting procedure.
After lighting pilot, release Control Knob. Control Knob should
return to fully extended position. To operate heater slightly
depress knob and gently turn to lock in desired position.
tile has turned bright orange.
After first burner tile has turned bright orange, adjust
heat output by turning Control Knob to desired position
2) 1 LB. propane
bottles are needed to use heater in (HI) position.
Warning:
fan switch is located just left of control knob side handel
Installation of 4 D-cell batteries is required for fan
operation. Battery box is located on lower back panel of
battery installation. See figure 2.
Heater fan can also be powered by electrical adapter
-
liamp current with positive tip polarity. See figure 2.
To shut off heater, slightly push down and turn Control
CAUTION: After turning heater off, wire guard will
remain hot. Allow to thoroughly cool before storing.
Do not operate, store or remove cylinder(s) near flam-
mable items or ignition sources.
HEATER WHEN NOT IN USE!
LIGHTING / OPERATING INSTRUCTIONS
FOR USE WITH DISPOSABLE 1 LB.
PROPANE CYLINDERS:
WARNING: Always inspect propane cylinder and heater propane
connections for damage, dirt, and debris before attaching
propane cylinder. Do not use if head of cylinder is damaged,
punctured or deteriorated.
CONNECTIONS!
U.S. Dept. of Transportation (DOT).
Use only 16.4 oz. (1 lb.) disposable cylinders that mate
with No. 600 valve connection.
Heater and attached cylinder(s) must be in an upright
position during operation.
-
-
wise (from bottom) into portable heater until hand-tight.
DO NOT use thread sealant on this connection.
Check cylinder(s) connection for leaks with soapy water
at the threaded connection under the domed plastic
cover where the cylinder screws into the tank swivel.
SEE WARNING!
Depress the Control Knob and turn counterclockwise to
the pilot postion.
Hold Control Knob down in the pilot position for 30-40
seconds.
While holding down the Control Knob, rotate clockwise
pilot position, a spark will be generated at the pilot as-
sembly and the heater should light.
If the heater does not light on the first attempt, repeat
the procedure.