FULL MANUAL MAC GB - NL
1. 2. PARTS & FUNCTIONS .................................................................................................................................................................. 2 GETTING STARTED ...................................................................................................................................................................... 3 2.1. CONNECTING THE DEVICE ..............................................................................................................
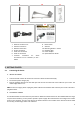
1. PARTS & FUNCTIONS A. INDOOR IP CAMERA 2 6 8 7 1. 2. 3. 4. 5. 6. 5 3 1 4 10 9 Power jack Antenna connection Micro SD card slot (only for HD IP cameras) Terminal connection for alarm Network connection External speaker connection 7. 8. 9. 10. 11. 11 IP Camera Antenna Network cable Power adapter Quick reference guide B.
10 9 12 1. 2. 3. 4. 5. 6. 7. Outdoor IP camera unit Antenna connection Network connection Power connection Audio out connection Audio in connection Terminal connection for alarm Connections 1 & 2 = OUTPUT / 3 & 4 = INPUT 11 13 8. 9. 10. 11. 12. 13. Reset button Antenna Mounting bracket + screws Network cable Power adapter Quick Reference Guide 2. GETTING STARTED 2.1. Connecting the device A. INDOOR IP CAMERA • • • Take the mrSafe outdoor IP camera out of the box. Attach the wifi antenna (8).
Example of an installation: • • Take the mrSafe outdoor IP camera out of the box. Attach the WiFi antenna (9) and the bracket (10). We use a cable box which is available for a few euros at the hardware store. • The grommets or glands are placed around the cables. You may need to cut the grommet around the camera cable. If so, it needs to be sealed again later. There are 2 connections open at the bottom of the cable box.
• A hole of about 10 mm will be drilled through the wall. The round plug of the power cable will be taken from the inside to the outside. The cable box is placed close to the power cable. The round plug will be attached to the camera cable inside the cable box. • The hole in the wall, the grommets or cable glands and possible cuts in the cable box should be sealed so that everything is water resistant. • If you want, you can fix the cable as well.
2.2. Software installation Download the software from www.mrsafe.eu and begin the software installation. Drag and drop the MrSafe software to the “Applications” folder to start the installation. Note: Since you have downloaded the software from the mrSafe website, your Mac may warn you with a pop-up message that installation was not allowed. In this case you need to change the Security & Privacy settings in your System Preferences .
3. TERMINOLOGY LAN: Local Area Network: Your home network, which includes your internet modem and all the equipment in the house that is connected to the network via cable or Wifi. WAN: Wide Area Network: The internet, if you have an Internet connection at home or anywhere else. Resolution: The quality and sharpness of the images. The resolution is expressed in pixels horizontal x vertical. The higher the resolution the better the image quality of the IP camera.
Press CTRL-button and simultaneously click on the IP camera in the LAN list and choose “Configuring network”. Click the “Wifi” tab and press “Scan”. The system is now going to search for local Wifi connections. When the scan is finished please select your local Wifi in the “Network name (SSID)” box. Type your network password and click “OK”. After confirming, the IP camera will automatically restart. This can take a few minutes. The camera is now connected with Wifi.
5. LAN CAMERA All the cameras that are online in your local network (LAN) will be displayed in the LAN list. 5.1. LAN Camera browsing Go to the LAN list and select the camera you want to see. The program is now going to make contact with your IP camera. This can take a few seconds. When the image appears, the camera is ready to operate. If the image is not completely clear /sharp, you can turn the lens focusing ring till the image appears sharp.
5.2. LAN Camera settings You can change the settings of each camera by pressing CTRL and simultaneously clicking on the camera you want to adjust. 5.2.1. Setting options 5.2.1.1. Change the camera alias You can change the camera ID into another name. Type a new name in the box and press “OK”. The camera will now have another name instead of its ID.
5.2.1.2. Set the IP address: configuring network You can change the IP address of your camera individually. • Choose ‘Configuring network’ and click on the Wifi tab. • Choose for DHCP if you want to use the automatic assigned IP address. • If you want to use the same IP address every time, you select “Fixed IP”. Put in the IP address manually by clicking in the “IP address” box. Press “OK” to save changes. The device status will show “Login successful” when the camera is logged into the mrSafe server. 5.
6. WAN CAMERA 6.1. WAN Login Press “Create Account” in the upper right corner. The pop-up window above will appear. Enter a username, password an e-mail address. Press “OK” to confirm your registration. For use over the Internet (WAN), you will be asked to log in. There are 2 possibilities to login. 1. You can login per camera. Find the login details at the bottom of the IP Camera. You need to enter the user name (CAM ID) and Password (Login Password).
6.2. WAN Camera browsing When you are logged in, select the camera you want to see. The program is now going to make contact with your camera. This can take a few seconds.
When the image appears, the camera is ready to operate. If you want to control the camera and change the viewing angle you can use the control panel. (For more information go to chapter “7.
6.3. WAN Camera settings You can change the settings of each camera by pressing CTRL and simultaneously clicking on the camera you want to adjust. 6.3.1. Setting options 6.3.1.1. Add camera You can rename the camera you want to add by entering a new name in the “Camera alias” box. Enter the Camera ID and access code (at the bottom of the IP Camera) and press “OK”. The new camera will now be shown in the WAN list.
6.3.1.2. Change CAMERA PASSWORD To change the password, enter the new password in de “New password” box and verify the new code by entering the same code in the box below. Press “OK” to save the setting. NOTE: The next time the system asks for the access code, you have to enter the new code! To delete the new code, restore the default settings and the original access code will be applied again.
6.3.1.3. Change the camera alias You can change the camera ID into another name (alias). Type a new name in the ‘Camera alias’ box and press “OK”. The camera will now have another name instead of its ID. 6.3.1.4. SD Card query (only for models with SD card reader) For more information go to chapter “SD Card”.
7. MENU INSTRUCTIONS 1 2 3 There are 3 different menus in the system: 1. Main menu 2. Control Panel 3. Bottom menu 7.1. Main menu You can watch video in full screen by pressing the 4 arrows button. To exit full screen mode click ‘Exit full screen” in the upper right corner.
The gear wheel is used for making changes in the preferences. − − − − Closing the main window: when you press the in the upper right corner you can choose between minimizing to the status bar, exit the software or need an inquiry. The program asks you to confirm the exit of the software Notify: You can choose if notifications will be shown or not. Upgrade: If you click on the “Update online” button you will be redirected to the mrSafe website where you can download the software update.
− PC captured files: this is the folder where the pictures you have taken will be saved. To change the destination folder, press “Choose” and choose another destination folder. If you want to browse through your captured images press “Open”. − Alarm view setting: when you choose to set an alarm you can adjust the amount of seconds the alarm will be shown/heard. − Clear record file: remove all recorded videos from the IP cameras. − Clear picture file: remove all recorded pictures from the IP cameras.
With the magnifying glass you can search for a local video that has been recorded. All the recorded files are listed on the left side. Clicking a file will open it in Quicktime (by default). Quicktime – an Apple software – cannot show all video formats. If the file is not properly displayed, you can install VLC media player, and open the files with VLC media player. With the lock icon you can change the login password (only in WAN menu). Enter the old password and the new password (2 times to verify).
The question mark icon is the support file. If you have a question about the software you can search the help file for the answer. In the right top corner, there is a menu “Create account”. Using this menu, you can create an account on the server, using your own login & password. (For more information see chapter “6.1 WAN login”). 7.2.
With this menu you can control your camera.
7.2.1. Settings With the settings button you can change the sharpness, brightness, saturation, etc… of your camera footage. The alarm management is used to set up the sensitivity of the alarm. That means that if you choose for a number between 0 and 5 the alarm will have a low sensitivity and will only go off when there is an obvious movement in front of the camera.
8. CAMERA MANAGEMENT 8.1. Camera preferences To change the settings go to the upper left corner and press the − − − − button. Closing the main window: when you press the in the upper right corner you can choose between minimizing to the status bar, exit the software or need an inquiry. The program asks you to confirm the exit of the software Notify: You can choose if notifications will be shown or not.
− Recording folder: here you can choose the destination folder of the files that you record. To change the destination folder press “Choose” to select another folder. To open the recorded files, press “Open”. − NOTE: “Loop recording” means that when the capacity for saving files is exceeded, the program will automatically remove the oldest files to save the newest files. − PC captured files: this is the folder where the pictures you have taken will be saved.
9. ALARM SETTINGS 9.1. Alarm management You can set alarms that will be activated by movements (motion) in front of the camera. Click on . The alarm management is used to set up the sensitivity of the alarm. That means that if you choose a number between 0 (no alarm) and 5 the alarm will have a low sensitivity and will only go off when there is an obvious movement in front of the camera.
9.2. Alarm view preferences In the “Preferences” menu, go to the “Monitor” tab and “Alarm view setting”: when you choose to set an alarm you can adjust the amount of seconds the alarm will be shown.
10. USE OF MICRO SD CARD (ONLY FOR HD IP CAMERAS) 10.1. Placing the micro SD card Important: The SD card should be a Class 10 SD card with a maximum capacity of 32 GB ! 1. 2. 3. 4. 5. Power off the IP Camera. Open the IP camera by removing the 4 screws. Carefully take off the backside. Insert the micro SD card. Power ON the IP Camera. 10.2. Configuration of the camera for use with micro SD card Go to the tab “LAN”. Press CTRL and simultaneously click on the camera and select “SD Card Configuration”.
10.3. Use of the FTP server You can only use the FTP function with an SD card in the camera. In the screen where you adjust the settings of the SD card, you can also give the details of the FTP server, namely: − − − − IP address of the FTP server Login Name Password The default port is port 21 The FTP server needs to be specified INCLUDING ftp:// and should not point to sub-directories. The user should have rights to create / append / delete / sub-directories or full access. 11.
Video surveillance and privacy issues are regulated by laws that vary from country to country. Check the laws in your local region before using this product. The use of the product is under your responsibility. In case of abuse, mrSafe cannot be held liable for any abuse whatsoever. 13. GUARANTEE Copyright © mrSafe®. mrSafe® is a registered trademark of TE-Group NV. The mrSafe® brand stands for superior quality products and excellent customer service.
1. 2. ONDERDELEN & FUNCTIES ......................................................................................................................................................... 6 AAN DE SLAG .............................................................................................................................................................................. 7 2.1. AANSLUITEN VAN HET APPARAAT .........................................................................................................
1. ONDERDELEN & FUNCTIES A. INDOOR IP CAMERA 2 6 8 7 5 3 1 4 10 9 1. Power jack 2. Antenne aansluiting 3. Micro SD kaartsleuf (enkel voor HD IP camera’s) 4. Aansluiting voor alarm 5. Netwerk aansluiting 6. Externe luidspreker aansluiting 11 7. 8. 9. 10. 11. IP Camera Antenne Netwerk kabel Voedingsadapter Beknopte handleiding B.
10 9 12 11 13 1. Outdoor IP camera 8. Reset knop 2. Antenne aansluiting 9. Antenne 3. Netwerkaansluiting 10. Montagebeugel + schroeven 4. Stroomaansluiting 11. Netwerkkabel 5. Audio uit aansluiting 12. Voedingsadapter 6. Audio in aansluiting 13. Beknopte handleiding 7. Aansluiting voor alarm Aansluitingen 1 & 2 = OUTPUT / 3 & 4 = INPUT 2. AAN DE SLAG 2.1. Aansluiten van het apparaat A. INDOOR IP CAMERA • • • Neem de mrSafe indoor IP camera uit de doos. Bevestig de wifi-antenne (8).
de camera eerst bij uw computer in te stellen, en vervolgens (dicht) bij de plaats van installatie te testen. Als de wifi gedurende 1 dag stabiel blijft werken, dan lijkt het wifi bereik voldoende te zijn. Hieronder een voorbeeld installatie: Neem de mrSafe outdoor IP camera uit de doos. Bevestig de wifi-antenne (9) en de beugel (10). We gebruiken een kabeldoos die voor een paar euro bij de bouwmarkt verkrijgbaar is. De tules of wartels worden rond de kabels geplaatst.
De camera wordt op de gewenste locatie bevestigd. Er wordt een gat van ca. 10 mm door de muur geboord. Van binnenuit wordt de ronde stekker van de voedingskabel naar buiten gevoerd. De kabeldoos wordt dicht bij deze voedingskabel geplaatst. De ronde stekker wordt in de kabeldoos aangesloten op de kabel van de camera. Het gat in de muur, de tules of wartels en een eventuele insnijding in de kabeldoos dienen met kit waterdicht afgewerkt te worden. Eventueel zet u de kabel nog vast.
2.2. Software installatie Download de software op www.mrsafe.eu en start de software installatie. Sleep de mrSafe software naar de “Applications” (toepassingen) map om de installatie te starten. Opmerking: Aangezien u de software van de mrSafe website heeft gedownload, kan uw Mac u waarschuwen met een pop-up bericht dat de installatie niet was toegestaan. In dit geval moet u de ‘Security & Privacy’ settings in uw ‘System Preferences’ aanpassen.
3. TERMINOLOGIE LAN: Local Area Network: Uw thuis-netwerk, dat uw internet modem en alle apparatuur omvat in het huis dat is aangesloten op het netwerk via kabel of Wifi. WAN: Wide Area Network: Het internet, een internetverbinding thuis of ergens anders. Resolutie: De kwaliteit en scherpte van de beelden. De resolutie wordt uitgedrukt in pixels horizontaal x verticaal. Hoe hoger de resolutie hoe beter de beeldkwaliteit van de IP-camera.
Druk gelijktijdig op de CTRL-toets en de IP camera in de LAN lijst en kies “Configuring network”. Ga naar de “Wifi” tab en druk op "Scan". Het systeem gaat nu zoeken naar lokale Wifi-verbindingen. Wanneer de scan voltooid is selecteert u uw lokale Wifi in het "Network name (SSID)" kader. Typ uw wachtwoord voor het netwerk in en klik op "OK". Na bevestiging zal de IP camera zichzelf automatisch opnieuw opstarten. Dit kan enkele minuten duren. De camera is nu verbonden met Wifi.
5. LAN CAMERA Alle camera’s die online zijn in uw lokaal netwerk (LAN) zullen nu zichtbaar zijn in de LAN lijst. 5.1. LAN Camera browsing Ga naar de LAN lijst en selecteer de camera die u wil bekijken. Het programma gaat nu contact maken met uw IP camera. Dit kan enkele seconden duren. Wanneer het beeld verschijnt is de camera klaar voor gebruik. Als het beeld niet helemaal scherp is, kunt u aan de lens draaien om het beeld scherp te stellen.
Als u de camera wil bedienen en de kijk-hoek wil veranderen, kunt u de camera kan bedienen met het bedieningspaneel (voor meer informatie over het bedieningspaneel ga naar 6.2 Bedieningspaneel) 5.2. LAN Camera instellingen U kan de instellingen van elke camera veranderen door gelijktijdig op de CTRL-toets en de camera te drukken waar u de instellingen van wil veranderen. 5.2.1. Opties voor instellingen 5.2.1.1.
5.2.1.2. Set the IP address: configuring network (IP adres instellen) U kunt het IP-adres van uw camera individueel veranderen. • Kies ‘configuring network’ en klik op het Wifi tabblad. • Kies voor DHCP als u het automatische toegewezen IP-adres wenst te gebruiken. • Als u hetzelfde IP-adres elke keer opnieuw wil gebruiken, selecteert u "Fixed IP". Vul het IP-adres handmatig in door te klikken in het vak "IP-adress". Druk op "OK" om de wijzigingen op te slaan.
6. WAN CAMERA 6.1. WAN Login Klik op “Create account” in de rechterbovenhoek. Vul een gebruikersnaam, wachtwoord en e-mailadres in. Klik op "OK" om uw registratie te bevestigen. Voor gebruik via het internet (WAN), wordt u gevraagd om in te loggen. Er zijn 2 mogelijkheden om in te loggen. 1. U kunt inloggen per camera. Vind de inloggegevens aan de onderkant van de IP-camera. U moet de gebruikersnaam (CAM -ID) en Password (Wachtwoord) invoeren.
Om uit te loggen klik op de camera ID in de rechterbovenhoek en klik op “Logout”’. 6.2. WAN Camera browsing Wanneer u ingelogd bent, selecteer de camera die u wenst te bekijken. Het programma gaat nu contact maken met uw IP camera. Dit kan enkele seconden duren.
Wanneer het beeld verschijnt is de camera gereed voor gebruik. Als u de camera wil bedienen en de kijk-hoek wil veranderen, kunt u de camera kan bedienen met het bedieningspaneel (voor meer informatie over het bedieningspaneel ga naar 7.
6.3. WAN Camera instellingen U kan de instellingen van elke camera veranderen door gelijktijdig op de CTRL-toets en de camera te drukken waar u de instellingen van wil veranderen. 6.3.1. Opties voor instellingen 6.3.1.1. Add camera (apparaat toevoegen) Bij het toevoegen van een nieuw apparaat kan u de naam van het apparaat zelf kiezen door deze in te vullen in de “Camera alias” kader.
6.3.1.2. Change CAMERA PASSWORD (verander de toegangscode) Om te toegangscode te veranderen vult u de nieuwe code in en moet u de nieuwe code verifiëren door deze nogmaals in te vullen in de kader onderaan. Druk op “OK” om de instellingen op te slaan. OPMERKING: De volgende keer wanneer het systeem vraagt om de access code, moet u de nieuwe code invullen! Om de nieuwe code te verwijderen moet u de standaardinstellingen herstellen (Restore default settings).
6.3.1.3. Change the camera alias (verander de naam van uw camera) Uw kan de camera ID veranderen in een eigen gekozen naam. Typ een nieuwe naam in en druk op “OK”. De camera zal vanaf nu een andere naam hebben in plaats van zijn ID-nummer. 6.3.1.4. SD Card query (overzicht opgenomen beelden) (enkel voor modellen met SD kaartlezer) Voor meer informatie ga naar hoofdstuk “10. Gebruik van micro SD-kaart”.
7. MENU INSTRUCTIES 1 2 3 Er zijn 3 verschillende menu’s in het systeem: 1. Hoofdmenu 2. Bedieningspaneel 3. Detailmenu 7.1. Hoofdmenu U kan de beelden in volledig scherm bekijken door te klikken op de 4-pijlentoets.
Om uit het volledige scherm te gaan klikt u op “Exit full screen” in de rechterbovenhoek. Het tandwiel wordt gebruikt om aanpassingen aan de instellingen te maken. − − − − − Closing the main window (het sluiten van het hoofdvenster): betekent dat u kunt kiezen tussen het minimaliseren van de statusbalk, de software afsluiten, of de keuze gegeven moet worden om het afsluiten van de software te bevestigen Notify (meldingen): U kunt kiezen of meldingen wel of niet worden getoond.
− − − − − − Recording folder (standaard map): hier kunt u de map van de bestanden die u opneemt kiezen. Om de bestandsmap te veranderen, kiest u “Choose” om een andere map te kiezen. Kies “Open” om de bestanden te openen. OPMERKING: “loop recording” betekent dat wanneer de capaciteit voor het opslaan van bestanden wordt overschreden, het programma automatisch de oudste bestanden zal verwijderen om de nieuwste bestanden op te slaan.
B. In het geval dat de camera is toegevoegd aan een account (naam + wachtwoord) die u hebt gemaakt op de server met behulp van het menu "Create account": Klik in de software menu op "Recover password?". Voer uw naam en e-mailadres in. De server zal dan een e-mail sturen met een nieuw wachtwoord. − − Change ACCESS CODE (verander toegangscode): u kan de toegangscode (op sticker aan de onderkant van IP camera) veranderen. Voor meer informatie ga naar hoofdstuk “5.3.1.
Vul het oude password in en daarna het nieuw (2 keer om te verifiëren). Het vraagteken is het Help-bestand. Heeft u een vraag over de software dan kunt u het antwoord zoeken in het Help-bestand.
In de rechterbovenhoek is er het menu “Create account”. Met behulp van dit menu kunt u een account creëren op de server, met behulp van uw eigen login en wachtwoord. (Zie voor meer informatie het hoofdstuk “6.1 WAN login”). 7.2. Bedieningspaneel Met dit menu kunt u de camera bedienen.
Spreek Horizontaal bewegen (niet ondersteund bij vaste outdoor camera) Vertikaal bewegen (niet ondersteund bij vaste outdoor camera) Ga naar voorinstelling, camera gaat terug naar vooraf ingestelde positie (niet ondersteund bij vaste outdoor camera) De voorinstelling instellen, de huidige positie van de camera toont instelling (niet ondersteund bij vaste outdoor camera) Instellen van snelheid boven/onder beweging (niet ondersteund bij vaste outdoor camera) Vertikaal spiegelen
Het alarm management wordt gebruikt voor het instellen van de gevoeligheid van het alarm. Dat betekent dat als u kiest voor een getal tussen 0 en 5 het alarm een lage gevoeligheid zal hebben en zal alleen afgaan als er zich een overduidelijke beweging voor de camera bevindt. Wanneer u kiest voor een getal tussen 5 en 10 zal het alarm een hoge gevoeligheid hebben en zal het alarm al afgaan wanneer er zich een hele kleine beweging voor de camera bevindt.
Om de instellingen te veranderen ga naar de linkerbovenhoek en druk op de − − − − − − − − − − − knop. Closing the main window (het sluiten van het hoofdvenster): betekent dat u kunt kiezen tussen het minimaliseren van de statusbalk, de software afsluiten, of de keuze gegeven moet worden om het afsluiten van de software te bevestigen Notify (meldingen): U kunt kiezen of meldingen wel of niet worden getoond.
8.2. − − Device management (apparaatbeheer) Add camera (apparaat toevoegen): u kan een extra IP camera toevoegen. Change management password (verander het login password): u kan het passwoord van uw login veranderen. Wat te doen als u het wachtwoord van uw camera hebt veranderd, maar u het nieuwe wachtwoord vergeten bent? C.
9. ALARM INSTELLINGEN 9.1. Alarm management U kunt alarmen instellen die door bewegingen in beeld worden geactiveerd. Klik op . Het alarm management wordt gebruikt voor het instellen van de gevoeligheid van het alarm. Dat betekent dat als u kiest voor een getal tussen 0 en 5 het alarm een lage gevoeligheid zal hebben en zal alleen afgaan als er zich een overduidelijke beweging voor de camera bevindt.
9.2. Alarm view preferences (alarm-weergave instellingen) In het “Preferences” menu, ga naar de “Monitor” tab en onderaan “Alarm view setting”: als u kiest voor een alarm kunt u het aantal seconden aanpassen dat het alarm wordt weergegeven/gehoord. 10. GEBRUIK VAN MICRO SD-KAART (ENKEL VOOR HD IP CAMERA’S) 10.1. Plaatsen van de micro SD-kaart Belangrijk: De SD-kaart moet een Class 10 SD-kaart zijn met een maximale capaciteit van 32 GB! - Schakel de IP Camera uit.
Formatteer de micro SD-kaart en wacht een minuut tot het formateren is gedaan. Selecteer de instellingen voor de micro SD-kaart, bijvoorbeeld vergelijkbaar met die in de bovenstaande afbeelding en klik op "Apply" om de instellingen te bevestigen. Klik op "Cancel" om de configuratie van de micro SD-kaart te vervolledigen. De camera zal nu opnemen op de SDkaart. Belangrijk: Als de SD-kaart vol is, wordt de oudste bestanden verwijderd en de nieuwere bestanden worden toegevoegd. 10.3.
In het scherm waarin u de instellingen van de SD-kaart aanpast, kunt u ook de details van de FTP-server ingeven. Voornamelijk: - IP-adres van de FTP-server - Loginnaam - Wachtwoord - De standaard poort is poort 21 De FTP-server moet worden ingegeven, INCLUSIEF de vermelding ftp:// en mag niet verwijzen naar sub-mappen. De gebruiker moet volledige toegang hebben of rechten hebben om sub-mappen te creëren / toevoegen / verwijderen. 11.