
Owners Manual


WARNING The information in this guide is designed to provide a general overview of how MrSteam® products are installed. All images and diagrams are for illustrative purposes only
and may have been altered for presentation purposes. NEVER use this document for the Installation, Operation or Maintenance of any MrSteam® product. For installation, operation and
maintenance information and instructions, only use the applicable MrSteam® Installation, Operation & Maintenance Manual(s). The specific Installation, Operation & Maintenance manual
that is supplied with each MrSteam® product contains important information required for the safe and reliable installation and operation of the product. Failure to install any MrSteam®
product according to the applicable manual may result in property damage, an inoperable system/control, or hazardous condition. If you do not have the applicable Installation, Operation
& Maintenance manual please contact MrSteam® for a free copy, or download a copy from www.mrsteam.com. If you have any questions about the installation, operation or maintenance of
any MrSteam® product please contact a customer or technical service representative using the contact information on the back cover of this guide or consult a properly licensed contractor,
architect and/or design professional.
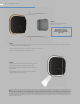
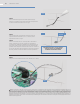
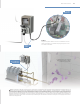
STEP 4
With a minimal length of the cable exposed, apply
silicone (provided) to the hole in the wall as required to
create a moisture seal as shown in Fig 2.
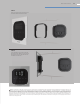
STEP 5
Push the Remote Temperature Probe into hole as
required to leave between 1/4”- 1/2” of the probe.
Exposed as shown in Fig 3.
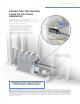
STEP 6
Ensure a minimum of 1/4” of the probe is exposed to
the air. Failure to do so may result in an inoperative
control and a hazardous condition.The exposed area of
the probe must be free of silicone or any materials that
prevent direct exposure to the steam room air. Failure to
do so may interfere with the ability to sense temperature
and may result in excessive steam room temperatures.
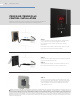
STEP 7
Plug MSTS into location shown on PC board (EXT. TEMP)
IMPORTANT NOTE: DO NOT STRAIN,
STAPLE, PINCH OR OTHERWISE
DAMAGE THE PROBE CABLE.
FIG 2
FIG 3
INSTALLED
PROBE
MSTS
25 MRSTEAM
®
GUIDE