
Installation Guide


INSTALLER
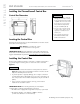
Installing the Fixture
To Install the Fixture:
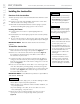
1. Connect the ChromaSteam3 fixture’s pigtail to the 30-foot control cable or Duo cable in the junction box
(Figure 11).
IMPORTANT NOTE:
Test that the fixture operates correctly prior to continuing with the following steps.
2. Clean the surface of the ceiling to ensure the double-stick adhesive of the fixture bonds completely to the ceiling.
3. Peel off and discard the protective layer from the fixture’s double-stick adhesive (Figure 12).
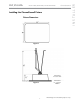
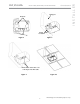
4. Squeeze the retention springs on the back of the fixture and fit them into the junction box (Figure 13). Insert the
fixture into the junction box and affix it to the ceiling, being careful not to pinch the pigtail/control cable/duo cable
(note that the pigtail/control cable/duo cable is not shown in Figure 13). Press firmly around edges of the fixture to
ensure adhesion to ceiling.
5. Apply a bead of silicone around the perimeter of the fixture (Figure 14) as required to create a moisture seal
between the fixture and the steam room ceiling. Use tape or other means as required to keep the fixture in position
as the silicone cures.
All drawings are for illustrative purposes only.
Figure 12Figure 11
Figure 14Figure 13
Adhesive
protective
layer
Pigtail
mr
.
steam
®
INSTALLATION, OPERATION, AND MAINTENANCE ChromaSteam
®
3
___________________________________________________________________________________
10