
Installation Guide


INSTALLER
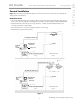
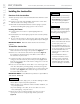
Installing the Junction Box
Functions of the Junction Box:
1. Allows precisely location of the ChromaSteam3 fixture within the steam
room ceiling.
2. Provides a secure and easily identifiable holder for the control cable
while the steam room is being constructed.
3. Works with the ChromaSteam3 fixture’s retention springs to prevent
the fixture from falling and injuring a person in the enclosure.
Locating the Fixture:
1. Locate the fixture in a location for optimal lighting within the
enclosure.
2. ChromaSteam3 is for mood lighting only. Not to be used as a primary
lighting source.
3. Do not locate the fixture in direct shower spray, near direct steam
emission, or in any location where a lighting fixture may be damaged.
IMPORTANT NOTE:
Maximum distance between the two fixtures
is 10 feet.
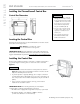
To Install the Junction Box:
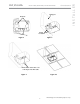
1. Remove the two screws from the interior clips of the junction box, and
hand-screw them into the wings of the junction box (Figure 7).
2. Remove one of the four knockouts from the junction box (Figure 7).
the resulting hole will allow routing of the 30-foot control cable or
Duo cable into the junction box..
3. Locate the two tabs on the junction box, and line them up against a
ceiling joist. The tabs locate the junction box proud of (slightly raised
from) the joist. Screw the two screws into the ceiling joist to secure the
junction box (Figure 8).
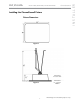
4. Route one end of the 30-foot control cable or one of the longer ends
of the Duo cable (with a yellow flag stating “To Fixture”) through the
knockout into the junction box, and fasten it to one of the interior clips
to hold it in place (Figure 9). Note that both longer ends of the 30-
foot control cable are the same.
IMPORTANT NOTE:
Contact MrSteam to purchase an optional 60-foot
cable (Part No. 104268-60).
• Be careful not to strain, staple, pinch, or otherwise damage the cable.
• Route cable as required to permit replacement.
• Cable should be run in dedicated conduit to facilitate installation, ser-
vice, and replacement.
• To prevent damage to the cable, do not route cable close to hot
water, steam piping, or any heat source.
5. After the junction box is completely installed, ensure that you create an
opening in the steam room ceiling that aligns with the junction box
(Figure 10).
• Installation to be performed by a
qualified and licensed electrician.
• Shock Hazard. Ensure that power
is turned off during installation.
Turn off power at breaker panel.
Failure to use the junction box with
correctly installed retention springs
may result in the ChromaSteam3 fix-
ture falling and causing injury.
• To prevent leaks, do not install
the ChromaSteam3 fixture where
direct contact with steam emission
or water spray could occur.
• The ChromaSteam3 fixture is not
intended to be installed underwa-
ter. To prevent leaks, do not install
the ChromaSteam3 fixture in a
location where it could become
submerged.
• The ChromaSteam3 fixture is
not rated for insulation contact.
Insulation must be a minimum
of 3” away from all sides of the
ChromaSteam3 fixture assembly
to prevent damage to the fixture.
WARNING
!
NOTICE
NOTICE
CAUTION
!
mr
.
steam
®
INSTALLATION, OPERATION, AND MAINTENANCE ChromaSteam
®
3
___________________________________________________________________________________
8