
Instructions / Assembly
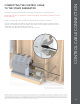
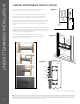
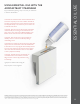

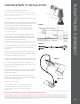
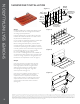

SHOWER SEAT INSTALLATION
28
Min.
1
/
2
”
Thick
Cement Board
Brackets
Opening
Facing Up
Left Bracket
Screws
17
1
/
32
”
Min.
1
/
4
”
ThickTile
Max. 1
1
/
8
”
ThickWall
Right Bracket
(with hole hinge pin
on the left side)
(with hole hinge pin
on the right side)
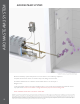
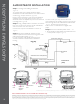
SHOWER SEAT INSTALLATION
14
7
/
8
”
19
3
/
4
”
15
5
/
16
”
1
11
/
16
Step 1.
Mount the WallSeat on a suitable surface like tile, granite
or marble. Mount the seat at a height above the floor
according to personal preference.
Using the template that is provided, drill four 5/32”pilot
holes into the wall and the header. Use a level to insure
the pilot holes are level. Be precise.
Do not oversize or undersize the pilot holes. Drill the pilot
holes to the full 3” depth (length of the screws).
Fill the mounting holes with silicone (provided) before
mounting the brackets to the wall as required to prevent
moisture from penetrating into the wall and/or wall cavity.
Correctly position and mount the left and right brackets
to the wall using the #12 x 3” screws provided.
for correct positioning of both brackets.
Do not over or under tighten the screws. NEVER use
any otherscrews other than the screws provided. If the
screws are missing, misplaced or damaged please call
MrSteam for free replacement screws.
See (figure 1)
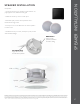
Step 2.
Insert seat assembly to brackets. Place seat with
the MrSteam logo and fasteners on the bottom.
Insert hinge pins to both left and right brackets
while the seat assembly is in vertical position.
Securely tighten both hinge pins, using Allen
wrench provided. See (figure 2)
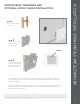
If the seat is not parallel to the floor when it is in
the lowered or seated position use the level
adjustment screws to adjust the mounted Wall-
Seat. An Allen wrench is provided for this purpose
Adjust both level screws so the WallSeat is even
and it contacts both brackets at the same time.
(See figure 4).
Homeowner
Instructions
PL EA SE LEAVE T HI S
GU ID E IN PLACE FOR
T HE HOMEOWNER
(figure 1)
(figure 2)
(figure 3)
(figure 4)
IMPORTANT The information in this guideline is designed to provide a general overview of how MrSteam products are installed. The diagrams are for Illustrative purposes only. NEVER use this document for the Installation,
Operation or Maintenance of any MrSteam product. For Installation, Operation and Maintenance information, only use the specic Installation, Operation and Maintenance manual supplied with each Mr. Steam product. The
specic Installation, Operation and Maintenance manual that is supplied with each Mr. Steam product contains important information required for the safe and reliable installation and operation of the product. Failure to use
the specic Installation, Operation and Maintenance manual that is supplied with each Mr. Steam product may result in product damage, property damage, death or personal injury. If you do not have an Installation, Operation
and Maintenance manual please contact MrSteam for a free copy, or download a copy from www.mrsteam.com. If you have any questions about the installation, operation or maintenance of any MrSteam product please
contact a customer or technical service representative using the contact information on the back cover of this guideline.