
Installation Manual


Page 19 mrcool.com
Indoor Unit Installation
Installation Instructions –
Outdoor Unit
Step 1: Select installation location
Before installing the outdoor unit, you must
choose an appropriate location. The following
standards will help you choose an appropriate
location.
Proper installation locations meet the
following standards:
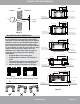
Meets all spatial requirements shown in
Installation Space Requirements (Fig. 5.1).
Good air circulation and ventilation.
Firm and solid location that can support
the unit and will cause vibration.
Noise from the unit will not disturb others.
Protected from prolonged periods of direct
sunlight or rain.
Where snowfall is anticipated, raise the unit
above the base pad to prevent ice buildup
coil damage. Mount the unit high enough to
be above the average accumulated area
snowfall. The minimum height must be 18
inches.
DO NOT install unit in the following locations:
Near an obstacle that will block air inlets and
outlets
Near a public street, crowded areas, or
where noise from the unit will disturb others
Near animals or plants that will be harmed
by hot air discharge
Near any source of combustible gas or in a
location that is exposed to large amounts of
dust
In a location exposed to a excessive
amounts of salty air
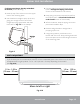
Fig. 5.1
Ground Installed:
12 in (30 cm)
Bracket Installed:
6 in (15 cm)
clearance between
back and wall
79in (200cm)
in front
12in (30cm)
on left
24in (60cm)
above
24in (60cm)
on right
79 in (200 cm)
in front
12 in (30 cm)
on left side
24 in (60 cm)
above
24 in (60 cm)
on right side
5
Outdoor Unit Installation