Please read this manual carefully before installation and keep it for future reference. Remote Control User Manual DIY Series Please keep this manual where the operator can easily find it. Inside you will find helpful hints on how to use and maintain your unit properly. For more details visit www.MrCool.
CONTENTS Remote control specifications 2 Operation of buttons 3 LCD Indicators 6 How to use the buttons 7 Timer operation 9 Handling the remote control 11 1 For more details visit www.MrCool.
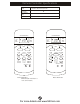
Remote Controller Specifications Model R G51F/EU1, R G51F1/EU1, R G51F3/EU1 Rated Voltage 3.
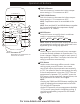
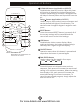
Operation of Buttons 1 TEMP UP Button Push this button to increase the indoor temperature setting in 1°F increments to 86°F.
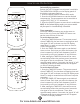
Operation of Buttons O SET TEMPERATURE ( F) FAN HIGH MED LOW AUTO COOL DRY HEAT TEMP 2 MOD E 3 4 5 6 7 8 SWING / CLEAN AIR SWING ON /OFF ECO RESE T LOC K FA N SPEED TIMER ON 1 9 10 11 TI MER OFF LED DISPLAY TURBO 12 13 14 Model: RG51F3/EU1 and RG51F/EU1(This model does not have clean air button 6 CLEAN AIR Button (applicable to RG51F3) Disable/Active clean air function.
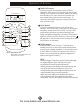
Operation of Buttons 12 TIMER OFF Button Press this button to initiate the auto-off time sequence. Each press will increase the auto-timed setting in 30 minutes increments. When the setting time displays 10.0, each press will increase the auto-timed setting 60 minutes increments. To cancel the autotimed program, simply adjust the auto-off time to 0.
LCD Indicators Information that is displayed when the remote is turned on. AUTO C OOL DR Y HE AT Mode display AUTO: COOL: TIMER ON OFF DRY: FAN HIG H ME D LOW HEAT: FAN: Displayed when remote signal is sent. Displayed when remote control is ON. TIMER ON Displayed when TIMER ON time is set. TIMER OFF Displayed when TIMER OFF time is set. Show set temperature or room temperature, or time under TIMER setting. Indicated all the current settings are locked.
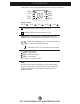
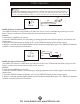
How to use the buttons O SET TEMPERATURE ( F) FAN HIGH MED LOW AUTO COOL DRY HEAT TE MP 2 1 MODE ON /OFF FAN SPEED SWING ECO TI MER ON RESET LOCK 2 3 TIMER OFF LED DISPLAY TURBO O SET TEMPERATURE ( F) FAN HIGH MED LOW AUTO COOL DRY HEAT TE MP 2 1 2 MODE ON /OFF FAN SPEED 3 SWING ECO TI MER ON 4 RESET LOCK TIMER OFF LED DISPLAY TURBO Auto operation Ensure the unit is plugged in and power is available.
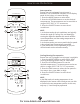
How to use the buttons O SET TEMPERATURE ( F) FAN HIGH MED LOW AUTO COOL DRY HEAT TE MP 2 1 MODE ON /OFF FAN SPEED SWING ECO TI MER ON RESET LOCK 2 3 TIMER OFF LED DISPLAY TURBO O SET TEMPERATURE ( F) FAN HIGH MED LOW AUTO COOL DRY HEAT TE MP MODE ON /OFF FAN SPEED SWING ECO TI MER ON RESET LOCK 1 TIMER OFF LED DISPLAY 2 TURBO Dehumidifying operation Ensure the unit is plugged in and power is available.
Timer Operation ! CAUTION The effective operation time set by the remote controller for the timer function is limited to the following settings: 0.5, 1.0, 1.5, 2.0, 2.5, 3.0, 3.5, 4.0, 4.5, 5.0, 5.5, 6.0, 6.5, 7.0, 7.5, 8.0, 8.5, 9.0, 9.5, 10, 11, 12, 13, 14, 15,16,17, 18, 19, 20, 21, 22, 23 and 24. Start Off h TIME R ON Set 6 hours later TIMER ON (Auto-on Operation) The TIMER ON feature is useful when you want the unit to turn on automatically before you return home.
Timer Operation Start h TIME R ON OFF Stop On Set 2 hours later after setting 10 hours later after setting COMBINED TIMER (Setting both ON and OFF timers simultaneously) TIMER OFF TIMER ON (On Stop Start operation) This feature is useful when you want to stop the air conditioner after you go to bed, and start it again in the morning when you wake up or when you return home. EXAMPLE: To stop the air conditioner 2 hours after setting and start it again 10 hours after setting. 1.
Handling the Remote Control •Use the remote controller within a distance of 26.25ft from the appliance, pointing it towards the receiver. Reception is confirmed by a beep. CAUTION •The air conditioner will not operate if curtains, doors or other materials block the signals from the remote control to the indoor unit. •Prevent any liquid from falling into the remote control. Do not expose the remote control to direct sunlight or heat.
NOTE: The device could comply with the local national regulations. •In Canada, it should comply with CAN ICES-3(B)/NMB-3(B). •In USA, this device complies with part 15 of the FCC Rules. Operation is subject to the following two conditions: (1) This device may not cause harmful interference, and (2) this device must accept any interference received, including interference that may cause undesired operation.
DIY Series The design and specifications are subject to change without prior notice. Consult with the sales agency or manufacturer for details. For more details visit www.MrCool.