Please read this manual carefully before installation and keep it for future reference. Remote Control User Manual Due to updates and constantly improving performance, the information and instructions within this manual are subject to change without notice. Please visit www.mrcool.com/documentation to ensure you have the latest version of this manual. Version Date: 04-27-21 For more info visit www.mrcool.
Contents 1 Remote Controller Specifications ...................................................................2 2 Operation Of Buttons ............................................................................................ 3 3 Indicators On LCD .................................................................................................... 6 4 How To Use The Buttons ......................................................................................7 Auto Operation ........................
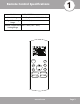
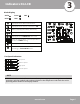
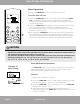
Installation Summary Remote Control Specifications Model Rated Voltage Signal Receiving Range 1 R 57A6/BGEFU1 3.0V (Dry Batteries R03/LR03 x 2) 26.25 ft. (8m) Remote Temperature 62°F - 86°F (16°C - 30°C) Setting Range ON/OF F S ILE NCE FP MODE TIME R ON TE MP TIME R OF F FA N S LE E P TUR BO S E LF C LE AN S WING DIR E C T LE D F OLLOW ME mrcool.
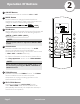
2 Operation Of Buttons 1 ON/OFF Button This button turns the air conditioner ON and OFF. 2 MODE Button Press this button to change the mode that the air conditioner is operating in. Each press of the button will change the mode in the following sequence: HEAT AUTO COOL DRY FAN 3 FAN Button Used to adjust the fan speed. Each press of the button will change the speed of the fan in the following sequence: AUTO LOW MED NOTE The fan speed cannot be adjusted in AUTO or DRY modes.
Operation Of Buttons 7 UP Button Push this button to increase the indoor temperature setting in 1° increments (°F or °C depending on mode) up to 86°F (30°C). DOWN Button Push this button to decrease the indoor temperature setting in 1° increments (°F or °C depending on mode) down to 62°F (16°C). NOTE Temperature control is not available in FAN mode. Press and hold UP and DOWN buttons together for 3 seconds to alternate the temperature display between the °F & °C scale.
Operation Of Buttons 10 TIMER OFF Button Press this button to initiate the auto-off time sequence. Each press will increase the auto-timed setting in 30 minute increments. When the time setting displays 10.0, each press will increase the auto-timed setting by 60 minute increments. To cancel the auto-timed program, simply adjust the auto-off time to 0.0 11 SWING Button This button is used to stop or start the auto-swing feature of the horizontal louver.
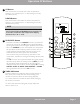
3 Indicators On LCD Mode Display AUTO COOL HEAT FAN DRY Displayed when data is transmitted. Displayed when remote controller is ON. Battery display (low battery detection). Displayed when TIMER ON time is set. Displayed when TIMER OFF time is set. Show set temperature, room temperature, or time in TIMER setting. Displayed in SLEEP MODE operation. Indicates that the air conditioner is operating in FOLLOW ME mode.
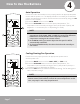
How To Use The Buttons 4 Auto Operation 2 1 ON/OF F S ILENCE FP MODE TIME R ON TE MP 1. In AUTO mode, the air conditioner can automaticallly select the appropriate mode (COOL, FAN, or HEAT) by sensing the difference between the actual ambient room temperature and the temperature setting on the remote control. 2. In the AUTO mode, you cannot adjust the fan speed. It will be automatically controlled. 3. To deactivate AUTO mode, the select desired mode manually on the remote.
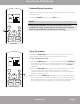
How To Use The Buttons Dehumidifying Operation Ensure the unit is properly wired to an appropriate power source and the power is on. 1. Press the MODE button to select DRY mode. NOTE 1 ON/OF F SILENCE FP MODE TIME R ON TE MP TIME R OF F FA N S WING DIR E C T S LE E P TUR BO In the DRY mode, you cannot adjust the fan speed. It will be automatically controlled. You are also not able to control the temperature setting.
How To Use The Buttons Timer Operation Pressing the TIMER OFF button can set the auto-off time. To set the Auto-off time. 1. Press the TIMER OFF button. The remote control will show TIMER ON/OF F S ILENCE FP MODE TIME R ON TE MP TIME R OF F FA N S LE E P TUR BO S E LF C LE AN 1 S WING DIR E C T LE D OFF, the last auto-off setting time, and the signal "H" will also be shown on the LCD display. It is now ready to reset the auto-off time to stop the operation. 2.
How To Use The Buttons Example of Timer Setting Timer OFF (Auto-Off Operation) The TIMER OFF feature is useful when you want the unit to turn off automatically after you go to bed. The air conditioner will stop automatically at the set time. Example: To stop the air conditioner in 10 hours. Stop On Set 10 hours later 1. Press the TIMER OFF button, the last setting of starting operation time and the signal "H" will show on the display area. 2.
How To Use The Buttons Example of Timer Setting TIMER ON (Off Start TIMER OFF Stop operation) This feature is useful when you want to start the air conditioner before you wake up and stop it after you leave the house. Example: Off Set To start the air conditioner 2 hours after setting, and stop it 5 hours after setting. Start Stop 2 hours 5 hours later after later after setting setting Page 11 1. Press the TIMER ON button. 2. Press the TIMER ON button again to display 2.0H on the TIMER ON display.
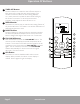
Handling The Remote Control 5 Location Of The Remote Control Use the remote control within a distance of 26.25 ft (8 m) from the appliance, pointing it towards the receiver. Reception will be confirmed by a beep. CAUTION • The air conditioner will not operate if curtains, doors or other materials block the signals from the remote control to the indoor unit. • This remote control emits infrared (IR) signals to control your air conditioner via the IR receiver located in the indoor unit.
Due to updates and constantly improving performance, the information and instructions within this manual are subject to change without notice. Please visit www.mrcool.com/documentation to ensure you have the latest version of this manual.