
Installation Guide


Page 23 mrcool.com
Indoor Unit Installation
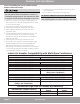
CAUTION
Be extremely careful not to dent or damage the
piping while bending it away from the unit, as
this could negatively affect the performance.
Fig. 5.7
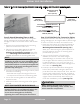
Step 4: Prepare indoor unit refrigerant piping
The piping of the indoor unit is attached to the back of
the unit towards the bottom. It will be covered with
insulation, and there will also be a drain pipe with
these. This piping will need to be bent and prepared
before it can be fed through the wall hole.
1.
2.
NOTE: Refrigerant piping should exit the indoor
unit from the right-hand side (Refer to Fig 5.6)
Based on the position of the wall hole, relative to
the mounting plate, determine the necessary angle
the piping will need to be bent to pass through the
wall hole when the unit is mounted to the bracket.
Grip the refrigerant piping at the base of the bend.
Then, slowly, and with even pressure, bend the
piping away from the back of the unit roughly 90
degrees. The piping should be sticking straight out
from behind the unit once completed (Refer to
Fig 4.6).
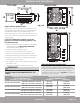
Step 5: Mount the Indoor Unit
In the following steps the indoor unit will now be
mounted to the wall bracket and the piping and
wires will be fed through the wall hole.
Double-check that the ends of the refrigerant
pipes are sealed (screw on caps are still in place)
to prevent any dirt or foreign material from
entering the pipes.
Feed the MC Cable/signal wire (should be
protected by conduit) through the wall hole.
Carefully lift the indoor air handler, and slowly
feed the taped bundle of refrigerant pipes and
drain hose through the wall hole, as you
position it to mount to the wall bracket.
1.
2.
3.
3.
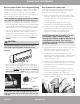
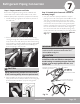
Now, you will need to lightly tape the refrigerant
piping and drain pipe together in a bundle, using
electrical tape, making sure that the drain pipe is at
the bottom. DO NOT tape the ends of the piping
(connectors). Refer to Fig 5.7 and the image below
for the correct orientation of the piping when taping.
Refrigerant
piping
Drain hose
Tape
Fig. 5.6
The drain hose must be placed at the bottom of
the bundle. If it is not, it could cause the drain
pan to overflow, which could lead to fire or water
damage.
DRAIN HOSE MUST BE ON BOTTOM
NOTE: Positioning the air handler on to the
wall bracket, while feeding the piping
through the wall hole, might be difficult for a
single person to manage. If so, it may be
necessary to seek the assistance of another
person for this step.
Slightly lean the top of the air handler toward the
wall and hook the top of the indoor unit on the
upper hook of the wall mounting plate.
Check that the unit is hooked firmly on the
mounting plate by applying slight pressure to the
left and right-hand sides of the unit. The unit
should not jiggle or shift.
Using even pressure, push down on the bottom
half of the unit. Continue pushing down until the
unit snaps onto the hooks along the bottom of
the mounting plate.
Again, check that the unit is firmly mounted to
the wall bracket by applying slight pressure to
the left and right-hand sides of the unit.
4.
5.
6.
7.
Repeat these steps for each of the additional air
handler you are installing.
8.