
Operation and Maintenance Manual


7
INSTALLER INFORMATION
®
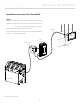
STEP 2
Peel the double stick adhesive off the back of the
iSteam3 control (2a). Apply a bead of silicone around
the rear of the iSteam3 control to create a moisture
seal (2b). Carefully feed the cables into the rough-in
box and secure the control to the wall. Care must be
taken to not pinch the cables. Ensure the control is
level.
IMPORTANT NOTE:
The control must be installed
with the arrow on the Peel-Off screen protector facing
up. If the Peel-Off screen protector has been removed
see the drawing in Step 2b for the proper orientation.
The control display can be flipped 180 degrees in the
settings menu if installed upside down.
NOTE: The silicone supplied by MrSteam can be
used to meet a variety of sealing and gasketing. It
cures to silicone rubber and adheres to glass, wood,
metal, porcelain, ceramic tile, painted surfaces, many
plastics and rubber. Surfaces must be clean and dry.
Apply thin layer of product. Fit together and support
if necessary. Allow excess material to cure, then trim
with a sharp blade. Sealant “skins” in 5 minutes, dries
to touch in 1 hour. Fully cures and bonds in 24 hrs.
IMPORTANT NOTE: Do not apply excessive amounts
of silicone. Do not apply silicone to any other parts
of the control including the adhesive gasket. Insure
the mounting surface is clean and dry as required for
good adhesion. Hold the control with the arrow on
the screen protector facing up and press the control
against the wall u ntil the adhesive sticks and holds
firmly. Control may have to be supported or secured
until the silicone has cured for 24 hours.
F
1 2 :16
P M
S TART
9 7
F
1
2 :1
6
P
M
M
S TAR
T
9
7
2b
2c
2a
This
End
Up
Before use, remove
and discard the peel-
off screen protector.
This
End
Up
8
STEP 2
Peel the double stick adhesive off the back of the
iSteamAQX control (2a). Apply a bead of silicone around
the rear of the iSteamAQX control to create a moisture
seal (2b). Carefully feed the cables into the rough-in box
and secure the control to the wall. Care must be taken to
not pinch the cables. Ensure the control is level.
IMPORTANT NOTE:
The control must be installed facing up.
NOTE: The silicone supplied by MrSteam can be used to
meet a variety of sealing and gasketing. It cures to silicone
rubber and adheres to glass, wood, metal, porcelain,
ceramic tile, painted surfaces, many plastics and rubber.
Surfaces must be clean and dry. Apply thin layer of
product. Fit together and support if necessary. Allow
excess material to cure, then trim with a sharp blade.
Sealant “skins” in 5 minutes, dries to touch in 1 hour. Fully
cures and bonds in 24 hrs.
IMPORTANT NOTE: Do not apply excessive amounts of
silicone. Do not apply silicone to any other parts of the
control including the adhesive gasket. Insure the mounting
surface is clean and dry as required for good adhesion.
Hold the control with the arrow on the screen protector
facing up and press the control against the wall u ntil the
adhesive sticks and holds firmly. Control may have to be
supported or secured until the silicone has cured for 24
hours.
Installation Instructions for iSteamAQX
(cont.)