
Instruction manual
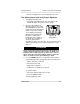


NOTE: Due to pulsations introduced by the Aspirator Bulb
Assembly, instability of readings may occur. Before
noting the readings, allow readings to stabilize for
three or four seconds after the bulb is squeezed.
"
CAUTION
Do not permit the end of the sampling line to touch or go
under any liquid surface. If liquid is sucked into the
instrument, readings will be inaccurate and the instrument
could be damaged. To prevent this, use Sample Probe (P/N
497600 or 800333) or an equivalent containing a special
membrane filter, permeable to gas but not to water.
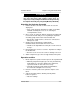
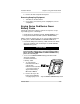
Attaching Probe to Sampling Line
(FIGURE 2-49)
1. Grasp the probe handle by the top two
sections:
• the large section (cap) with the
MSA logo and
• the center section (base) with the
label.
2. Unscrew lower section (guard) from
the label section.
3. Feed male end of the sample line
through the guard and screw into
the exposed connector ring on the
probe.
4. Screw the guard back onto the base.
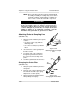
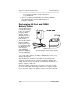
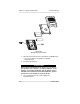
Changing the Probe Filter
(FIGURE 2-50)
1. Grasp the probe handle by the base
and guard.
2. Push the cap section toward the other
two and turn clockwise (the spring
will push the sections apart).
3. Grasp and spin the wand clockwise
while pulling to disengage.
Figure 2-49.
Attaching Probe to Sample
Line
Figure 2-50.
Changing the Probe Filter
Chapter 2, Using the FiveStar Alarm Instruction Manual
2-28 FiveStar Alarm