
Specifications

17
Upgrades and Modifications
Removal of the cover - Unplug the AC power. Work on a clean surface.
Start by removing the 14 screws of the cover. Carefully remove and set aside
the cover.
Removal or Installation of the volume modules - The volume modules
can be plugged in, or unplugged from the Platinum mother board. They
are held in place with their two connectors. The boards are automatically
detected, so when unplugged the DAC will output the same level signal as it
would with them plugged in at 0 dB. The volume knob will now select the
input and the remote volume buttons will have no effect.
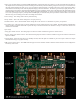
Install the Signature DAC Upgrade - This upgrade provides hand
matched DAC modules for superior sound quality. These DACs can run at
twice the speed (384 kHz sampling rate) with 1/2 the settling time. The noise
level is cut to 1/3 the normal value and the signal-to-noise ratio is up to 145
db. They are user installable and come as a matched set of four, replacing the
existing DACs. Remove the clamp holding the DAC modules in. Pull each
module straight out without tipping or twisting. Align the new module with
the pins and push rmly back in. Take care that each connector is aligned.
Do one DAC module at a time.
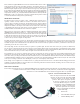
iLink II Upgrade - Remove the cover. Plug ribbon cable in “Aux 3”.
Install new cover.
Galaxy Femtosecond Clock Upgrade - Remove the cover. Plug the clock in the clock upgrade header. Install the clock mounting screw located
in the cover of the clock box. Re-Install the cover.
Other Upgrades - Check the instructions supplied with the upgrade.
USB Upgrades
The USB upgrades are common enough to include
here rather than make a separate manual. For more
detailed and up-to-date information check our web
site. All three levels of USB input work basically the
same, with the difference being the maximum sample
rate they can receive.
Apple MAC OS
On the MAC the USB is plug and play. The MAC will
recognize the USB DAC and its capabilities and will
allow the output to be set to any sample rate desired.
The bad news is, with certain programs such as iTunes,
the output sample rate has to be set manually when
the le sample rate changes. So if you set the output
for 192 kHz, and played a 192 kHz le, it would
play perfectly, but if you then played a 44.1 kHz CD,
the MAC OS would upsample that le to 192 kHz.
Computer upsampling is not too bad, but does not
compare at all with the quality of the upsampling done
by MSB. Better to change the output to 44.1 kHz and
play the le bit-perfect. Fortunately there is an APP
called BIT PERFECT. Download it and the MAC with
the MSB USB 2 is perfection itself.
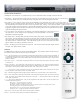
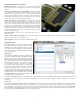
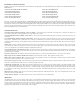
The Apple Audio MIDI Setup screen is shown above. Notice that the presence of the MSB USB Signature DAC has allowed 352.8 and
384 kHz sample rates to show up on the menu. Normally they are not present. iTunes will play at whatever sample rate you select in
this setup.
Windows OS
The amazing thing about the MSB USB 2 input with Windows is that once you get it set up it works completely and absolutely perfectly,
with every le playing bit-perfect at its native sample rate up to 384 kHz with no user intervention. Just pick the song and play. The
rest is automatic and works perfectly. This is a rst for any Windows machine I have seen and a dream come true. The bad is that MSB
drivers will have to be installed, and your music must be played with a properly set up player program like Foobar. Its a small price to
pay for perfection, and MSB will help walk you through the process.