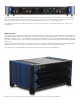
Signature Universal Media Transport plus Video Outputs: 2 HDMI Digital Audio Outputs: Optical, Coaxial RCA x 3, Balanced XLR, MSB ProI2S Clock Interface: Internal Clock Header, External 512 Clock in or out Analog Audio Outputs: None Bit Stream Surround Outputs: Optical and Coaxial External Media Connections: 3 USB ports, Computer Network Streaming Maximum Output Resolution: 24 bit, 192 kHz PCM, 32 bit, 192 kHz MSB ProI2S File Types: WAV, FLAC, DSD 64x, MP3, Dolby Digital HD, DTS HD and more Disc
Signature Universal Media Transport Plus Quick start guide Setup and Connections: 1. Display - If you plan to play music from DVD, BluRay, USB or Network, attach any display to HDMI 1. 2. Internet - If you plan to stream from the internet or want a firmware update online, plug COMPUTER LAN into any computer network (wireless is not recommended). 3. Connect Audio - For use with an MSB DAC, use the MSB CAT-6 cable to connect MSB ProI2S OUTPUT to the MSB ProI2S INPUT on the DAC.
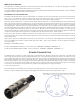
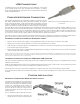
Here is the back panel of an MSB DAC. Note the ProI2S input on the DAC (Green Ring). This special input can be connected to the UMT ProI2S output and this connection will not only transfer data bit perfectly, but will do it without any ground connection, PLUS the low jitter clock in the DAC will be sent to the UMT, and the UMT will operate in sync with the DAC clock. This connection is made with an MSB Network cable or any CAT-5 or CAT-6 cable. The connection will not work with CAT-7 or shielded cables.
Contents Audio Format Setup 20 Blu-ray Audio Playback 21 Multichannel Audio Processing Setup 22 Speaker Configuration 22 Down Mix Mode 22 Speaker Settings 22 Other Audio Processing Settings 22 Device Setup 23 BASIC OPERATIONS 28 Disc Playback 28 OPTION Menu 28 Fast Playback 29 Pause and Frame-by-Frame 29 Slow Playback 29 Blu-ray Disc Menu Playback 29 DVD Menu Playback 29 On-Screen Display 29 Volume Control 30 Audio Language/Track Selection 30 Subtitle Selection 30 HD
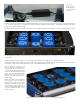
Rear Panel Details 1. Power Input – This product must be plugged into a Signature Transport Power Base, any of the DAC IV power bases with a digital supply or an external desktop supply. For improved performance plug in a second supply. This completely separates the video and drive part of the UMT from the Audio part. 2. RS-232– The RS-232 input is for control of the unit. For use with complete system controllers. 3.
Connections Video Connections The UMT has a range of applications. If your only use is the playing of audio discs, then no video connection is required. The system setup is optimum for you and all you have to do is make the proper audio connections. If your interests is in playing music from a Hard Disc, USB stick or from a computer network, then a video display is needed for navigation. A small computer monitor with no audio and an HDMI input would be ideal.
The Ground Lift feature of the DAC IV This feature is the most powerful tool available for UMT setup and makes a huge difference in sound! So we have given you all the tools to get it right. The most important is a ground lift in the DAC IV menus that disconnects the analog part of the DAC output stage from the chassis and digital ground. The idea is to avoid ground loops and if your Amps are grounded this connection SHOULD be lifted.
MSB Clock Header The UMT offers an amazing opportunity to install the lowest jitter clock in the world and use it to clock our data going to non MSB DACs with depend on the incoming data stream to recover the clock. The standard MSB Clock Header allows both the Femto140 Clock and the Galaxy Femtosecond Clock to be installed. It is user installable. Just plug it in and the UMT will detect it and start using it. External Clock Interface The UMT is truly flexible when it comes to clock interfaces.
One or two medical grade desktop supplies can be used with the UMT. The Signature Transport Power Base is a dedicated high quality power supply for the UMT. It is a linear power supply with ultra low noise. It can be used alone or in conjunction with any other power supply for better isolation. It should be hooked up to the audio supply when used with a desktop supply. The Dual Signature Transport Power Base is equivalent to two Signature Power bases combined.
USB Connections A USB Storage device may be attached to any of the USB inputs. These inputs are for reading storage devices only and should not be attached to a computer, iPod or other USB peripheral. Appropriate devices would include USB memory sticks and USB Hard Drives. Computer Network Connection The UMT has significant internet exploration capabilities.
will be disabled. • MSB cannot guarantee that the IR IN port will be compatible with devices that are not manufactured by MSB. • Connecting the IR IN port to an incompatible device may result in damage to the connected device or the player. Please contact MSB customer support if you plan to integrate the player into an IR distribution system. Customer support can provide recommendations on how to properly connect the control signals.
Remote Buttons 1. POWER: Toggle power STANDBY and ON 3. PURE AUDIO: Turn off/on video 4. NUMBER Buttons: Enter numeric values 5. CLEAR: Clear numeric input 6. TOP MENU: Show BD top menu or DVD title menu 7. ARROW and ENTER Buttons: Navigate menu selection 8. OPTION: Brings up the context-related menue 9. COLOR Buttons: Function varies by content 10. PLAY: Start playback 11. STOP: Stop playback 12. REV: Fast reverse play 13. PREV: Skip to previous 14. AUDIO: Change audio language or channel 15.
Front Panel Controls Standby Button – This is used to reset the unit. When the light is red, the unit is in standby and the MSB Network Input is selected. When the light is green, the UMT is on. The UMT is slow when going into or out of standby. Also, the UMT saves it’s settings only when going into Standby. If you do allow the unit to go into Standby it will not save it’s settings. Eject – It open and closes the drawer.
MSB Advanced Audio Setup There are several special setup modes possible relating to the MSB audio processing. These modes are enabled with a special series of remote keystrokes. When pressed correctly the UMT will acknowledge by blinking the red LED on the front panel for 5 seconds. Here are the commands. 1. DSD Mode: The UMT defaults with DSD output on the digital outputs. This is perfect for use with an MSB DAC. For use with a non- DSD DAC, the DSD mode may be turned off.
access the setup item, please check for configuration conflicts and consistency. For example, if Video Setup > 3D Output is set to Off, the 3D Setting menu item will be grayed-out. Setting 3D Output to On (or Auto) will enable the 3D Setting menu. To access the player’s Setup Menu simply press the SETUP button on the remote control.
6. • Area Code – Some Blu-ray Discs may have different parental control ratings for different geographical areas. At this time the player only supports the parental control ratings used in the United States. • Change Password – To change the parental control password, enter a 4-digit number as the new password. Enter the new password again to confirm. If the two entries are matching, the new password replaces the old parental control password. Language: To configure language preferences.
• Blank HDMI 2 (Yes/No) – Allows you to force HDMI 2 OUT to output a blank 2D screen when HDMI 1 OUT outputs 3D video. During 3D movie playback, when HDMI 1 is connected to a 3D display and HDMI 2 is connected to a non-3D receiver which is in turn connected to the same 3D display, you may encounter an issue where there is no audio coming from the receiver. Setting this option to “Yes” can resolve this issue.
• OSD Position – To set the display position for the on-screen display (OSD). When the “OSD Position” is set at 0, the OSD is shown at the top and bottom of the video screen. When it is set at a value between 1 and 5, the OSD is shifted towards the center of the video screen. Similar to the subtitle shift setting above, the “OSD Position” feature is helpful for customers using a 2.35:1 “Constant Image Height” video projection system.
3. Contrast: To adjust the contrast (white level) of the video output. NOTE: Proper brightness and contrast settings are necessary for a quality video output. If you do not have the correct black and white levels, your images can appear washed out or can lose detail in shadows when watching darker scenes. Televisions have brightness (black level) and contrast (white level) controls; however it may require a combination of tweaking both the player and your television to get the optimal result.
sharpening effect without making noise more visible. The Detail Enhancement and Edge Enhancement methods are additive, so the results of both sharpening methods are combined. An example of this would be to use general sharpening to increase detail in the entire image. If object edges are over enhanced, then negative edge-qualified sharpening is applied to reduce the over enhancement of the edges. If general sharpening is applied to a noisy image, the increase in noise may be objectionable.
NOTE: Since the Deep Color feature is OPTIONAL and may not be supported by all TVs, enabling Deep Color while connected to a TV without this feature may result in no effect or no video. At this time, no disc is encoded with Deep Color. Enabling Deep Color will not magically make colors richer, but will help preserve the maximum precision as a result of video processing and picture control adjustment. Dithering is a technique to improve the image color depth with limited color quantization.
5. SACD Output: To select audio output format for SACD. The options are: • PCM – DO NOT SELECT THIS OPTION. • DSD – SACD DSD data is output over HDMI without any conversion. For the digital audio outputs, DSD data is processed by the internal MSB processor to obtain the highest possible digital audio. The S/PDIF outputs 172.4 kHz 24 bit digital audio but the MSB Network outputs the full resolution 32 bit output. Note: Due to a hardware limitation, DSD output is only available from the HDMI 2 OUT port.
You can also move on to configure the next speaker by selecting the “Next Speaker” option. 1. Size: Please set all speakers to LARGE. NOTE The front, surround and surround back speakers are configured as pairs. Changes to the size of one speaker will automatically change the other speaker of the pair. 2. Distance: The speaker distance parameters set delay control for the corresponding audio channel. The delay is to compensate for the audio propagation time difference caused by the placement of speakers.
Device Setup The “Device Setup” section of the Setup Menu system allows you to configure additional player options related to the hardware and control functions. The menu items in this section are: 1. Firmware Information: To display the currently installed OPPO firmware version. 2. Firmware Upgrade: Now this can be a little bit confusing. There are two sets of firmware in the UMT.
• 7. 8. 9. Alt. Code – Alternative remote code. The alternative remote control code enables users to program their universal remote controls that come with TV, projector or A/V receiver to operate the UMT. If the universal remote control has a DVD player control function, please program it with the code for TOSHIBA, PHILIPS, MAGNAVOX, MARANTZ or ZENITH DVD players.
internal flash memory that can be used for persistent storage. There are also two USB ports on the player that can accept a USB drive to be used as the persistent storage. The choices are: • Internal Flash – Use the internal flash memory for persistent storage. • USB Drive – Use a USB drive for persistent storage. To meet the specification for BD-Live, a USB flash drive of 1GB or larger is required. A USB hard drive is not recommended.
Network Setup The “Network Setup” section of the Setup Menu system allows you to configure the parameters for the Internet connection of the player, test the connection and restrict BD-Live access. The menu items in this section are: 1. Connection Information: To display the current internet connection information, such as connection type, IP address, Ethernet MAC, Wireless MAC, etc. 2. Player Name: Enter and display the player’s identification name as it is displayed on local network sharing products.
input the security key using the remote control. The player will then test the connection and display the results. • Manual – Allows you to manually enter the information for a wireless network. You need to use the remote control to input the SSID, select the Security Mode and input the Security Key. The player will then test the connection and display the results. • WPS – Starts the Wi-Fi Protected Setup.
BASIC OPERATIONS Disc Playback 1. Press the POWER button to turn on the player. 2. Press the OPEN/CLOSE (OPEN) button to eject the disc tray. 3. Place the disc with the label side facing up and the recorded side facing down. 4. Press the OPEN/CLOSE (OPEN) button again to retract the tray. 5. The player will read the disc information and starts playback. 6. Depending on the content of the disc, a menu or navigation screen may appear.
Fast Playback You may fast forward or reverse during playback. 1. Press the FWD button on the remote control and the player starts fast forward playback. Each press of the FWD button switches the playback speed in the following sequence: 2. Press the REV button on the remote control and the player starts fast reverse playback.
DVD and Blu-ray Disc: - Title elapsed time - Chapter elapsed time - Title remaining time - Chapter remaining time - Track elapsed time - Disc elapsed time - Track remaining time - Disc remaining time CD and SACD: In addition to the playback time, the on-screen display may also contain the following information about the content currently playing: • Playback status: an icon indicating play, pause, and fast forward/reverse status.
Audio Return Channel (ARC) Selection 1. When sending a digital audio signal from the TV back to the UMT through an HDMI connection, press the INPUT button on the remote to bring the Input Source menu. 2. Use the UP/DOWN ARROW buttons to choose the required ARC channel. 3. You can always select BLU-RAY PLAYER to return to UMT HOME menu. NOTE: Audio Return Channel (ARC) is a feature introduced in HDMI v1.
ADVANCED OPERATIONS Output Resolution The UMT supports multiple output resolutions. If you would like to change the output resolution, you may do so by pressing the RESOLUTION button on the remote control: 1. Make sure the HDMI cable is properly connected. 2. Turn on the TV and adjust the TV to use its HDMI input port. 3. Make sure that the player is turned on.
• Full Screen – The image is stretched by 1.33 times for both vertical and horizontal directions. For movies with 2.35:1 aspect ratio, this zoom level cuts off the black borders at the top and bottom of the image while maintaining the correct aspect ratio. The left and right sides of the image are slightly cropped. 2) Playing 4:3 BD or DVD when “TV Aspect Ratio” is set to “16:9 Wide” • 1:1 - The image fills up the entire 16:9 screen but is horizontally stretched.
Subtitle Shift For customers using a 2.35:1 “Constant Image Height” video projection system, subtitles may get cut off because they are positioned outside of the active video area. The Subtitle Shift feature can be useful to these customers. The player can shift subtitles up or down so they are displayed within the active video area. To shift the display position of subtitles, please follow these steps: 1.
Playback from a Specific Location - DVD and Blu-ray Discs During the playback of a DVD or Blu-ray Disc, you may specify a location to start playback by entering the title, chapter or time directly. Press the GOTO button to bring up the on-screen display. On top of the video screen, the on-screen display information has the following components (from left to right): Playing Status, Title, Chapter, Time Counter, Progress Indicator, and Total Time.
1. Track time search. For example, search for a specified time within the currently playing track. Press the GOTO button to place the cursor on the track Time Counter. Use the NUMBER or ARROW buttons to enter the hours, minutes and seconds for your specified search and press the ENTER button. 2. Disc time search. For example, search for a specified elapsed time of the entire disc. While the on-screen display is shown, press the PAGE UP or PAGE DOWN button to switch the Time Counter to Disc Time mode.
MEDIA FILE PLAYBACK In addition to playing standard disc-based formats such as Blu-ray Disc, DVD, CD and SACD, the UMT can play media files. You can enjoy digital music, movies and photos stored on a data disc (recordable CD, DVD or Blu-ray) or an external USB drive. Due to the variation of media, encoding software and techniques used, compatibility cannot be guaranteed for all user-created or downloaded content. Support for such content is on a best effort basis.
NOTE: NAS is a networked appliance that provides file-based data storage services to other devices on the network. Commercial products are available on the market. SMB (Server Message Block) or CIFS (Common Internet File System) is mostly known as Microsoft Windows Network. It does not require an extra media server or perform any media format transcoding, which reduces the processing load and keeps the original content quality.
Playing Music Files To play digital music files stored on an optical disc or USB drive, select “Music” from the Home Menu. A file browser will appear to assist you in navigating the files and folders. The first step is to select the “Data Disc” or USB device that contains the music files. The player will take a moment to read the media and list the folders and music files.
Playing Movie Files To play movie files stored on an optical disc, USB drive, select “Movie” from the Home Menu. A file browser will appear to assist you in navigating the files and folders. The first step is to select the “Data Disc”, USB device that contains the movie files. The player will take a moment to read the media and list the folders and movie files.
Adding Background Music You can add background music to the photo slideshow. To do so, you will need to prepare some digital music files. The music files can be stored on the same disk as the photos, or on a different USB drive. Start music playback first by selecting “Music” from the home menu. Once the music is playing, press the HOME button to get back to the home menu, and start the photo slideshow by selecting “Photo” in the usual manner.
Language Code List Warranty All MSB products carry a one year warranty. No returns accepted without an RMA. All units must be returned to the distributor in the country of origin. MSB will not make warranty repairs on grey market products. Be sure the product you purchased is authorized to be in your country. Upon receipt, MSB will repair or replace any defective product. All product shipped FOB Aptos. Shipping and shipping damage is the responsibility of the consignee.
Optional Zone Free Upgrade 44