iPoint NVR v5.16 Server User Manual iPoint NVR Server v5.
iPoint NVR v5.16 Server Manual Table of Contents iPoint NVR Server v5.16 .................................................................................................................................... 1 USER’S GUIDE..................................................................................................................................................... 1 1. Introduction............................................................................................................................
iPoint NVR v5.16 Server Manual 1. Introduction Thank you for purchasing the iPoint NVR system. This operation manual was created to help you quickly and efficiently install the NVR system and its most commonly used features. It is important to go through this manual, follow each step in order. Read the instructions carefully to ensure proper programming of the NVR system. Note: Please set the screen area as 1024x768 pixels before using this system.
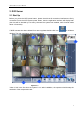
iPoint NVR v5.16 Server Manual 2. DVR Server 2.1 Start Up Before you press the NVR power button, please check that all connection interfaces are firmly connected. Press the NVR system power button, then the application interface will display later (the time will be decided by how many channels the system has installed, each channel needs about 4-5 seconds). on windows If NVR Autostart has been deleted from start up please double click icon desktop.
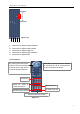
iPoint NVR v5.16 Server Manual Figure1-1-2 2.2 Main Interfaces *Show Tips: When the mouse moves close to or stops on a button, the button function text tip will show immediately. *Full Screen Mode: Right click mouse button, a menu pops up, select “full screen”, change display mode to full screen (or press F12 on the keyboard). *Zoom In/Out Video Image: Double click the left mouse button on a camera window, zoom in/out video image (or press F11 on the keyboard). *Recording Status: a.
iPoint NVR v5.16 Server Manual Increase Decrease Figure 1-2-1 ①② ③ ④ ⑤ 1 2 3 4 5 Allows user to adjust image brightness Allows user to adjust image contrast Allows user to adjust image hue Allows user to adjust image saturation Allows user to adjust audio 4). PTZ Control: By pressing and holding these buttons, the PTZ camera will be moved up, down, right and left as well quadrants in between.
iPoint NVR v5.16 Server Manual Relay (on/off): Controls the PTZ cameras internal relay (relay1), or the decoders relay (relay1) Used to turn on a light or control an access gate. Wiper (on/off): Using the PTZ cameras corresponding wiper control relay, this toggles the relay/wiper on and off Zoom +, Zoom- : Controls the zoom function of the PTZ camera. Focus +, Focus-: Overrides the auto-focus setting of the PTZ camera, adjusts focus of the image.
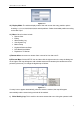
iPoint NVR v5.16 Server Manual 5). Network Panel: The Network Configuration of the system is displayed. Network adapter type IP address of the system Subnet Mask Gateway When client computers are connected, the Client IP address will be displayed Figure1-2-4 6). Matrix & Display: This panel includes Matrix Groups and Display Groups. Each group includes 16 numeric buttons. Each button denotes one matrix or display.
iPoint NVR v5.16 Server Manual Figure1-2-6 12). Display Mode: The window display mode of the main screen has many partition options including 1,4,9,12,16,20,25,28,33,36,40 and 49 partitions. Select the suitable partition according to the video input. 13). Menu: Other functions include • Remote Chat • E-Map • Write Working Log • View System Log • Motion Setup • Keyboard Shortcuts Setup • DVR Board Work Mode • Playback to TV Monitor.
iPoint NVR v5.16 Server Manual Figure1-2-8 d) System Log: Allows users to view all recorded activities as well as operator log reports. System log keeps a record of system events such as shutdown, camera setup changes, program startup and shutdown, and all Operator or System Administrator’s daily activities according to time and date. Users can search by date and by system parameters. System parameter includes operations, system prompts, alarms and other activities.
iPoint NVR v5.16 Server Manual Sensitivity Figure1-2-10 Add a cover area. If there are some areas you don’t want show, draw those areas with mouse till they change to black. You can set several coverage areas. Press the Add Mask button, set cover area, and press again to complete setup. Delete all cover areas. f) Keyboard Shortcuts Setup: Disable the fast key functions if you do not want to use. Figure1-2-11 Click “Lock Sensitive Fast Key”, and choose the fast keys you want to disable.
iPoint NVR v5.16 Server Manual The new DVR board work mode will take effect after restarting DVR Server software. h) Playback to TV Monitor: In DVR system, the recorded data can be transmitted to TV monitor via the Matrix Card. When using “Playback to TV monitor”, the Matrix card will output recorded data. In this process, you can playback recorded files by date and camera, and the recorded files will be played automatically by turn.
iPoint NVR v5.16 Server Manual Figure1-2-12 16). Function Key: Cameras Sequence Partition auto-switch. Emergency Record Button: This button triggers recording by all cameras for 30 seconds, Even if they have been setup to record by motion, sensor or time period. This function is useful in an emergency where quick action is required. Image Capture: Allows users to save a still images of a selected camera in live view. Manual Record Button (on/off): Allows users to record manually by any camera.
iPoint NVR v5.16 Server Manual Click 2.3.1. in the main system screen to enter into the DVR system set-up mode: System Set-Up Figure1-3-1 Set system parameter 【Number of Channels】Display the total number of channels. 【Sensor Input (DI)】 Display the number of sensors (DI). 【Sensor Output (DO)】Display the number of alarms (DO). 【Audio Monitoring】Select monitoring audio or no audio. 【Use E-Map】Select display Electron Map or not when there is an alarm.
iPoint NVR v5.16 Server Manual 【Main Recording Disk】Select the first disk partition from which the DVR saves data. The previous disk of this one will not be used to record or will not be checked by the system. 【System Keystroke】When it is in use, some system keys will be disabled such as (Ctrl+Alt+Del). 【DI/DO Device】Select alarm driver type. 【Alarm Beep】Disable or enable beep alarm from drop-down list. When there is an alarm, system will make beep noise if “enable” is selected.
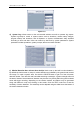
iPoint NVR v5.16 Server Manual Figure 3-2 1. If your DVR uses a dynamic IP, you should configure your DVR system as follow : Figure1-3-3 2. The DNS server will get your DVR’s domain name and the current IP. Figure1-3-4 3. Clients will get the DVR’s current IP through DNS the server according to the DVR’s domain. 4. Clients will visit DVR through the IP its get from DNS server. For stability purposes, the system can be set to restart automatically.
iPoint NVR v5.16 Server Manual 2.3.2. Camera Setup Figure1-3-5 Individual setup 【Selected Camera】 Set the parameters for a camera by selecting the camera from the drop-down list. 【Camera Description】Input the description for easy identification. 【Camera Type】Select camera type from drop-down list. Users can choose from PAL or NTSC. 【Camera】Enable or disable selected camera. Video loss detection will sound if a camera is not physically connected while enabled. 【Bit Rate】Set record mode.
iPoint NVR v5.16 Server Manual 【Image Quality】Sets the quality of the image to be recorded from Poorest, Poor, Medium, Very Good and Best. Click this button and users can choose advanced settings for video quality, such as IBP, FPS and Maximum Bit Rate. 【Frame Rate(fps)】Sets the recording rate for selected camera. For Frames Per Second (fps), the rate should be from 1 to 30 fps. 【OSD Contrast】 【OSD Pos】 Sets On Screen Display controls brightness and position.
iPoint NVR v5.16 Server Manual picture as disabled and the alarm will disappear. When you want to use them later, set as enabled again. 2. The unit of the swap file should be MB. 2-50 is the range. 3. Set the position and contrast of the date shown on the screen. Sometimes the date cannot be clearly seen for its color is similar with the background. You can change its position or color when this happen. 4. Image size is the format used when recording.
iPoint NVR v5.16 Server Manual Figure1-3-6 Tips: One block of pane means half an hour. Firstly click record mode icon , then click schedule diagram, hold down the mouse and move it to select large area (Drag & Drop). 1. Normal Record (Green): DVR System is always recording video. (e.g. Sun. Fri. Sat.) 2. Motion Detect (Blue): DVR System begins to record video only when it detect moving object. (e.g. Mon.) Click "Motion Detect" icon, then select your schedule time by drag & drop.
iPoint NVR v5.16 Server Manual 2.3.3. Sensor Set-Up Figure1-3-7 【Select Sensor】Select the camera from the drop-down list in order to set the parameters for a sensor. 【Sensor】 Select this sensor port to use or not. 【Sensor Position】Enter the description for easy identification. 【Activate PTZ Preset】 Select linkage of Speed Dome preset number . Speed Dome will auto-move to this preset number when there is an alarm. (Need Speed Dome installed). 【Play Alarm Sound】 Select a sound of .
iPoint NVR v5.16 Server Manual Sensor group set up is very similar to the group set up of camera recording. 【Sensor Type】Select N/C or N/O alarm type. 【Alarm Write log】Select write alarm log or not. 【Alarm Action After It Times-Out】Select system alarm linkage mode after an alarm time-out. “Stop Immediately” means the system stop alarm immediately after the alarm driver stops an alarm. “Follow Input State ” means the system don’t stop alarm after the alarm driver stops an alarm.
iPoint NVR v5.16 Server Manual Figure1-3-9 【Selected Camera】Select the camera from the drop-down list to set the parameters for it. 【PTZ Port】Selects PTZ communication port. Choose “No Com” for no PTZ, or Com 1, 2 for PTZ. 【PTZ Protocol】Selects the PTZ protocol for the PTZ camera. 【PTZ Address】Allows the installer or user to set the camera ID number corresponding of the PTZ camera being controlled. Note: The PTZ camera typically has a bank of dip switches allowing the setup of PTZ address.
iPoint NVR v5.16 Server Manual 【DO Port】【DO Port Name】If an alarm input is in use and there is alarm associated with a camera, the alarm will be sent to the client automatically, same with sensors. But the client will only automatically connect to the cameras when an alarm is detected. 【Send Alarm to Client】Selects whether alarm are sent to a network client or not. 【Motion Detected In Camera】Selects camera from dropdown list. 【Play Alarm Sound】Selects a “.wav” sound file for a camera alarm.
iPoint NVR v5.16 Server Manual 2.3.5. Send Email Setup Figure1-3-11 【SMPT Server】SMTP server address. E.g.: mail.ipontllc.com. 【SMPT Port】SMTP listen TCP’s port for connection requests. 【Authentication Type】 Login mailbox, operator will select SMTP authentication type, or select “simple login”. 【Login User ID】Mailbox ID. 【Login Pass】 Mailbox password. 【Send To】Address of receiver. 【Sender Email】Operator’s email address.
iPoint NVR v5.16 Server Manual 【Send Notification from Sensors (Screenshot From Linked Camera)】Operator can select which sensors alarm send email. *NOTE: If send the grab picture as the attachment, you should set the alarm of the camera or sensor, to “alarm send to network” enabled. 2.3.6. Digital Matrix Setup Figure1-3-12 【Matrix Group】System operator can organize into groups to matrix video out, each group has different display mode. There are 16 groups in common.
iPoint NVR v5.16 Server Manual 【Display Group】 System operator can organize groups to display video out, each group has different display setup number from 1 to 16. 【Video Split Mode】Video out display mode, the split mode is the same as main window’s display split mode. There are 1, 4, 9, 12, 16, 20, 25, 28, 33, 36, 40 and 49 partition options. 【Video Window】 【Display Camera in the window】 After selecting the video split mode, select a corresponding display video window, select one camera show in a window.
iPoint NVR v5.16 Server Manual 【Use Password】 Click it to enable User Manage mode and activate the lock button main window. Only authorized user can log into System at User Manage Mode. in Add a new user .Press this button, and input user information, including user name, password, and user level. Then Press button, the new user will be added in user list. Select user from user list, and modify his information and authority, then click button, system will save user’s information and authority.
iPoint NVR v5.16 Server Manual Name, Password, and Confirm Password. Select Manage Right, (Administrator or Operator), then click Add User to save. f. Delete User Button- Select user from drop-down list, then click Delete User. 2.4. System Playback 2.4.1 Enter Play Back Mode: Click button in main window to enter playback window. Figure1-4-1 2.4.2 Select Playback Channel Number: Directly click the number button in the right-up screen corner.
iPoint NVR v5.16 Server Manual Figure1-4-2 Gray channel number means that channel has recorded data. Click channel number to select search camera. Select one window (the 1st one is default), click the channel number and playing will begin. Different colors will show information of all cameras. You can see all kinds of record, their time and length according to the color. You can choose to play some record data by clicking its time. Figure1-4-3 Click this button to synchronize all playback channels time.
iPoint NVR v5.16 Server Manual The Smart Search allows users to draw a zone on video image and perform a search based on any motion, missing object, or unattended object events occurred within that zone. It can find recorded video you are interested in. Press this button to start smart search, and pull a select a area, the system will play all motion occurred within this area. System will start and play previous 3 seconds and next 3 seconds of the motion. Press again will end smart search.
iPoint NVR v5.16 Server Manual Last frame, Start, Pause, Stop and Next frame First frame of that day, Last Minute, Next Minute, and Last Frame of that day. Image Zoom Out. Press this button, single click the left mouse button on an image. Quarter of the image will be enlarged. Thereafter, single click right mouse button on the image, it will resume to the normal. Adjust Voice. Click the button to clear the voice. Adjust Playing Speed. Click the button to resume normal playing speed. 2.4.
iPoint NVR v5.16 Server Manual a. Select one from file list and double click it ,this file will be played. Information of the playing file. Including beginning time, ending time, file size, b. resolution, frame rate etc. Play control button c. d.【Select Camera】Change a channel conveniently. e.【Save path】Select clip file’s save path. f. Set the beginning position and ending position of the file, the file attribute on the left will show the size of the file. h. i.
iPoint NVR v5.16 Server Manual Figure1-4-10 【Save Path】Select “save path” for the backup file. 【Backup Camera】Select the backup camera. 【Select begin time】 【Select end time】Select the backup files’ beginning time and ending time. 【Unite File】Enable or disable unite file . If select disable, the record file will not united. If select enable, all record files will be united. Users can set the Max. value of the united file. 【Backup File Max Value】Max. value of the united file.
iPoint NVR v5.16 Server Manual Figure1-4-11 a.【Save Path】Select path of the backup file. b【Select Channel】 Select channel. Select one from File List and double click it ,this file will be played. The united file is c. named by “date + begin time” and “date + end time”. d. Start writing CD e. Copy the player to the catalog of the backup file. 2.4.
iPoint NVR v5.16 Server Manual Figure1-4-12 a. Directory list. b. File list. c. Name and path of current picture. If you want to save the reworked picture in another file, you can change its name and path here, with bmp and jpg as suffix. Then click the button d. e. f. g. . Save the reworked picture. Function buttons of picture disposal. When the result of disposal is not good click it to the default. Print picture. When the image is wider than 400 pixels, it will be printed smaller.
iPoint NVR v5.16 Server Manual smaller, it will be printed bigger. When it’s selected, with the mouse moving, part of the picture will be enlarged. h. i. Delete current file or delete all files. J. Button of Window split, in server there are 1,4,9and 16 splits. In client there are 1, 4 and 9 splits. k. Open all: press this button, open all playback windows in turns according to the order of the cameras. l. Close all: press this button, close all playback windows. *Note:1.
iPoint NVR v5.16 Server Manual 2.4.7 Camera State Click this button to show the cameras status. If the color of number is gray, it means it is recording data. If white, it is not recording data. Figure1-4-7 2.4.8 Showing Files Click this button to show all the files of current cameras.
iPoint NVR v5.16 Server Manual Appendix A: Shortcuts Reference: This color key denotes PTZ control. This color key denotes other function control. PTZ Control: Key Function ↑ Up ↓ Down ← Left → Right Home Zoom- End Zoom+ Insert Focus- Delete Focus+ S Save preset G、Enter Call preset C、—、 Num0-9 Presets Control Operation F3-F8 Tracking all presets, interval is 3-8 Sec of every preset.(F3 denotes 3sec.F4 denotes 4 sec,F8 denotes 8 Sec etc.
iPoint NVR v5.