
Computer Computer Hardware User's Manual


5-4
MS-7031 Micro ATX Mainboard
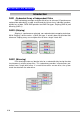
(2) Delete RAID Sets
1. Select the Delete RAID Set in the main menu, and select the desire set and
press <Enter>.
2. Press Y when asked “Are You Sure?”
3. The drive will be returned to the original status which the RAID Set can be
created.
(3) Rebuild Mirrored Set
Here you can copy the data from an existing drive to a replacement drive that
has been installed in a RAID 1 Set after the failure of one of the members.
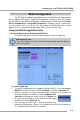
1. Select the Rebuild Mirrored Set in the main menu, and select the desire set
and press <Enter>.
2. Press Y when asked “Are You Sure?”
3. The drive will be rebuilt. The status of the rebuild will be displayed.
(4) Resolving Conflicts
When a RAID set is created, the metadata written to the disk includes drive
connection information, containing the channel on the host adapter to which it is
connected. If after a disk failure the replacement disk was previously part of a RAID
set or used another system, it may have conflicting metadata, especially in reference
to the drive connection information. If so, this will prohibit the RAID set from being
either created or rebuilt. In order to let the RAID set function properly, this old metadata
must be first overwritten with the new metadata. To correct this, select Resolve
Conflict and the correct metadata, including the correct drive connection information,
will automatically be written to the replacement disk.
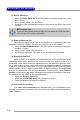
1. Select the Resolve Conflicts.
2. Select the Invalid RAID drive entry and press <Enter>.
3. Follow the prompts to resolve the conflict.
(5) Low Level Formatting
The Low Level Formatting menu selection allows you to completely erase
the data on a hard drive. However, you can perform the action of formatting directly
under Windows.
MSI Reminds You...
If your system currently boots to RAID and you delete the RAID Set here,
your system will become unbootable.