MSI MICRO-STAR INTERNATIONAL MS-6534 Micro ATX Mainboard Version 1.
Manual Rev: 1.0 Release Date: August 2001 FCC-B Radio Frequency Interference Statement This equipment has been tested and found to comply with the limits for a class B digital device, pursuant to part 15 of the FCC rules. These limits are designed to provide reasonable protection against harmful interference when the equipment is operated in a commercial environment.
Edition August 2001 Copyright Notice The material in this document is the intellectual property of MICROSTAR INTERNATIONAL. We take every care in the preparation of this document, but no guarantee is given as to the correctness of its contents. Our products are under continual improvement and we reserve the right to make changes without notice. Trademarks All trademarks used in this manual are the property of their respective owners. Intel and Pentium are registered trademarks of Intel Corporation.
Safety Instructions 1. 2. 3. 4. 5. Always read the safety instructions carefully. Keep this User’s Manual for future reference. Keep this equipment away from humidity. Lay this equipment on a reliable flat surface before setting it up. The openings on the enclosure are for air convection hence protects the equipment from overheating. DO NOT COVER THE OPENINGS. 6. Make sure the voltage of the power source and adjust properly 110/220V before connecting the equipment to the power inlet. 7.
Contents Chapter 1. Introduction ............................................................... 1-1 Mainboard Specification ............................................................ 1-2 Mainboard Layout ..................................................................... 1-4 Quick Components Guide ......................................................... 1-5 Key Features ............................................................................ 1-6 Chapter 2. Hardware Setup ..........................
Power Saving Switch Connector: JGS1 ............................. 2-19 Wake On LAN Connector: JWOL1 .................................... 2-19 Wake On Ring Connector: JMDM1 (Optional) ................... 2-20 IrDA Infrared Module Connectors: IR1 & IR2 ...................... 2-21 Fan Power Connectors: C_FAN1/S_FAN1 ......................... 2-22 CD-In/Aux Line-In/Modem-In Connector: CD_IN1/AUX_IN1/ MDM_IN1 ..........................................................................
Set Supervisor/User Password ................................................ 3-30 Save & Exit Setup ................................................................... 3-32 Exit Without Saving ................................................................. 3-33 Chapter 4. AMI® BIOS Setup ...................................................... 4-1 Entering Setup .......................................................................... 4-2 Selecting the First Boot Device ...................................
Introduction 1 Chapter 1. Introduction Thank you for purchasing the MS-6534 Micro-ATX motherboard. The mainboard, based on Intel® Brookdale (82845) & 82801BA chipsets, is a high-performance computer mainboard designed for Intel® Pentium® 4 processor in the 478 pin package that provides a high-end and professional desktop platform solution.
Chapter 1 Mainboard Specification CPU z Supports Socket478 for Intel® Pentium 4 (FC-PGA2) processor z Supports 1.3GHz, 1.4GHz and up to 2.
Introduction - 1 floppy port supports 1 FDD with 360K, 720K, 1.2M, 1.44M and 2.88Mbytes. - 2 serial ports (COMA / COMB) - 1 parallel port supports SPP/EPP/ECP mode - 4 USB ports (Rear * 2 / Front * 2) - PS/2 Keyboard/Mouse connector - 1 Line-In/Line-Out/Mic-In/Game port H/W Audio (Optional) z C-mediaCMI8738-6CH-LX z Supports 6 channel Audio z AC97 2.1 compliant S/W Audio z 2-channel Audio Codec z 4-channel Audio Codec (Optional) z AC97 2.
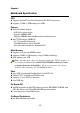
Chapter 1 Mainboard Layout USB ports FDD1 C_FAN1 ATX Power Supply Top : mouse Bottom: keyboard Bottom: Line-Out Line-In Mic IDE 2 AUX_IN1 Top : Game port CD_IN1 DIMM 1 Bottom: COM A COM B DIMM 2 Top : Parallel Port Intel Brookdale Chipset JPW1 I/O Chip IDE 1 AGP Slot MDM_IN1 BATT + JAUDIO1 CNR MS-6534 Micro-ATX Mainboard 1-4 USB2 F_P2 JGS1 FWH USB1 IR2 F_P1 PCI Slot 3 JBAT1 PCI Slot 2 JMDM1 (Optional) IR1 Audio Codec S_FAN1 ICH2 JWOL1 H/W Audio (Optional) PCI Slot 1
Introduction Quick Components Guide Component Function Reference DIMM1~2 Installing DIMM modules See p. 2-5~2-6 Socket 478 Installing CPU See p. 2-2~2-4 C_FAN1 Connecting to CPU FAN See p. 2-22 S_FAN1 Connecting to SYSTEM FAN See p. 2-22 ATX Power Supply Installing power supply See p. 2-7 JPW1 Connecting to 12V ATX power supply See p. 2-8 IDE1& IDE2 Connecting to IDE hard disk drives See p. 2-14 FDD1 Connecting to floppy disk drive See p.
Chapter 1 Key Features z z z z z z z z z z z Micro-ATX Form Factor CPU: Socket 478 for Intel® Pentium® 4 Processors Memory: 2 SDRAM DIMMs Slot: 1 AGP slot, 1 CNR slot, 3 PCI slots I/O: 2 serial ports, 1 parallel port, 4 USB 1.
Hardware Setup Chapter 2. Hardware Setup 2 Hardware Setup This chapter provides you with the information about hardware setup procedures. While doing the installation, be careful in holding the components and follow the installation procedures. For some components, if you install in the wrong orientation, the components will not work properly. Use a grounded wrist strap before handling computer components. Static electricity may damage the components.
Chapter 2 Central Processing Unit: CPU The mainboard supports Intel® Pentium® 4 processor. The mainboard uses a CPU socket called Socket 478 for easy CPU installation. Make sure that the CPU has a Heat Sink and a cooling fan attached to prevent overheating. If you do not find the Heat Sink and cooling fan, contact your dealer or purchase them before turning on the computer. Open Lever Installing the CPU 1. Pull the lever sideways away Sliding Plate from the socket.
Hardware Setup Installing the CPU Fan As processor technology pushes to faster speeds and higher performance, thermal management becomes increasingly important. To dissipate heat, you need to attach the CPU cooling fan and heatsink on top of the CPU. Follow the instructions below to install the Heatsink/Fan: 1. Locate the CPU and its retention 2. Position the heatsink onto the mechanism on the motherboard. retention mechanism. Retention Mechanism 3. Mount the fan on top of the 4.
Chapter 2 5. Connect the fan power cable to the 3-pin fan power connector on the board. fan power cable CPU Core Speed Derivation Procedure If CPU Clock Core/Bus ratio then CPU core speed WARNING! = = = = = 100MHz 14 Host Clock x Core/Bus ratio 100MHz x 14 1.4GHz Overclocking This motherboard is designed to support overclocking. However, please make sure your components are able to tolerate such abnormal setting, while doing overclocking.
Hardware Setup Memory The mainboard provides 2 sockets for 168-pin SDRAM DIMM (Double In-Line Memory Module) modules and supports a maximum memory size of 2GB. DIMM Slots (DIMM 1~2) Introduction to SDRAM Synchronous DRAM (SDRAM) is a type of dynamic RAM memory chip that has been widely used starting in the latter part of the 1990s. SDRAMs are based on standard dynamic RAM chips, but have sophisticated features that make them considerably faster.
Chapter 2 DIMM Modules Combination You can install memory modules in any combination as follows: S (Single Side): 32MB ~ 512MB D (Double Side): 64MB ~ 1GB DIMM 1 DIMM 2 S/D -- -- S/D S D D S S S D D Note: As 845 chipset does not properly support the PC100 memory, it is strongly recommended to install PC133 DIMM modules for better system performance and stability. We do not guarantee the system stability when installing PC 100 DIMM modules. Installing DIMM Modules 1.
Hardware Setup Power Supply The mainboard supports ATX power supply for the power system. Before inserting the power supply connectors, always make sure that all components are installed properly to ensure that no damage will be caused. ATX 20-Pin Power Connector This connector allows you to connect to an ATX power supply. To connect to the ATX power supply, make sure the plug of the power supply is inserted in the proper orientation and the pins are aligned.
Chapter 2 ATX 12V Power Connector: JPW1 Attaching the ATX power supply to the connector is helpful for offering sufficient voltage to Pentium 4 CPU.
Hardware Setup Back Panel The Back Panel provides the following connectors: Parallel Mouse Keyboard USB COM A Midi/Joystick COM B L-out L-in MIC Mouse Connector The mainboard provides a standard PS/2® mouse mini DIN connector for attaching a PS/2® mouse. You can plug a PS/2® mouse directly into this connector.
Chapter 2 Keyboard Connector The mainboard provides a standard PS/2® keyboard mini DIN connector for attaching a PS/2® keyboard. You can plug a PS/2® keyboard directly into this connector.
Hardware Setup Parallel Port Connector The mainboard provides a 25-pin female centronic connector for LPT. A parallel port is a standard printer port that supports Enhanced Parallel Port (EPP) and Extended Capabilities Parallel Port (ECP) mode.
Chapter 2 Serial Port Connectors: COM A & COM B The mainboard has two 9-pin male DIN connectors for serial port COM A and COM B. You can attach a serial mouse or other serial devices.
Hardware Setup Connectors The mainboard provides connectors to connect FDD, IDE HDD, case, modem, LAN, USB Ports, IR module and CPU/System FAN. Floppy Disk Drive Connector: FDD1 The mainboard provides a standard floppy disk drive connector that supports 360KB, 720KB, 1.2MB, 1.44MB and 2.88MB floppy disk types.
Chapter 2 Hard Disk Connectors: IDE1 & IDE2 The mainboard uses an IDE controller on the Intel® ICH2 chipset that provides PIO mode 0-4, Bus Master, and Ultra DMA 66/100 modes. It has two HDD connectors IDE1 (Primary) and IDE2 (Secondary). You can connect up to four hard disk drives, CD-ROM or 120MB Floppy to IDE1 and IDE2. IDE1 (Primary IDE Connector) - The first hard disk drive should always be connected to IDE1. You can connect a Master and a Slave drive to IDE1.
Hardware Setup Case Connectors: F_P1 & F_P2 The case connector block F_P1 allows you to connect to the Power Switch, Reset Switch, Speaker, Power LED, Keylock and HDD LED on the case. The other case connector block F_P2 is compliant to Intel Front Panel I/O Connectivity Design Guide and can connect to the the Power Switch, Reset Switch, Power LED and HDD LED on the case.
Chapter 2 Power Switch Connect to a 2-pin push button switch. Reset Switch Reset switch is used to reboot the system rather than turning the power ON/ OFF. Avoid rebooting while the HDD is working. You can connect the Reset switch from the system case to this pin. Power LED (F_P1) The Power LED is lit while the system power is on. There are three types of LEDs you can connect from the system case to the pin: 2-pin single color power LED: Connected to pin 5 & 6.
Hardware Setup z When you select Dual (color) in the BIOS utility: LED Status Description Steady Green The system is in the full-on mode. Steady Orange The system enters the suspend/sleep mode. Power LED (F_P2) The Power LED is lit while the system power is on. There are two types of LEDs you can connect from the system case to the pin: 2-pin single color power LED: The power LED is not able to change its color.
Chapter 2 HDD LED HDD LED shows the activity of a hard disk drive connected to the IDE1 or IDE2 connector. Avoid turning the power off while the HDD is working. You can connect the HDD LED from the system case to this pin. Speaker (F_P1 only) Speaker from the system case is connected to this pin. If on-board Buzzer is available, then: Short pin 14-15: On-board Buzzer Enabled. Open pin 14-15: On-board Buzzer Disabled. Keylock (F_P1 only) Keylock allows you to disable the keyboard for security purpose.
Hardware Setup Power Saving Switch Connector: JGS1 Attach a power saving switch to this connector. Pressing the switch once will have the system enter the sleep/suspend state. Press any key to wake up the system. ExtSMI# GND 1 JGS1 Wake On LAN Connector: JWOL1 This connector allows you to connect to a LAN card with Wake On LAN function. You can wake up the computer via remote control through a local area network.
Chapter 2 Wake On Ring Connector: JMDM1 (Optional) This connector allows you to connect to a modem card with Wake On Ring function. The connector will power up the system when a signal is received through the modem card. 5VSB NC MDM_WAKEUP GND 1 NC JMDM1 Note: Modem wake-up signal is active “low”.
Hardware Setup IrDA Infrared Module Connectors: IR1 & IR2 These connectors allow you to connect to IrDA Infrared modules. You must configure the setting through the BIOS setup to use the IR function. The difference between IR1 & IR2 is that IR2 is compliant to Intel Front Panel I/O Connectivity Design Guide.
Chapter 2 Fan Power Connectors: C_FAN1/S_FAN1 The C_FAN1 (processor fan) and S_FAN1 (system fan) support system cooling fan with +12V. It supports three-pin head connector. When connecting the wire to the connectors, always take note that the red wire is the positive and should be connected to the +12V, the black wire is Ground and should be connected to GND.
Hardware Setup CD-In/Aux Line-In/Modem-In Connector: CD_IN1/AUX_IN1/ MDM_IN1 CD_IN1 connector is for CD-ROM audio connector. AUX_IN1 connector is for DVD add-on card with Line-in connector. MDM_IN1 connector is for modem with internal audio connector. R R GND GND L L CD_IN1 AUX_IN1 GND Phone_In Mono_Out MDM_IN1 Note: Mono_Out is connected to the Modem speaker-out connector. Phone_In is connected to the Modem Microphone-In connector.
Chapter 2 USB Front Panel Connectors: USB1 & USB2 The mainboard provides two Front USB (Universal Serial Bus) pin headers that allow you to connect optional USB ports for front panel. Different from USB1, USB2 is compliant to Intel Front Panel I/O Connectivity Design Guide.
Hardware Setup Front Panel Audio Connector: JAUDIO1 You can connect an optional audio connector to the Front Panel Audio Header. Pin number 1to 10 of the audio pin header is compliant to Intel Front Panel I/O Connectivity Design Guide.
Chapter 2 Jumpers The motherboard provides jumpers for you to set the computer’s function. This section will explain how to change your motherboard’s function through the use of jumpers. Clear CMOS Jumper: JBAT1 There is a CMOS RAM on board that has a power supply from external battery to keep the data of system configuration. With the CMOS RAM, the system can automatically boot OS every time it is turned on. If you want to clear the system configuration, use the JBAT1 (Clear CMOS Jumper ) to clear data.
Hardware Setup Slots The motherboard provides three 32-bit Master PCI Bus Slots, one AGP and one CNR slot. AGP Slot PCI Slots CNR Slot AGP (Accelerated Graphics Port) Slot The AGP slot allows you to insert the AGP 1.5V graphics card. AGP is an interface specification designed for the throughput demands of 3D graphics. It introduces a 66MHz, 32-bit channel for the graphics controller to directly access main memory and provides three levels of throughputs: 1x (266Mbps), 2x (533Mbps) and 4x (1.07Gbps).
Chapter 2 PCI Interrupt Request Routing The IRQ, abbreviation of interrupt request line and pronounced I-R-Q, are hardware lines over which devices can send interrupt signals to the microprocessor.
AWARD® BIOS Setup Chapter 3. AWA R D ® B I O S Setup 3 AWARD® BIOS Setup If your motherboard comes with the AWARD® BIOS ROM, read this chapter for an overview of the Award® BIOS settings. AWARD® BIOS ROM provides a Setup utility for users to modify the basic system configuration. The information is stored in a battery-backed CMOS RAM so it retains the Setup information when the power is turned off.
Chapter 3 Entering Setup Power on the computer and the system will start POST (Power On Self Test) process. When the message below appears on the screen, press key to enter Setup. Hit DEL if you want to run SETUP If the message disappears before you respond and you still wish to enter Setup, restart the system by turning it OFF and On or pressing the RESET button. You may also restart the system by simultaneously pressing , , and keys.
AWARD® BIOS Setup Getting Help After entering the Setup utility, the first screen you see is the Main Menu. Main Menu The main menu displays the setup categories the BIOS supplies. You can use the up/down arrow keys ( ↑↓ ) to select the item. The on-line description for the selected setup category is displayed on the bottom of the screen.
Chapter 3 The Main Menu Once you enter AWARD® BIOS CMOS Setup Utility, the Main Menu will appear on the screen. The Main Menu displays twelve configurable functions and two exit choices. Use arrow keys to move among the items and press to enter the sub-menu.
AWARD® BIOS Setup PnP/PCI Configurations This entry appears if your system supports PnP/PCI. PC Health Status This entry displays the current status of your PC. Frequency/Voltage Control Use this menu to specify your settings for frequency/voltage control. Load Fail-Safe Defaults Use this menu to load the BIOS default values for the minimal/stable performance of your PC. Load Optimized Defaults Use this menu to load the default factory settings for BIOS for optimal system performance.
Chapter 3 Standard CMOS Features The items inside Standard CMOS Features menu are divided into 13 categories. Each category includes none, one or more setup items. Use the arrow keys to highlight the item you want to modify and use the or keys to switch to the value you prefer.
AWARD® BIOS Setup IDE Primary Master/Primary Slave/Secondary Master/Secondary Slave Press PgUp/<+> or PgDn/<-> to select the hard disk drive type. The specification of hard disk drive will show up on the right hand according to your selection.
Chapter 3 Halt On The item determines whether the system will stop if an error is detected at boot. Available options are: All Errors No Errors All, But Keyboard All, But Diskette All, But Disk/Key The system stops when any error is detected. The system doesn’t stop for any detected error. The system doesn’t stop for a keyboard error. The system doesn’t stop for a disk error. The system doesn’t stop for either a disk or a keyboard error.
AWARD® BIOS Setup Advanced BIOS Features CMOS Setup Utility - Copyright (C) 1984-2001 Award Software Advanced BIOS Features Anti-Virus Protection CPU L1 & L2 Cache Quick Boot 1st Boot Device 2nd Boot Device 3rd Boot Device Boot Other Device Swap Floppy Seek Floppy Boot Up Num-Lock LED Gate A20 Option Typematic Rate Setting x Typematic Rate (Chars/Sec) x Typematic Delay (Msec) Security Option APIC Mode MPS Version Control For OS Boot OS/2 for DRAM > 64MB Hard Disk S.M.A.R.
Chapter 3 Quick Boot The option speeds up Power On Self Test (POST) after you power on the computer. When setting the item to Enabled, BIOS will shorten or skip some check items during POST. Settings: Enabled and Disabled. 1st/2nd/3rd Boot Device The items allow you to set the sequence of boot devices where BIOS attempts to load the disk operating system. The settings are: Floppy The system will boot from floppy drive. LS120 The system will boot from LS-120 drive.
AWARD® BIOS Setup Gate A20 Option This item is to set the Gate A20 status. A20 refers to the first 64KB of extended memory. When Fast is selected, the Gate A20 is controlled by Port92 or chipset specific method resulting in faster system performance. When Normal is selected, A20 is controlled by a keyboard controller or chipset hardware. Typematic Rate Setting This item is used to enable or disable the typematic rate setting including Typematic Rate & Typematic Delay.
Chapter 3 MPS Version Control For OS This field allows you to select which MPS (Multi-Processor Specification) version to be used for the operating system. You need to select the MPS version supported by your operating system. To find out which version to use, consult the vendor of your operating system. Settings: 1.4 and 1.1. Boot OS/2 for DRAM > 64MB This allows you to run the OS/2® operating system with more than 64MB DRAM.
AWARD® BIOS Setup Advanced Chipset Features CMOS Setup Utility - Copyright (C) 1984-2001 Award Software Advanced Chipset Features Configure DRAM Timing CAS# Latency Precharge Delay RAS# to CAS# Delay RAS# Precharge DRAM Data Integrity Mode Memory Hole At 15M-16M Delayed Transaction AGP Aperture Size (MB) [By SPD] [1.
Chapter 3 RAS# to CAS# Delay This field allows you to set the number of cycles for a timing delay between the CAS and RAS strobe signals, used when DRAM is written to, read from or refreshed. Fast speed offers faster performance while slow speed offers more stable performance. Settings: 3 and 2 (clocks). RAS# Precharge This item controls the number of cycles for Row Address Strobe (RAS) to be allowed to precharge.
AWARD® BIOS Setup Integrated Peripherals CMOS Setup Utility - Copyright (C) 1984-2001 Award Software Integrated Peripherals On-Chip Primary PCI IDE On-Chip Secondary PCI IDE IDE Primary Master PIO IDE Primary Slave PIO IDE Secondary Master PIO IDE Secondary Slave PIO IDE Primary Master UDMA IDE Primary Slave UDMA IDE Secondary Master UDMA IDE Secondary Slave UDMA USB Controller USB Mouse Support USB Keyboard Support Init Display First AC’97 Audio AC’97 Modem Onboard/CNR LAN selection IDE HDD Block Mode Flo
Chapter 3 On-Chip Primary/Secondary PCI IDE The integrated peripheral controller contains an IDE interface with support for two IDE channels. Choose Enabled to activate each channel separately. IDE Primary/Secondary Master/Slave PIO The four items allow you to set a PIO (Programmed Input/Output) mode for each of the four IDE devices that the onboard IDE interface supports. Modes 0~4 provide increased performance. In Auto mode, BIOS automatically determines the best mode for each IDE device.
AWARD® BIOS Setup not, it is disabled. Disable the controller if you want to use other controller cards to connect to a modem. Settings: Auto and Disabled. Onboard/CNR LAN selection Use the item to enable or disable the onboard or external CNR LAN device. Settings:Auto, Onboard and Ext. CNR. IDE HDD Block Mode This allows your hard disk controller to use the fast block mode to transfer data to and from the hard disk drive.
Chapter 3 abled and Disabled. IR Duplex Mode The field specifies a duplex value for the IR device connected to COM B. Full Duplex mode permits silmutaneous two-direction transmission. Half Duplex mode permits transmission in one direction only at a time. Settings: Half and Full. IR Pin Select Consult your IR peripheral documentation to select the correct setting of TxD and RxD signals. Settings: IR-Rx2Tx2 and RxD2, TxD2.
AWARD® BIOS Setup Power Management Setup CMOS Setup Utility - Copyright (C) 1984-2001 Award Software Power Management Setup IPCA Function ACPI Standby State Power Management/APM MODEM Use IRQ Suspend Time Out Power Button Function Wake Up On PME Wake Up On Ring Wake Up On LAN USB Wakeup From S3 CPU THRM-Throttling Resume By RTC Alarm x Date(of Month) Alarm x Time(hh:mm:ss) Alarm POWER ON Function KB Power ON Password Hot Key Power ON Power Again Sleep State LED [Enabled] [S1/POS] [User Define] [3] [Disabl
Chapter 3 S1/POS S3/STR The S1 sleep mode is a low power state. In this state, no system context (CPU or chipset) is lost and hardware maintains all system context. The S3 sleep mode is a power-down state in which power is supplied only to essential components such as main memory and wake-capable devices and all system context is saved to main memory. The information stored in memory will be used to restore the PC to the previous state when an “wake up” event occurs.
AWARD® BIOS Setup enters the suspend/sleep mode, but if the button is pressed for more than four seconds, the computer is turned off. Wake Up On PME/Ring/LAN, USB Wakeup From S3 These fields specify whether the system will be awakened from power saving modes when activity or input signal of the specified hardware peripheral or component is detected. Note: To use the function of “Wake Up On Ring” and “Wake Up On LAN”, you need to install a modem/LAN card supporting power on function.
Chapter 3 Hot Key Power ON If POWER ON Function is set to Hot KEY, you can assign a hot key combination in the field for the PS/2 keyboard to power on the system. Settings: CtrlF1 through Ctrl-F12. Power Again This item specifies whether your system will reboot after a power failure or interrupt occurs. Available settings are: Power Off Leaves the computer in the power off state. Power On Reboots the computer. Last State Restores the system to the status before power failure or interrupt occured.
AWARD® BIOS Setup PnP/PCI Configurations CMOS Setup Utility - Copyright(C) 1984-2001 Award Software PnP/PCI Configurations PNP OS Installed Reset Configuration Data Resources Controlled By x IRQ Resources x DMA Resources PCI/VGA Palette Snoop [No] [Disabled] [Auto(ESCD)] Press Enter Press Enter [Disabled] Item Help Menu Level 8 Select Yes if you are using a Plug and Play capable operating system Select No if you need to BIOS to configure non-boot devices ↑↓→←:Move Enter:Select +/-/PU/PD:Value F10:Save E
Chapter 3 98. If you want to configure the system by yourself, select Manaul. IRQ Resources This item is adjustable only when Resources Controlled By is set to Manual. Press and you will enter the sub-menu of this item. The item lists IRQ resources and allows you to set each IRQ a type depending on the type of device using the IRQ. Settings: PCI/ISA PnP and Legacy ISA. Note: IRQ (Interrupt Request) lines are system resources allocated to I/O devices.
AWARD® BIOS Setup PC Health Status This section is to monitor the current hardware status including CPU temperature, CPU Fan speed, Vcore etc. This is available only if there is hardware monitoring mechanism onboard. CMOS Setup Utility - Copyright(C) 1984-2001 Award Software PC Health Status Current System Temp. Current CPU Temperature POWER fan SYSTEM fan CPU fan Vcore VTT 3.3 V + 5V +12V -12V - 5V VBAT(V) 5VSB(V) CPU Critical Temperature 32°C/89°F 58°C/132°F 0RPM 0RPM 4560RPM 1.66V 1.47V 3.33V 5.02V 12.
Chapter 3 Frequency/Voltage Control CMOS Setup Utility - Copyright(C) 1984-2001 Award Software Frequency/Voltage Control CPU Ratio Selection Auto Detect PCI Clock Spread Spectrum CPU Host/PCI Clock [X 8(Safe)] [Enabled] [+/-0.
AWARD® BIOS Setup frequency. It provides end users an overclocking method. Settings: 100/ 33Mhz and higher frequency combination.
Chapter 3 Load Fail-Safe/Optimized Defaults The two options on the main menu allow users to restore all of the BIOS settings to the default Fail-Safe or Optimized values. The Optimized Defaults are the default values set by the mainboard manufacturer specifically for the optimal performance of the mainboard. The Fail-Safe Defaults are the default values set by the BIOS vendor for the stable system performance.
AWARD® BIOS Setup When you select Load Optimized Defaults, a message as below appears: CMOS Setup Utility - Copyright(C) 1984-2001 Award Software 8Standard CMOS Features 8Frequency/Voltage Control 8Advanced BIOS Features Load Fail-Safe Defaults 8Advanced Chipset Features Load Optimized Defaults 8Integrated Peripherals Set Supervisor Password Optimized Defaults (Y/N)? N Set User Password 8Power ManagementLoad Setup 8PnP/PCI Configurations Save & Exit Setup 8PC Health Status Exit Without Saving E
Chapter 3 Set Supervisor/User Password When you select this function, a message as below will appear on the screen: CMOS Setup Utility - Copyright(C) 1984-2001 Award Software 8Standard CMOS Features 8Frequency/Voltage Control 8Advanced BIOS Features Load Fail-Safe Defaults 8Advanced Chipset Features Load Optimized Defaults 8Integrated Peripherals Set Supervisor Password 8Power Management Setup Enter Password: Set User Password 8PnP/PCI Configurations Save & Exit Setup 8PC Health Status Exit Wi
AWARD® BIOS Setup use of your computer. The setting to determine when the password prompt is required is the Security Option in the Advanced BIOS Features menu. If the Security Option is set to System, the password is required both at boot and at entry to Setup. If set to Setup, password prompt only occurs when trying to enter Setup. About Supervisor Password & User Password: Supervisor password : Can enter and change the settings of the setup menu.
Chapter 3 Save & Exit Setup When you want to quit the Setup menu, you can select this option to save the changes and quit.
AWARD® BIOS Setup Exit Without Saving When you want to quit the Setup menu, you can select this option to abandon the changes.
AMI® BIOS Setup Chapter 4. AMI ® BIOS Setup 4 AMI® BIOS Setup If your motherboard comes with the AMI® BIOS ROM, read this chapter for an overview of the AMI® BIOS settings. AMI® BIOS ROM provides a Setup utility for users to modify the basic system configuration. The information is stored in a battery-backed CMOS RAM so it retains the Setup information when the power is turned off.
Chapter 4 Entering Setup Power on the computer and the system will start POST (Power On Self Test) process. When the message below appears on the screen, press key to enter Setup. DEL:Setup F11:Boot Menu F12:Network boot TAB:Logo If the message disappears before you respond and you still wish to enter Setup, restart the system by turning it OFF and On or pressing the RESET button. You may also restart the system by simultaneously pressing , , and keys.
AMI® BIOS Setup Control Keys <↑> Move to the previous item <↓> Move to the next item <←> Move to the item in the left hand <→> Move to the item in the right hand Select the item Jumps to the Exit menu or returns to the main menu from a submenu <+/PU> Increase the numeric value or make changes <-/PD> Decrease the numeric value or make changes Restore the previous CMOS value from CMOS, only for Option Page Setup Menu Load the default CMOS value from Fail-Safe defaul
Chapter 4 Getting Help After entering the Setup utility, the first screen you see is the Main Menu. Main Menu The main menu displays the setup categories the BIOS supplies. You can use the arrow keys ( ↑↓ ) to select the item. The on-line description for the selected setup category is displayed on the bottom of the screen. General Help The BIOS setup program provides a General Help screen. You can call up this screen by simply pressing . The Help screen lists the appropriate keys to use.
AMI® BIOS Setup The Main Menu Once you enter AMIBIOS SIMPLE SETUP UTILITY, the Main Menu will appear on the screen. The Main Menu displays twelve configurable functions and two exit choices. Use arrow keys to move among the items and press to enter the sub-menu. AMIBIOS SIMPLE SETUP UTILITY - VERSION 1.41 (C)1999 American Megatrends, Inc.
Chapter 4 PNP/PCI Configuration This entry appears if your system supports PnP/PCI. Integrated Peripherals Use this menu to specify your settings for integrated peripherals. Hardware Monitor Setup This entry shows your PC’s current status, and allows you to adjust CPU clock etc. The hardware monitoring data appears only if your motherboard comes with the Hardware Monitor chipset installed. Load Optimal Defaults Use this menu to load the default factory settings for BIOS for optimal system performance.
AMI® BIOS Setup Standard CMOS Setup The items inside STANDARD CMOS SETUP menu are divided into 9 categories. Each category includes none, one or more setup items. Use the arrow keys to highlight the item you want to modify and use the or key to switch to the value you prefer. AMIBIOS SETUP - STANDARD CMOS SETUP (C)1999 American Megatrends, Inc.
Chapter 4 Pri Master/Pri Slave/Sec Master/Sec Slave Press PgUp/<+> or PgDn/<-> to select the hard disk drive type. The specification of hard disk drive will show up on the right hand according to your selection. TYPE SIZE CYLS HEAD PRECOMP LANDZ SECTOR MODE Type of the device. Capacity of the device. Number of cylinders. Number of heads. Write precompensation cylinder. Cylinder location of Landing zone. Number of sectors. Access mode.
AMI® BIOS Setup BIOS Features Setup AMIBIOS SETUP - BIOS FEATURES SETUP (C)1999 American Megatrends, Inc. All Rights Reserved Quick Boot 1st Boot Device 2nd Boot Device 3rd Boot Device Try Other Boot Devices Full Screen LOGO Show S.M.A.R.T.
Chapter 4 CDROM SCSI NETWORK BBS-0 BBS-1 BBS-2 BBS-3 Disabled The system will boot from the CD-ROM. The system will boot from the SCSI. The system will boot from the Network drive. The system will boot from the first BBS (BIOS Boot Specification) compliant device. The system will boot from the second BBS (BIOS Boot Specification) compliant device. The system will boot from the third BBS (BIOS Boot Specification) compliant device.
AMI® BIOS Setup Setting to Off will allow end users to use the arrow keys on the numeric keypad. Settings: On and Off. SwapFloppy Setting to Enabled will swap floppy drives A: and B:. Seek Floppy Setting to Enabled will make BIOS seek floppy drive A: before booting the system. Settings: Disabled and Enabled. Password Check This specifies the type of AMIBIOS password protection that is implemented. Setting options are described below.
Chapter 4 Chipset Features Setup AMIBIOS SETUP - CHIPSET FEATURES SETUP (C)1999 American Megatrends, Inc.
AMI® BIOS Setup allowed to precharge. If insufficient time is allowed for the RAS to accumulate its charge before DRAM refresh, refresh may be incomplete and DRAM may fail to retain data. This item applies only when synchronous DRAM is installed in the system. Available settings: 3 Clocks and 2 Clocks. RAS# to CAS# Delay This field allows you to set the number of cycles for a timing delay between the CAS and RAS strobe signals, used when DRAM is written to, read from or refreshed.
Chapter 4 Power Management Setup AMIBIOS SETUP - POWER MANAGEMENT SETUP (C)1999 American Megatrends, Inc.
AMI® BIOS Setup USB Wakeup From S3 This item allows the activity of the USB device to wake up the system from S3 sleep state. S3 is the STR (Suspend to RAM) mode. Available settings: Enabled and Disabled. Mouse Wakeup From S3 The item controls which button on the PS/2 mouse can wake up the system from S3 mode. Settings: Disabled, Left-button and Right-button. Keyboard Wakeup From S3 The item controls which button on the PS/2 keyboard can wake up the system from S3 mode.
Chapter 4 FDC/LPT/COM Ports, Primary Master IDE, Primary Slave IDE, Secondary Master IDE, Secondary Slave IDE These items specify if the BIOS will monitor the activity of the listed hardware peripheral or component. If set to Monitor, any activity detected on the specified hardware peripheral or component will wake up the system or prevent the system from entering the power saving modes. Settings: Monitor and Ignore. Power Button Function This feature sets the function of the power button.
AMI® BIOS Setup Note: If you change these settings, you must reboot the system until it enters the operating system and then power off the system. By doing so, the changed settings will come into effect next time you power on the system. Power Again This item specifies whether you system will reboot after a power failure or interrupt occurs. Available options: Power Off Leaves the computer in the power off state. Power On Reboots the computer.
Chapter 4 PNP/PCI Configuration This section describes configuring the PCI bus system and PnP (Plug & Play) feature. PCI, or Personal Computer Interconnect, is a system which allows I/O devices to operate at speeds nearing the speed the CPU itself uses when communicating with its special components. This section covers some very technical items and it is strongly recommended that only experienced users should make any changes to the default settings.
AMI® BIOS Setup registers of both VGA devices to be identical. The setting must be set to Enabled if any non-standard VGA adapter card, such as MPEG card, installed in the system requires VGA palette snooping. DMA Channel 0/1/3/5/6/7 These items specify the bus that the system DMA (Direct Memory Access) channel is used. The settings determine if AMIBIOS should remove a DMA from the available DMAs passed to devices that are configurable by the system BIOS.
Chapter 4 Integrated Peripherals AMIBIOS SETUP - INTEGRATED PERIPHERALS (C)1999 American Megatrends, Inc.
AMI® BIOS Setup AC’97 Audio This item is used to enable or disable the onboard AC’97 (Audio Codec’97) feature. Selecting Auto allows the mainboard to detect whether an audio device is used. If an audio device is detected, the onboard AC’97 controller will be enabled; if not, the controller is disabled. Disable the function if you want to use other controller cards to connect an audio device. Settings: Disabled and Auto.
Chapter 4 Full-Duplex mode permits simultaneous two-direction transmission. HalfDuplex mode permits transmission in one direction only at a time. Settings: Half Duplex and Full Duplex. IR Pin Select Set to IRRX/IRTX when using an internal IR module connected to the IR (IR1 or IR2) connector. Set to SINB/SOUTB. when connecting an IR adapter to COM B. Parallel Port This field specifies the base I/O port address of the onboard parallel port.
AMI® BIOS Setup 9, 10 and 11. OnBoard Game Port The item specifies I/O port address for the onboard Joystick/Game port. Settings: Disabled, 200 and 208.
Chapter 4 Hardware Monitor Setup This section describes how to set the CPU FSB frequency, monitor the current hardware status including CPU/system temperatures, CPU/System Fan speeds, Vcore etc. Monitor function, such as “Chassis Intrusion” and “CPU Temperature”, is available only if there is hardware monitoring mechanism onboard. AMIBIOS SETUP - Hardware Monitor Setup (C)1999 American Megatrends, Inc.
AMI® BIOS Setup Chassis Intrusion (Optional) The field enables or disables the feature of recording the chassis intrusion status and issuing a warning message if the chassis is once opened. To clear the warning message, set the field to Reset. The setting of the field will automatically return to Enabled later. Settings: Enabled, Reset and Disabled. CPU Temperature, System Temperature, CPU Fan Speed, System Fan Speed, Vcore, Vio, + 5.0V, +12.0V, –12.0V, – 5.
Chapter 4 Load Optimal/Fail Safe Defaults The two options on the main menu allow users to restore all of the BIOS settings to the default Fail Safe or Optimal values. The Optimal Defaults are the default values set by the mainboard manufacturer specifically for the optimal performance of the mainboard. The Fail Safe Defaults are the default values set by the BIOS vendor for the stable system performance.
AMI® BIOS Setup When you select Load Fail Safe Defaults, a message as below appears: AMIBIOS SIMPLE SETUP UTILITY - VERSION 1.41 (C)1999 American Megatrends, Inc.
Chapter 4 Supervisor/User Password When you select this function, a message as below will appear on the screen: AMIBIOS SIMPLE SETUP UTILITY - VERSION 1.41 (C)1999 American Megatrends, Inc.
AMI® BIOS Setup Additionally, when a password is enabled, you can also have AMIBIOS to request a password each time the system is booted. This would prevent unauthorized use of your computer. The setting to determine when the password prompt is required is the PASSWORD CHECK option of the BIOS FEATURES SETUP menu. If the PASSWORD CHECK option is set to Always, the password is required both at boot and at entry to Setup. If set to Setup, password prompt only occurs when you try to enter Setup.
Chapter 4 IDE HDD AUTO Detection You can use this utility to AUTOMATICALLY detect the characteristics of most hard drives. AMIBIOS SETUP - STANDARD CMOS SETUP (C)1999 American Megatrends, Inc. All Rights Reserved Date (mm/dd/yyyy) : Thu Aug 02, 2001 Time (hh/mm/ss) : 00:00:00 TYPE Pri Master Pri Slave Sec Master Sec Slave SIZE CYLS HEAD PRECOMP LANDZ SECTOR MODE : AUTO : AUTO : AUTO : AUTO Floppy Drive A : 1.
AMI® BIOS Setup Save & Exit Setup When you want to quit the Setup menu, you can select this option to save the changes and quit. A message as below will appear on the screen. AMIBIOS SIMPLE SETUP UTILITY - VERSION 1.41 (C)1999 American Megatrends, Inc.
Chapter 4 Exit Without Saving When you want to quit the Setup menu, you can select this option to abandon the changes. A message as below will appear on the screen. AMIBIOS SIMPLE SETUP UTILITY - VERSION 1.41 (C)1999 American Megatrends, Inc.
Using 4-/6-channel Audio Function Appendix A. Using 4-/6-channel Audio Function Using 4-/6-channel Audio Function A The mainboard comes with C-Media 6-channel audio function, which allows you to attach 4 or 6 speakers for better space sound effect. The section will tell you how to activate 4-/6-channel audio function.
Appendix A Installing C-Media Drivers The mainboard is able to transform the audio connectors on the back panel from 2-channel to 4-/6-channel. To use the function, you need to install the C-Media drivers. To install C-Media drivers: 1. Insert the companion CD into the CD-ROM drive. The setup screen will automatically appear. 2. Click on C-Media Sound Drivers. 3. Follow the on-screen instructions to complete installation. 4. Restart the system. Note: For Windows NT4.
Using 4-/6-channel Audio Function Software Configuration To have 4-/6-channel audio work, you must set appropriate configuration in the C-Media software application. To set the multi-channel configuration: 1. Click the C-Media Mixer icon from the window tray on the bottom. 2. The following screen appears. Click the indicated button. Click here 3. The “Advanced” window appears. 4. Select 5.1 for 6-channel or 4 for 4-channel audio output. 5. Click OK.