User Guide Release Management for Visual Studio 2013
ABOUT THIS GUIDE The User Guide for the release management features is for administrators and users. The following related documents for release management are also available: Installation guide, which describe setup and configuration of release management components. Release Notes, which describe the new and changed features and fixed problems in the latest version of the software This document is provided “as-is”.
Contents ABOUT THIS GUIDE ................................................................................................................................................2 1 2 OVERVIEW ........................................................................................................................................................8 1.1 INTRODUCTION .............................................................................................................................................8 1.
2.10.3 Configure Component in a Release Template ................................................................................... 23 2.10.4 Configure Security in a Release Template......................................................................................... 23 2.11 2.11.1 Open a Release Template .................................................................................................................. 23 2.11.2 Create Release from Release Template ..............................
.2.1 Viewing Component Details .................................................................................................................. 43 5.2.2 Release Stage ......................................................................................................................................... 44 5.2.3 Approving a Release .............................................................................................................................. 44 5.2.4 Rejecting a Release ............
Configure Virtual Directory ............................................................................................................................... 69 Remove Virtual Directory ................................................................................................................................... 70 MS-SQL ..................................................................................................................................................................
Remove Section ................................................................................................................................................... 81 Create Key and Value ......................................................................................................................................... 81 Modify Key and Value......................................................................................................................................... 81 Remove Key and Value ..
1 OVERVIEW 1.1 Introduction Release management is a continuous deployment solution that makes release cycles repeatable, visible and more efficient by automating deployments through every environment from Team Foundation Server (TFS) until production. With pre-defined release paths, release management triggers deployments upon approval, assembles all the components of your application, moves them to the target servers and installs all of them in one transaction.
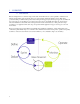
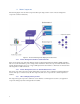
1.2 Main Components The following figure shows the main components that require deployment in order for release management components to function effectively. Figure 1 –Release Management Deployment Overview 1.2.1 Release Management Client for Visual Studio 2013 There are two Client components. The Windows client is a Windows Presentation Foundation (WPF) application that serves as the main interface point to manage release information. This is the component with which most users interact.
The deployment agent can be configured in the Client by choosing Administration, Settings, Deployer Settings. The following options are available: Report status to server every x seconds – Used to define the interval for running the Heartbeat service. The Heartbeat service is used to communicate with the Server to report the status of the deployment agent and run various tests. Look for packages to deploy every x seconds – Used to define the interval for running the Deployment service.
2 CONFIGURATION 2.1 First Time Configuration Using release management features for the first time can seem a bit difficult to grasp. In order to help with these first steps, there is a built-in guide. Each time you get to a screen to create an object which needs other steps to be completed (pre-requisites), the guide will be presented to let you know what you are missing.
Maximum Resource File Size for Tools – Maximum size (in KB) of a resource attached to a Tool. Default Component Deployment Timeout – Default deployment timeout used in new components. TFS-Triggered Deployment Timeout – Maximum time allowed to complete a deployment that has been triggered by a TFS build. If the threshold is reached, the deployment is considered a failure.
2.4 2.4.1 Configure Groups “Everyone” The group named Everyone is a reserved group automatically added by the system. Some security parameters may be modified within this group.
2. Double-click the group you want to start editing. 3. Edit the group name and description. 4. In the Security tab, you can configure permissions for this Group to perform different actions in the system. 5. In the Stage Type Security tab, you can identify which Stage Type this Group has access to with its specific permissions. 6. Choose the Save & Close button in the Security Groups form title bar to persist your changes. 2.5 Configure TFS Connections 1.
2.6.2 Configure Technology Types Technology types are informational values that allow the user to identify what kinds of technologies are used in your environments and servers. That information is not required in the process of release management. 1. In the main menu, choose Administration. Then, in the sub-menu, choose Manage Pick Lists. The list of all available pick lists will appear. 2. In the list of pick lists, choose Technology Type.
6. In the Resources section, you can enter one or more resources (executables, scripts, etc.). These resources will then be available to be used in the command field described previously. 2.8 2.8.1 Configure Environments and Servers Create a new Environment 1. In the main menu, choose Configure Paths. Then, in the sub-menu, choose Environments. The list of active environments will appear. 2. Choose the New button in the Environments list title bar.
Although servers can be registered in the system manually, we recommend they are configured using the Scan for New feature (see next section). 5. Select the server owner from the Owner dropdown. 6. Select the IP Address Type; either Server or Gateway. This will allow release management to recognize the deployment agent based on its DNS Name and the IP Address that it communicates. IP Address Type There are two ways a deployment agent can indicate its uniqueness in a network.
2.8.3 Scan for new Servers If you have installed deployment agents before creating the corresponding Servers in release management, you can “scan” for them. Each deployment agent communicates its presence and shares certain details with the release management Server. The list of Unregistered Servers can be viewed from the Servers List view. 18 1. In the main menu, choose Configure Paths. Then, in the sub-menu, choose Servers. The list of active servers will appear. 2.
c. 2.9 Select whether to use the Server or Gateway IP Address to uniquely identify the Server across multiple networks. Configuring Release Paths Release paths are used to define the full path for distributing the release for diverse scenarios. For example, the release path for a customer emergency might not be the same as the one for standard development. This also allows the definition of who are the acceptance, deployment, validation and approvers of each stage. 1.
11. Choose the Save & Close button in the Release Path form title bar to persist your changes. The new release path will now appear in the list of active release paths. 2.10 Configuring Release Templates and Components 2.10.1 Create a new Release Template A Release Template is the definition of the workflow used for releasing an application. 1. In the main menu, choose Configure Apps. Then, in the sub-menu, choose Release Templates. The list of active release templates will appear. 2.
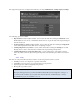
5. 6. Specify how the component gets the files used during the deployment by selecting one of the following 3 options: i. Builds with application: When ‘Builds with application’ is selected, the component is integrated with Team Build and inherits the Team Project and Build Definition from the release template. At release time, those fields will be used to provide a selection of builds from which a specific package to release will be selected. ii.
9. Select the configuration variable replacement mode from the Variable Replacement Mode dropdown. Variable Replacement Mode The Variable Replacement Mode determines when the configuration variable tokens will be replaced with their values during a deployment. The following options are available: Never, Before Installation, After Installation and, Before and After Installation.
10. Choose the Add button on top of the list of configuration variables in order to create a new configuration variable for the component. Enter the configuration variable name and description in the Name and Description column respectively. Repeat as necessary. 11. Choose the Save and Close button in the Component form title bar. The new component will now appear in the list of components. 12. Repeat the steps in this section to add more components to the release template. 2.10.
Note: If you cannot find the release template in the list, it may be because its status is inactive. This is the default status when creating a new release template. Change the status filter in the Release Templates list title bar from Active to Inactive. 2.11.2 Create Release from Release Template Releases are instances constructed from the definition created during the configuration of a release template. 3. Choose the New Release button in the Release Template form title bar.
2.12 Deploy a Release 2.12.1 Open a Draft Release We are assuming in this section that a release has already been configured. 1. In the main menu, choose Track Releases. Then, in the sub-menu, choose Releases. The list of In Progress releases will appear. 2. Change the status filter in the Releases list title bar from In Progress to Draft. 3. Double-click the release you want to start. 2.12.2 Start a Release We are assuming in this section that the release status is Draft. 4.
Note: When debugging to find the reason why a deployment failed, it can be helpful to execute the installation command (which can be found in the Log) manually in a command prompt on the targeted server. 12. Choose the Retry Failed Deployment button in the Release form title bar. 13. Go back to the Log tab and verify that the deployment was successful. 2.12.5 Validate Deployment We are assuming that the release has been deployed successfully into the current stage environment. 14.
2.13.2 Visual Studio 2010, Visual Studio 2012 and Visual Studio 2013 When using Visual Studio 2010, Visual Studio 2012, or Visual Studio 2013, release management provides its own template (select the proper version of the Build template corresponding to your TFS Version). This build template contains the logic needed to trigger a Release from a build. This template also contains the logic to tokenize your configuration files.
2.14.2 Updating Metadata Argument Open the argument Metadata. Add the 3 entries found in Metadata collection of ReleaseDefaultTemplate.xaml file. 2.1 - Configurations to Release Leave the ConfigurationsToRelease property blank. 2.2 - Release Build Copy and paste this description: Set this to True to indicate you want this build to be released. 2.3 - Release Target Stage Copy and paste this description: Specify the Target Stage for the Release.
3 - Initialize Tokens logic From the ReleaseDefaultTemplate.xaml, navigate to and copy the Initialize Tokens sequence. Paste it in your Build Template after the sequence Initialize Workspace and before the If condition If CreateLabel.
From the ReleaseDefaultTemplate.xaml, navigate to and copy the If ReleaseBuild is Set sequence. Paste it in your Build Template after the sequence If BuildSettings.HasProjects and before the sequence If Not Disable Tests. 5 - Save Save your Build Template. Note: When using the functionality to automatically trigger Releases from a Build, you will need to install Release Management Client for Visual Studio 2013 on your TFS Build Server. Also, after installation, restart the TFS Build Services.
3 RELEASE TEMPLATES 3.1 Overview The Release Template allows for the definition of the sequence used to orchestrate the deployment of your application components. It also allows for the selection of all sorts of actions to be executed during a deployment process. The sequence can be configured independently for every stage defined in the associated release path. A Release Template can be created from the Release Templates view by selecting the New option. 3.
3.3 Deployment Sequence Following the creation of a Release Template, you are placed in the Deployment Sequence view. The Toolbox contains a list of all activities that can be added to the sequence. This can be done via a simple drag-and-drop operation. The Toolbox is organized into categories. There are static / system categories. The System Categories are Control Flow, Servers, and Components. The remaining Categories are extracted from the Actions.
If any of the preceding rules is not met, it will not be possible to activate the Release Template and therefore Releases cannot be created using this Release Template. In addition, only Component or Action activities can be temporarily disabled or skipped from execution. This can be done by choosing the activity’s icon image. Skipping a Component or Action can also be done when defining a Release. Therefore, the Release Template can be the default, while the Release can be the override for such a feature.
3.4 Configuration Variables Components and Actions can be dynamically configured by providing values specific to a Stage. This is done via Configuration Variables, which are defined during the configuration of a Component / Action. Specifying the values of a Configuration Variable can be done in 2 ways: Inline, within a Component / Action activity inside the Deployment Sequence; or globally, within the Configuration Variables panel at the bottom, left of the view.
The Configuration Variables panel is useful when you want to compare values across multiple Stages. You can also use it to manage the values (i.e. copy / paste).
3.5 Copying a stage to another It is possible to copy the entire deployment sequence of a stage onto another one. This is done by using the contextual menu of the stage. To access it, right-click the stage to copy and then right-click again on the destination stage to paste it.
2. When a user opens a release template, he will be informed that it is locked by someone else. The user can still open the release template, but it will be put in read-only mode. Sometimes, different users will want to work on the same release template. One way to achieve it would be to make a copy of the release template, edit that copy and either save it for future edits or copy/paste the relevant information from a deployment sequence to the original release template.
3.7.2 Example 2 During normal execution, if ‘Create Application Pool’ succeeds, then ‘Create Web Site’ fails, activities contained in first Rollback, second Rollback and Rollback Always are marked as to be executed during the rollback mode execution.
4 RELEASES 4.1 Overview Releases represent the physical act of deploying your application through a Release Path until the Target Stage is reached. Throughout this process, release management performs a number of checks to ensure that components are only installed on a Server when the owner of the corresponding Environment allows it. A Release is based on a Release Template. A Release can be created from the Releases view under Track Releases by selecting the New option.
When selecting a Release Template that is associated with a Release Path that contains more than one Stage, you can then also select the Target Stage. In cases where the Release Path contains multiple Stages, the Target Stage allows you to override the default behavior of publishing a Release through all Stages. You may, for example, only want to publish your Release up to your User Acceptance Test (UAT) Stage but not all the way to Production.
4.4 Deployment Log The Deployment Log can be accessed by selecting the View Log option. In this view you get all the already completed or currently processing steps. Setting the Include Future Steps flag causes the view to show steps that have yet to be executed. Selecting Details (button under the Details column) displays the next level information for the corresponding Deployment Log Entry. Not all entries have more details to show. 4.
5 RELEASE EXPLORER 5.1 Overview For approvers, a web client called Release Explorer is available. To access your Release Explorer, request the URL from your application administrator. On a default installation, the URL would be in the form http[s]://[:port]/ReleaseManagement.
5.2 5.2.1 Operations Viewing Component Details To view the Component Details for a Release, 43 1. Choose the Component button. This will open the Component view. 2. In the Component view you will see a list of all the components used in your current release with their build associations.
5.2.2 Release Stage To retrieve the details of a Release Stage: 1. Choose the blue square, which indicates the active stage. This will open the Current Stage view. 2. The Current Stage view shows all the steps that have been or will be executed. 3. Selecting previous stage will navigate to the previous stage. Similarly, selecting next stage will navigate to the next available stage in the Release Path. 5.2.3 Approving a Release To approve a Release: 44 1.
4. Approve the Release by choosing the Approve button. 5.2.4 Rejecting a Release To reject a Release: 1. Select the Release you want to reject by choosing it. 2. Choose the Reject button. The Rejection Confirmation dialog appears. 3. On the Rejection Confirmation dialog, observe the following: a. 4. 45 The Do you want to proceed? text box is used to put a comment for the action. Reject your release by choosing the Reject button. Reject the Release by choosing the Reject button.
5.2.5 Reassigning a Release To reassign a Release: 1. Select the release you want to reassign by choosing it. 2. Choose the Reassign button. The Reassign Request dialog appears. 3. Choose the User/Group to whom you want to reassign the release. 4. Reassign your approval by choosing the Reassign button. 5.3 Previously Approved Releases The Previously Approved view shows a list of all previously acted on releases for a specific user.
Appendix 47
A1. SECURITY MANAGEMENT Release Path Security Introduction The release path can be secured to control who can view, edit or manage security on them. Security definition of the release path is a “most permissive” kind of security. For example, if a user is in 2 different groups and a release path is accessible for one of the 2 group and not for the other group, this user will have access to this release path.
5. 6. 7. Choose the Add button to access the group lookup and select one or more group (hold CTRL key to select more than one). Select View, Edit or Manage Security permissions as needed for that group. Note that if a group has the Edit permission, he will have access to the View as well. Choose the Save & Close button of the release path to save all security changes. Define “Can Create Release Path” Security through Groups 8. Navigate to Administration, Groups. 9. Open or create a New group 10.
What is affected? Release Paths Only Release Paths accessible with the View or Edit permission for the user will be visible in the list. When a user opens a Release Path which is not allowed in Edit, it will be in Read-Only and saving will not be allowed. If the user is a release manager, all release paths will be visible and editable. Also, if the user is not part of a group that has access to the Can Create Release Path security, the New button will not be accessible.
3. In the properties of the release template, look under the Security section. 4. By default, the system’s reserved group named Everyone will be checked with View, Edit, Can Release and Manage Security permissions. Since the security is “most permissive,” you will have to clear the View, Edit, Can Release and Manage Security permissions of this group to be able to control manually over other groups.
17. Choose the Security tab. 18. By default, the system’s reserved group named Everyone will have Can Create Release Template permissions. Since the security is “most permissive,” you will have to clear the Can Create Release Template permission of this group to be able to control manually over other groups. 19. Choose the Add button to access the group lookup and select one or more group (hold CTRL key to select more than one). 20. Choose Can Create Release Template permissions as needed for that group.
What is affected? Release Templates Only release templates accessible with the View or Edit permission for the user will be visible in the list. When a user opens a release template which is not allowed in Edit, it will be in Read-Only and saving will not be allowed. If the user is a release manager, all release templates will be visible and editable. Also, if the user is not part of a group that has access to the Can Create Release Template security, the New button will not be accessible.
Track Release From the release list’s advanced filter (button available. ), only the release template available in View or Edit will be When creating a new release, only Release Templates configured with the Can Release permission for the user will be visible in the dropdown list of the Categorization tab. If the user is a release manager, all release templates will be visible. Release Security Introduction The releases can be secured to control who can view them.
What is affected? Track Releases A release will be visible for a user only if this user has access to its release template or is an approver or is a release manager. Release Traffic Overview When consulting the release history, releases will be visible for the user only if this user has access to its release template or is an approver or is a release manager.
Release Explorer (Web) A release will be visible for a user only if this user has access to its release template or is an approver or is a release manager.
Stage Type Security Introduction The Stage Type can be secured to control who can edit the Configuration Variables, the Target Servers, the Approver Selection and which Environments can be selected. Security definition of the Stage Type is “most permissive.” For example, if a user is in 2 different groups and Edit is enabled in one of the 2 groups but not in the other group, the user will be considered to have the rights to edit.
Control variables, target servers, approvals and environment permissions 1. Navigate to Administration, Groups. By default, the system’s reserved group named Everyone will have access to both Edit Values and Target Servers and Edit Approvals and Environment permissions for All Stage Types.
What is affected? Release Paths Only environments allowed by the selected stage type will be available in the Environment dropdown list. Also, if the user does not have access to Edit Approvals and Environment permission, all stage information will be readonly. If the user is a release manager, all information will be editable.
Prerequisites Here are some prerequisites in order to use this security level: You must login using a Release Manager account; Security Groups are only available to Release Managers. Define Security 1. 2. 3. 4. Navigate to Administration, Groups. Open or create a New Group. In the Security section, select or clear the Can Manage Environment check box. Be sure to remove the Can Manage Environment permission to the Everyone group or every user will be able to manage all environments.
Prerequisites Here are some prerequisites in order to use this security level: You must login using a Release Manager account since Inventory is only available to Release Managers. Define Security 1. 2. 3. 4. Navigate to Administration, Groups. Open or create a New Group. In the Security section, select or clear the Can Manage Inventory check box. Be sure to remove the Can Manage Inventory permission to the Everyone group or every user will be able to manage the inventory.
A2. ACTIONS CATALOG Windows Azure Start a Windows Azure VM This action allows users to start an existing VM in Windows Azure. It will fail if the VM does not exist or is not accessible. The configuration variables of this action are: Parameters Mandatory? Description ServiceName Yes The name of the Windows Azure service into which the VM exists. Name Yes The name of the Windows Azure VM to start. Stop a Windows Azure VM This action allows users to stop an existing VM in Windows Azure.
Parameters Mandatory? Description IdentityUserDomain No Domain of the user to use as the identity of the application pool. This parameter is allowed only for IIS 7.0, 7.5, 8.0, and 8.5. If not defined and the “IdentityUserName” is defined, the user will be considered as a local user (i.e. .\localuser). IdentityUserName No User name to use as the identity of the application pool. This parameter is allowed only for IIS 7.0, 7.5, 8.0 and 8.5.
Parameters Mandatory? Description IsAutoStart No Flag that indicate if the application pool must be started automatically. This parameter is allowed only for IIS 7.0, 7.5, 8.0 and 8.5. The allowed values are: - 1 or True: The application pool will be started automatically when Windows starts. 0 of False: The application pool will not be started automatically when Windows starts. Configure Application Pool This action allows users to configure an existing application pool under IIS, 7.5, 8.0 and 8.5.
Parameters Mandatory? Description RecycleKbMemory No The maximum number of Kb of memory that be used before the application pool is recycled. RecycleAfterMinutes No A fixed number of minutes after which the application pool is recycled. RecycleFixedTime No A fixed time at which the application pool is recycled. The required format is HH:MM (i.e. 23:58 or 01:23). StartMode No The start mode to be used for the application pool. This parameter is allowed only for IIS 8.0 and 8.
Parameters Mandatory? Description AppPoolName Yes The name of the application pool to start. Stop Application Pool This action allows users to stop an existing application pool under IIS 7.0, 7.5, 8.0 and 8.5. It will fail a deployment if the application pool does not exist but will not fail if the application pool is already stopped. The configuration variables of this action are: Parameters Mandatory? Description AppPoolName Yes The name of the application pool to stop.
Parameters Mandatory? Description SiteName Yes The name of the web site to configure. PortNumber No The port number to use for the web site to configure. PhysicalPath No The complete physical path of the web site to configure. AppPoolName No The name of the application pool to use for the web site to configure. IsPreloadEnabled No Flag that indicate if the preload functionality is enabled for the web site.
Restart Web Site This action allows users to restart an existing web site under IIS 7.0, 7.5, 8.0 and 8.5. It will fail a deployment if the web site does not exist but will not fail if the web site is already stopped. The configuration variables of this action are: Parameters Mandatory? Description SiteName Yes The name of the web site to restart. Create Web Application This action allows users to create a new web application under IIS 7.0, 7.5, 8.0 and 8.5.
Parameters Mandatory? Description IsPreloadEnabled No Flag that indicate if the preload functionality is enabled for the web application. The allowed values are: - 1 or True: Preload is enabled 0 of False: Preload is disabled Remove Web Application This action allows users to remove an existing web application under IIS 7.0, 7.5, 8.0 and 8.5. It will NOT fail a deployment if the web application does not exist.
Parameters Mandatory? Description WebApplicationName No The name of the web application under which the virtual directory resides. If not defined, the Root web application of the web site will be used. PhysicalPath The complete physical path of the virtual directory. No Remove Virtual Directory This action allows users to remove an existing virtual directory under IIS 7.0, 7.5, 8.0, and 8.5. It will NOT fail a deployment if the virtual directory does not exist.
Backup SQL Database This action allows users to backup an existing SQL Server database. The configuration variables of this action are: Parameters Mandatory? Description ServerName Yes The server name where the SQL database resides. DatabaseName Yes The SQL database name to backup. Path Yes The path and file name where to put the backup file (i.e. \\server\filename.bak). Restore SQL Database This action allows users to restore a SQL Server database by using an existing backup file.
Parameters Mandatory? Description FileFolderName Yes The file(s) or folder name and path to delete. Wildcards can be used (i.e. c:\temp\*.log). Move File or Folder This action allows moving a file(s) or a folder from one location to another. The configuration variables of this action are: Parameters Mandatory? Description FileFolderName Yes The source file(s) or folder to be moved. Wildcards cannot be used (i.e. c:\temp\*.log). DestinationName Yes The destination path where to move.
Parameters Mandatory? Description System No Allow the user to set or reset the file(s) or folder system attribute. - Hidden No + : Set the flag - : Reset the flag Any other value : Let the flag as it is Allow the user to set or reset the file(s) or folder hidden attribute. - + : Set the flag - : Reset the flag Any other value : Let the flag as it is Modify File(s) or Folder Owner This action allows modification of the owner of a file(s) or folder.
Parameters Mandatory? Description VariableValue No The new value to give to the variable. If no value is set, the variable will be deleted. Delete Environment Variable This action allows deletion of an environment variable at system level. It will not fail if the environment variable does not exist.
Delete Windows Registry Key This action allows deleting an existing registry key. It will fail if the registry key does not exist. The configuration variables of this action are: Parameters Mandatory? Description RegistryKey Yes OperatingSystemType No The complete name of the registry key to delete (i.e. HKLM\Software\KEYTODELETE). The operating system type in which to delete the registry key. The allowed values are: - 32: The key will be deleted in the 32-bit registry.
Parameters Mandatory? Description OperatingSystemType No The operating system type in which to create the registry value. The allowed values are: - 32: The value will be created in the 32-bit registry. If not specified, this will be the default. 64: The value will be created in the 64-bit registry. Modify Windows Registry Value This action allows modifying an existing registry value. If the registry key or the registry value specified does not exist, they will be created.
Delete Windows Registry Value This action allows deleting an existing registry value. It will fail if the registry value does not exist. The configuration variables of this action are: Parameters Mandatory? Description RegistryKey Yes The complete name of the registry key that contains the value (i.e. HKLM\Software\MYKEY). RegistryValue Yes The name of the registry value to be deleted. OperatingSystemType No The operating system type in which to delete the registry value.
Parameter Variable Mandatory? Description -command N/A Yes Fixed value ./WindowsProcess.ps1. -ProcessName Yes The name of the Windows process to kill. -UserName No The user account running the process. If not specified, the process will be killed for all users. -IsKillProcessTree No Flag that indicates if the process tree must be killed.
Configure Service This action allows users to configure an existing Windows service. It will fail if the service to configure does not exist. The configuration variables of this action are: Parameters Mandatory? Description ServiceName Yes Name of the service to configure. BinPath No Binary path and name of the service. DisplayName No Display name that will be used for this service. Description No Description that will be given to the service.
Parameters Mandatory? Description ServiceName Yes Name of the service to delete. Start Service This action allows users to start an existing Windows service. It will fail if the service to configure does not exist but will not fail if it is already started. The configuration variables of this action are: Parameters Mandatory? Description ServiceName Yes Name of the service to start. Stop Service This action allows users to stop an existing Windows service.
Parameters Mandatory? Description NewSectionName No The new section name to affect. If not specified, the keys of the old section will be put under the root section (all keys that are at the beginning of the file before the first section is considered in the root). Remove Section This action allows users to remove a section and all its keys and values in an INI file. If the INI file specified does not exist, the action will fail.
Parameters Mandatory? Description SectionName No The section name where the key is to be modified. If not specified, the root section will be considered (all keys that are at the beginning of the file before the first section is considered in the root). KeyName Yes The name of the key to modify. KeyValue No The new value to affect to the key. If not specified and the NewKeyName is specified, the system will use the actual value.
A3. TOOLS CATALOG Database Deployment Agent – Execute Script This tool allows users to execute a SQL query in a specific database. It is based on the standard sqlcmd executable distributed with SQL Server. There are a lot of possible parameters for this executable but we will list only the one used for this tool. Please refer to the sqlcmd documentation for further information about this executable.
Parameter Variable Mandatory? Description -i Yes if single items Item file. If specified, the item name must be provided (-n). This parameter is used when a single item must be deployed. If so, the item location (-l) and folder (-f) parameters must not be present. -n Yes if single items Item name. If specified, the item file must be provided (-i). This parameter is used when a single item must be deployed. If so, the item location (-l) and folder (-f) parameters must not be present.
Parameter Variable -PrevProductName Mandatory? Description No Allow the user to specify the previous product name to be uninstalled prior to installing the MSI. By default, the system will use the product name in the MSI to install. XCopy Deployment Agent This tool allows users to copy a package location to a specific destination. It is based on a custom release management batch script.
Windows Registry Manager This tool allows users to manipulate registry information in Windows. It is based on a custom release management PowerShell script. The configuration variables of this tool are: Parameter Variable Mandatory? Description -command N/A Yes Fixed value ./ManageWindowsRegistry.ps1. -Action Action Yes The action to be performed.
Parameter -ValueType Variable Mandatory? Description No Type of the value being affected.
Windows Common IO This tool allows users to perform common IO under Windows. It is based on a custom release management PowerShell script. The configuration variables of this tool are: Parameter Variable Mandatory? Description -command N/A Yes Fixed value ./ManageWindowsIO.ps1.
Parameter Variable Mandatory? Description -OwnerDomain No Represent the domain of the new owner to affect to the file or folder. -OwnerName No Represent the name of the new owner to affect to the file or folder. Windows Services Manager This tool allows users to manipulate Windows services. It is based on a custom release management PowerShell script. The configuration variables of this tool are: Parameter Variable Mandatory? Description -command N/A Yes Fixed value ./ManageWindowsServices.
Parameter Variable -UserName Mandatory? Description No User name that will be used for the credentials to start the service (must be in the form DOMAIN\USER). If provided, the parameter – Password must also be provided. If not provided, the LocalSystem account will be used by default. Optional for Create and Config actions and ignored by all others. To reset the credentials to the LocalSystem, enter LocalSystem as the user and "" as the password.
Parameter Variable Mandatory? Description /TargetDatabaseName: DatabaseName Yes The name of the SQL Server database where to publish. IIS Deployment Agent This tool allows users to manipulate IIS objects and settings. It is based on a custom release management executable. The configuration variables of this tool vary depending of the type of actions to perform.
Parameter Variable Mandatory? Description -apIdentUserPassword No The password of the user to use as the identity of the application pool. This parameter is allowed only for IIS 7.0, 7.5, 8.0 and 8.5. -apNetVers No The .NET Framework version to use for the application pool. This parameter is allowed only for IIS 7.0, 7.5, 8.0 and 8.5. The allowed values are: v1.0, v1.1, v2.0, v4.0 -apPipelineMode No The managed pipeline mode to use in the application pool.
Parameter Variable Mandatory? Description -AutoStart No Flag that indicate if the application pool must be started automatically. This parameter is allowed only for IIS 7.0, 7.5, 8.0 and 8.5. The allowed values are: - - -log 1 or True: The application pool will be started automatically when Windows start. 0 of False: The application pool will not be started automatically when Windows start.
Parameter Variable -AutoStart Mandatory? Description No Allowed on IIS 7.0, 7.5, 8.0 and 8.5. Flag that indicates if the web site must be automatically started. Optional in Create and Configure actions. Allowed values are: - -log No 1 or True: Start Automatically 0 or false: Do not Start Automatically A log file with this given name will be generated in the Physical Directory.
Parameter Variable -Action Mandatory? Description Yes Indicate the action to be performed: - CreateVirtualDirectory ConfigureVirtualDirectory DropVirtualDirectory -vd Yes Name of the virtual directory. -pd No* The full path of the virtual directory. Mandatory for create action and optional in configure. -sn No Web site name. If not specified, the system will use Default web site when creating a new virtual directory. Optional in Create and Configure actions. -ws No Web application name.
XBAP Deployer This tool allows users to deploy XBAP application. It is based on a custom release management executable. The configuration variables of this tool are: Parameter Variable Mandatory? Description -pn ProjectName Yes The XBAP project name to be deployed. -d Installation Path Yes The path where to install the XBAP application. -ml No The complete path to the mage utility executable. If not defined, the tool will use the one provided as a resource in the tool.
Parameter Variable Mandatory? Description -SuiteId SuiteId Yes The identifier of the Teat Plan under which the tests must run (Unique ID as defined in Test Manager). -ConfigId ConfigId Yes The identifier of the Test Configuration under which the tests must run (Unique ID as defined in Test Manager). -Collection TfsCollection Yes The Team Foundation Server Collection URL for which the Automated Tests will execute.
Parameter Variable Mandatory? Description -BuildNumber No* Allows the user to specify the build number whose drop location will contain the Automated Tests. This parameter can only be used under MTM 2012. If defined, the BuildDefinition parameter must also be specified. If not specified, the field "build," visible in the details of a test run, will not be affected by the test run. -SettingsName No Allows the user to specify the settings to use for the test run.
TFSCollection $(TfsUrlWithCollection) TeamProject $(TeamProject) INI File Manager This tool allows users to alter the content of an INI file and can create a new INI file if specified. It is based on a custom release management executable.
Parameter Variable Mandatory? Description -NewKeyName No The new name to give to the key. Used only in the ModifyKeyValue action. -CreateFileIfNotExists No Indicate to the tool that a file must be created if it does not exist. Windows Process This tool allows users to kill a Windows Process. The configuration variables of this tool are: Parameter Variable Mandatory? Description -command N/A Yes Fixed value ./WindowsProcess.ps1. -ProcessName Yes The name of the Windows process to kill.