
User guide


49
5. Choose the Add button to access the group lookup and select one or more group (hold CTRL key to select
more than one).
6. Select View, Edit or Manage Security permissions as needed for that group. Note that if a group has the
Edit permission, he will have access to the View as well.
7. Choose the Save & Close button of the release path to save all security changes.
Define “Can Create Release Path” Security through Groups
8. Navigate to Administration, Groups.
9. Open or create a New group
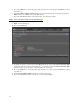
10. Choose the Security tab.
11. By default, the system’s reserved group named Everyone will be checked with Can Create Release Path
permissions. Since the security is “most permissive,” you will have to clear the Can Create Release Path
permission of this group to be able to control manually over other groups.
12. Choose the Add button to access the group lookup and select one or more group (hold CTRL key to select
more than one).
13. Select Can Create Release Path permissions as needed for that group.
14. Choose the Save & Close button of the group to save all security changes.