EA SE EL R TP C Impero Education Pro Installation Guide © 2014 Impero Solutions Ltd. www.imperosoftware.
Impero Education Pro Installation Guide Quick Start Guide EA SE table of contents Minimum System Requirements How to verify if you have the correct .NET Framework installed Installing .NET 3.
Impero Education Pro Installation Guide 1 Quick Start Guide This guide will take you through the process of installing and registering the Impero server and deploying the Impero clients. We have also included some advanced troubleshooting topics to answer your common questions. 1.1 Minimum System Requirements EA SE Impero Server: Microsoft Windows XP SP3, Vista, Windows 7, Windows Server 2003/2008/2012 Microsoft .NET Framework 3.5 SP1 32 Bit and 64 Bit operating systems Windows Installer 3.5 2.
Impero Education Pro Installation Guide Please refer to Microsoft's Server documentation for official procedures as those above are intended for demonstration purposes only. Microsoft Server 2003 Control Panel > Add/Remove Programs Under installed programs verify you have .NET 3.5.1 SP1 installed. If you do not have the correct .NET Framework installed then please click the button at the top of the page or visit the Microsoft website.
Impero Education Pro Installation Guide 1.4 Download Impero Software You will require an activation code to register and download Impero software. If you do not already have an activation code you may request one from our website. EA SE To download Impero software, please visit the download section of our website. You will need to enter your email address and the activation code.
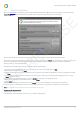
Impero Education Pro Installation Guide 1.5 Server Installation EL EA SE Once your download has completed, locate the downloaded file and extract it. Open the extracted folder, and run the file called ImperoSetup.exe located in the ImperoSetup folder. This will open the 'Impero Setup' window (Image 3): Image 3 - Impero Setup This window will tell you that Impero requires the install of two applications - Impero Server and Impero Client.
Impero Education Pro Installation Guide Image 3.1 - Impero Server Icon EL EA SE 2. You will then see an 'Introduction' window explaining the registration process. Please read this window, and then click on 'Next'. 3. Please enter the details that you are prompted for, and click on 'Next' (Image 3.2) Image 3.2 - Impero Server Registration R 4. On the following screen, enter your Activation Code (which you earlier used to download the Impero software package) and a desired password.
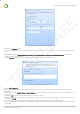
EA SE Impero Education Pro Installation Guide Image 3.3 - Impero Server Activation Image 3.4 - Impero Activation Advanced Settings C TP R EL 5. If the registration is successful, please skip ahead to Step 16. If the Impero Server failed to register, please continue to Step 6. 6. If your Impero Server failed to register, click on 'Advanced Settings' (Image 3.4) 7. If you are using a Proxy Server, click on 'Proxy Settings'. Enter the relevant details and click on 'OK' (Image 3.
EA SE Impero Education Pro Installation Guide Image 3.5 - Impero Server Advanced Proxy Settings EL 8. Click on the 'Register' button 9. If the registration is successful, please skip ahead to Step 16. If the Impero Server still failed to register, please continue to Step 10. TP R 10. Tick the box next to 'Cannot Register Impero? Try registering Impero using your default web browser', located under Advanced Settings (Image 3.3). 11. Click 'Register'.
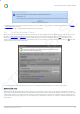
Impero Education Pro Installation Guide EA SE Image 3.7 - Impero Access Details 19. The first screen you see is the License Tab where you can see details of your license. For further details, please see our Impero Server Guide (PDF format). 20. You are now ready to install the Impero Client across your network. 1.6 Installing Windows Clients TP R EL Once your Impero Server has been installed, you are then able to start installing the Impero Client.
Impero Education Pro Installation Guide EA SE Image 4.1 - Client Installed Option 2: Install Remotely This will open the 'Impero - Remote Deploy MSI' wizard (Image 4.2) which gives you three options with which you can deploy the Impero Client to your network. First you must select the desired computers to install the Impero Client to. You can do this a number of different ways; Found Computers, Manual Add and Add Domain.
Impero Education Pro Installation Guide EA SE This allows you to enter a starting IP Address and an ending IP Address (Image 4.3). The 'Impero - Remote Deployment' wizard will then try to install the Impero Client to every IP Address in that range. Image 4.3 - Manual Add Any entries that you have added using either of these methods will then load a list of the Computer Names/IP Addresses into the right-hand panel of the 'Impero - Remote Deploy MSI' window.
Impero Education Pro Installation Guide Local Account: Username: Administrator Password: password Domain Account: Username: Domain\Administrator Password: password EA SE On the dialogue box 'Impero - Choose MSI', select 'Browse' to locate the ImperoClientSetup.msi. This file must be local to this machine as the MSI deployment tool does not support the use of shared directories. Leave the 'Enter Parameters' dialogue box blank as Impero Client already has the parameter silently built-in. Click 'OK'.
Impero Education Pro Installation Guide Q. Can I include the Im pero Client in a default im age that can be pushed out to the rest of the netw ork ? A. Yes, Impero can be installed on a master image that then can be pushed out to the rest of the network. Impero will not require any additional configuration settings once it has been installed on the image. Q. W hat if w e use m ultiple VLAN 's on our netw ork ? A. Impero supports multiple VLAN's.
Impero Education Pro Installation Guide 1.8 Starting the Impero Console To begin using Impero, locate the 'Impero Console' shortcut icon (Image 6) on a Windows desktop and double click. Alternatively, in the system tray locate the Impero icon (Image 6.1), right-click and then select 'Open Impero Console'. EA SE Image 6 Desktop Icon Image 6.1 - System Tray Icon You may be presented with the password entry box* (Image 6.2), or the Impero console will open (Image 6.3).
Impero Education Pro Installation Guide 2.1 Reactivating Your Server EA SE If you receive the error message 'Your Impero Server needs registering or your trial period has expired' (Image 7), please follow the steps below. Image 7 - Impero Cannot Run 1. Open your Impero Server to verify if this is correct. If so you will need to reactivate your license first. 2. If you need to re-register your Impero Server, you will need to log in to our website. 3.
Impero Education Pro Installation Guide W indows T erm inal S erver 2003: http://technet.m icrosoft.com /en-us/library /cc781026(v=W S .10).aspx W indows T erm inal S erver 2008: http://technet.m icrosoft.com /en-us/library /cc742815(v=W S .10).aspx VMware View Desktop visualization EA SE Base tem plate and a cloned desk top pool Install the ImperoClientSetup.msi to the base image. If you want the name of the Thin Client to report back to the Impero Console, you will need to install VMware Tools.
Impero Education Pro Installation Guide Q: I cannot register my Impero Server Q: The Impero Server says that it is already registered. EA SE A: Check your proxy setting details on the register window. You may need to add the following websites access through your web filter; www.imperov3.co.uk, www.imperosoftware.com or see the question; This server does not have access to the internet.
Impero Education Pro Installation Guide 2.4 Troubleshooting Window Clients Q: I am getting errors when trying to deploy the Client remotely A: Please work through the troubleshooting steps below: EA SE Verify all firewalls are off during the remote deployment; both Anti-Virus and Windows Firewall. Make sure that you can open the C$ share (e.g. \\computername\C$) as the Impero Remote Deploy needs this to be available for the remote deployment tool to work.
Impero Education Pro Installation Guide Impero uses the following ports: EA SE TCP/UDP Ports 30015 - Reserved for Impero Server TCP/UDP Ports 30016 - Reserved for Impero Server TCP/UDP Ports 30017 - Reserved for Impero Server TCP/UDP Ports 30018 - Reserved for Impero Server TCP/UDP Ports 30019 - Reserved for Impero Server TCP/UDP Ports 30020 - Reserved Proxy or Thumbnail view TCP/UDP Ports 30021 - 30521 N ote: T his exam ple is based on seeing 500 thum bnail clients at once.
Impero Education Pro Installation Guide 2.6 Using Apple Xserve How to set the Impero Proxy with your Xserve Impero needs to be setup to work with the Apple Xserve or it will not block or log any internet traffic. You will need to replace your existing proxy (Image 9) with the Impero proxy settings and then tell the Impero proxy what IP Address and Port to use for your existing proxy. EL EA SE N ote : Im pero currently does not work with proxy .pac files within X serve.
EA SE Impero Education Pro Installation Guide Image 10 - DNS Manager C TP R EL N ote : If this does not im m ediately resolve any issues y ou m ay be experiencing, y ou m ay need to restart the affected com puter, or run an 'ipconfig / flus hdns ' com m and in the Com m and Prom pt of the affected com puter. © 2014 Impero Solutions Ltd. © 2014 Impero Solutions Ltd.