
Installation guide


Impero Education Pro Installation Guide
© 2014 Impero Solutions Ltd.
© 2014 Impero Solutions Ltd. 21
2.6 Using Apple Xserve
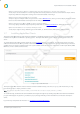
How to set the Impero Proxy with your Xserve
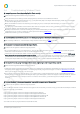
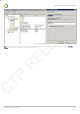
Impero needs to be setup to work with the Apple Xserve or it will not block or log any internet traffic. You will need to replace your
existing proxy (Image 9) with the Impero proxy settings and then tell the Impero proxy what IP Address and Port to use for your
existing proxy.
N ote: Impero currently does not work with proxy.pac files within Xserve.
Image 9 - Xserve Workgroup Manager
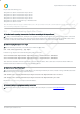
Step 1
Set Proxy Autoconfig Url to: http://localhost:30020/impero_proxy.pac
N ote: O ther proxy options should be disabled.
Step 2
On the Mac OSX clients, open terminal and enter the following command without quotes. It must be one continuous line
of code. Please press enter after you have entered each line of code. Change 10.0.0.1 to your proxies IP Address and also
change 8080 to the correct port that your proxy is using.
“sudo defaults write /Library/Preferences/com.impero-solutions-ltd.ImperoClientSrv persistent_proxy true”
“sudo defaults write /Library/Preferences/com.impero-solutions-ltd.ImperoClientSrv proxy_host 10.0.0.1”
“sudo defaults write /Library/Preferences/com.impero-solutions-ltd.ImperoClientSrv proxy_port 8080”
Verify that Internet blocking and logging are now working correctly on your Apple Mac clients.
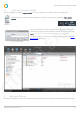
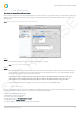
2.7 DNS Record
You can create a DNS record to ensure that both Windows and Mac Impero Clients are able to find the Impero Server, even if it is
located in on different VLAN. In order to do so, please go through the following steps:
1. Open your DNS Manager (Image 10).
2. Expand the 'Forward Lookup Zones'.
3. Locate your domain and select it.
4. Right click and choose 'New Host (A or AAAA)'.
5. Under 'Host' enter 'impero_server'.
6. Under 'IP Address', enter the IP Address of your Impero Server.
CTP RELEASE