
Installation guide


Impero Education Pro Installation Guide
© 2014 Impero Solutions Ltd.
© 2014 Impero Solutions Ltd. 6
1.5 Server Installation
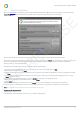
Once your download has completed, locate the downloaded file and extract it. Open the extracted folder, and run the file called
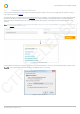
ImperoSetup.exe located in the ImperoSetup folder. This will open the 'Impero Setup' window (Image 3):
Image 3 - Impero Setup
This window will tell you that Impero requires the install of two applications - Impero Server and Impero Client.
You will first need to install the Impero Server, which you can do by clicking the 'Install' button within the '1. Impero Server' panel
at the top of the window. This will launch the ImperoServerSetup.msi installer which you can also find in the 'Installations'
directory within your downloaded folder.
After clicking the 'Install' button, please proceed through the following steps:
1. You may be prompted with a security warning asking if you wish to run this file. Click on 'Run'.
2. On the welcome screen, click on 'Next'.
3. Read through the End-User License Agreement. If you accept the terms, select the checkbox to mark your acceptance and click
on 'Next'.
4. You are then prompted to select an install location for the Impero Server. If you are happy with the default location, click on
'Next' and skip to step 7.
5. If you wish to change the install location, click on 'Browse' to navigate to an alternate location.
6. Once you have selected your alternate location, click on 'Next'.
7. Click 'Install'.
8. Once the installation has completed, click on the 'Finish' button to close the Impero Server Setup wizard window.
9. Impero Server is now installed. In order to continue setting up Impero, you then need to register your Impero Server.
N ote: O nce the install is finished, please wait 1 m inute before launching Im pero S erver
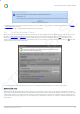
Registering the Impero Server
1. Double click on the new Impero Server icon on your desktop (Image 3.1).
CTP RELEASE