M S I R G 300 E X(L i t e ) RG300EX - 300Mbps 11n/g/b Wireless Router with gigabit switch RG300EX Lite - 150Mbps 11n/g/b Wireless broadband router. 1.Table of contents……………………………………………………………………………1 2.0 Introduction.......................................................................................................................................2 2.1 Functions and features ......................................................................................................................2 2.
M S I R G 300 E X(L i t e ) 2.0 Introduction Thank you for purchasing MSI RG300EX(Lite) router. We would like briefly introduce how to setup our N router to you with following charters. After this configuration, you can enjoy the speed brings by RG300EX(Lite) series products. 2.1 Functions and features The RG300EX(Lite) is ideal to create your own secured wireless network in an instant. The RG300EX (Lite) is a fast wireless router which can provide your entire house with a wireless network.
M S I R G 300 E X(L i t e ) which you connected the UTP networking cable, is lit. The LED on the network adapter of your computer should also be lit. 3.2 Configuring the RG300EX(Lite) for connection with the Internet(Appendix B) Before you can configure the RG300EX(Lite) for a connection with the Internet, you will first need to connect to the RG300EX(Lite). Follow the instructions below to connect to the RG300EX(Lite). 1. Turn on your computer. 2. Open your Internet browser (e.g.
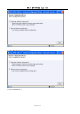
M S I R G 300 E X(L i t e ) 6. The login screen is shown. 3.3 Determining the connection method To quickly configure the RG300EX(Lite) for a connection to the Internet through your provider you will first need to determine which connection method your provider is using (‘DHCP’, ‘Static IP’, or ‘PPPoE’ ). Consult the information you received from your provider or look at. 3.3.1 Configuring the RG300EX(Lite) for a DHCP Internet For an internet connection using ‘DHCP’ you can use the following steps. 1.
M S I R G 300 E X(L i t e ) 2. Select ‘Manual Internet Configuration’. 3. Select ‘DHCP Method’.
M S I R G 300 E X(L i t e ) 4. Click ‘Next’. 5. Click ‘Next’.
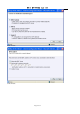
M S I R G 300 E X(L i t e ) 6. Click ‘Save’ and ‘Close’. 3.3.2 Configuring the RG300EX(Lite) for a Static Internet connection If your provider requires you to make a connection by using a Static IP-address, then use the following steps. (e.g. Speedtouch Home). 1. Click ‘Internet Wizard’.
M S I R G 300 E X(L i t e ) 2. Select ‘Manual Internet Configuration’. 3. Select ‘Static IP’.
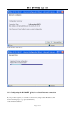
M S I R G 300 E X(L i t e ) 4. Click ‘Next’. 5. Fill in the data as provided by your Internet Service Provider.
M S I R G 300 E X(L i t e ) 6. Click ‘Next’. 7. Click ‘Save’ and ‘Close’ .
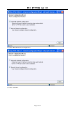
M S I R G 300 E X(L i t e ) 3.3.3 Configuring the RG300EX(Lite) for a PPPoE Internet If your provider requires you to make a connection by using PPPoE (with username and password), then use the following steps. 1. Click ‘Internet Wizard’. 2. Select ‘Manual Internet Configuration’.
M S I R G 300 E X(L i t e ) . 3. Select ‘PPPoE’. 4. Click ‘Next’.
M S I R G 300 E X(L i t e ) 5. Fill in the data as provided by your Internet Service Provider. 6. Click ‘Next’.
M S I R G 300 E X(L i t e ) 7. Click ‘Save and Close’. 3.4 Securing a wireless network To avoid having uninvited guests probing your wireless network we strongly recommend securing your wireless network. There are several security methods which can secure the network at different levels. To apply a method to your network it is required that all wireless network devices support this method. The strongest method of security is WPA (WiFi Protected Access).
M S I R G 300 E X(L i t e ) WEP security, continue with paragraph 3.4.2. 3.4.1 WPA security (recommended) 1. Click ‘Wireless Wizard’. 2. The wizard appears in a pop-up screen. Click ‘Next’. 3. Choose you country/region and click ‘Next’.
M S I R G 300 E X(L i t e ) 4. Click ‘Next’. 5. The RG300EX(Lite) will automatically scan for a suitable wireless channel.
M S I R G 300 E X(L i t e ) 6. Choose ‘WPAPSK’ and click ‘Next’. 7. Choose ‘TKIP’ and click ‘Next’.
M S I R G 300 E X(L i t e ) 8. Fill in a password in the ‘Network Key’ field (e.g. ‘yourname1’). Do not use any punctuation marks and make sure the password is at least 8 characters long! 9. Write down the network name and the chosen password.
M S I R G 300 E X(L i t e ) 10. Click ‘Next’. 11. Click ‘Finish’.
M S I R G 300 E X(L i t e ) 12. The wizard will now save the settings and will close the screen automatically. Hint: WPA security is supported by Windows 2000 and up (with all updates installed).This security method is not supported by Windows 98, unless your wireless network adapter software supports WPA. In case you do not have Windows 2000, XP, Vista or the required software, continue with section 3.4.2. 3.4.2 WEP security 1. Click ‘Wireless Wizard’. 2. The wizard appears in a pop-up screen.
M S I R G 300 E X(L i t e ) 3. Fill in the desired name for your wireless network in the field ‘SSID’. (Use the‘Check SSID’ option to ensure this name is not already in use.) 4. The RG300EX(Lite) will automatically scan for a suitable wireless channel.
M S I R G 300 E X(L i t e ) 5. As a choice, the most suitable wireless channel will appear on your screen. 6. Choose ‘WEP’ and click ‘Next’.
M S I R G 300 E X(L i t e ) 7. Choose ‘Use a 128 bit key’ and click ‘Next’. Fill in a password in the field ‘Network Key’. For this WEP key you are only allowed to use numbers from 0 till 9 and the letters a till f. Do not use any punctuation marks and make sure the password is exactly 26 characters long. 8. Write down the network name and the chosen password*.
M S I R G 300 E X(L i t e ) 9. Click ‘Next’. 10. Click ‘Finish’.
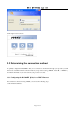
M S I R G 300 E X(L i t e ) The wizard will now save the settings and will close the screen automatically. 3.5 Finishing the installation procedure of your wireless router After following chapter 3, you can finish the installation procedure by following the next steps: 1. Remove the UTP network cable from your computer. 2. Remove the UTP networking cable from the LAN port of your RG300EX(Lite). 3. Restart your computer. 4. Congratulations! You have properly installed the RG300EX(Lite).
M S I R G 300 E X(L i t e ) 3.7 Connecting the RG300EX(Lite) 1. Turn off the computer. 2. Connect the RG300EX(Lite) to a wall outlet using the supplied power adapter. 3. Connect the supplied UTP network cable to the ‘LAN 4’ port of the RG300EX(Lite). 4. Connect the other end of this UTP network cable to the network adapter of your computer. Is my RG300EX(Lite) correctly connected to the wall outlet? You can check this by verifying that the POWER LED is on or not.
M S I R G 300 E X(L i t e ) 6. Click ‘Advanced Setup’ in the left menu. 7. Click ‘Network’ in the left menu. 8. Click ‘LAN/DHCP Server’. 9. Select ‘Stop’ at ‘DHCP Server’.
M S I R G 300 E X(L i t e ) 10. Click ‘Apply’ at the right side in the menu ‘DHCP Server’. 11. Type ‘192.168.0.200’ in the ‘LAN IP address’ field. 12. Type ‘255.255.255.0’ in the ‘Subnet mask’ field. 13. Click the button ‘Apply & Restart’. Note! If you wish to log in to your RG300EX(Lite) at a later point in time, you must assign a fixed IPaddress to your computer. 1. Click ‘Start’. 2. Double click ‘Network Connections’.
M S I R G 300 E X(L i t e ) 3. Right click the appropriate ’LAN Connection’ . 4. Click ‘Properties’.
M S I R G 300 E X(L i t e ) 5. Select ‘Internet-protocol (TCP/IP)’. 6. Click ‘Properties’.
M S I R G 300 E X(L i t e ) 7. Select ‘Use the following IP Address’. 8. Enter ‘192.168.0.25’ in the ‘IP Address’ field. 9. Enter ‘255.255.255.0’ in the ‘Subnet mask’ field. 10. Click ‘OK’.
M S I R G 300 E X(L i t e ) 11 . Enter ‘http://192.168.0.200’ in the address bar to log in to the RG300EX(Lite). 3.9 Securing a wireless network To avoid having uninvited guests probing your wireless network we strongly recommend securing your wireless network. There are several security methods which can secure the network at different levels. To apply a method to your network it is required that all wireless network devices support this method.
M S I R G 300 E X(L i t e ) 2. The wizard appears in a pop-up screen. Click ‘Next’. 3. Fill in the desired name for your wireless network in the field ‘SSID’. (Use the‘Check SSID’ option to ensure this name is not already in use.
M S I R G 300 E X(L i t e ) 4. The RG300EX(Lite) will automatically scan for a suitable wireless channel. As a choice, the most suitable wireless channel will appear on your screen. . 5. Choose ‘WEP’ and click ‘Next’.
M S I R G 300 E X(L i t e ) 6. Choose ‘Use a 128 bit key’ and click ‘Next’. Fill in a password in the field ‘Network Key’. For this WEP key you are only allowed to use numbers from 0 till 9 and the letters a till f. Do not use any punctuation marks and make sure the password is exactly 26 characters long. 7. Write down the network name and the chosen password**.
M S I R G 300 E X(L i t e ) 8. Click ‘Next’. 9. Click ‘Finish’.
M S I R G 300 E X(L i t e ) The wizard will now save the settings and will close the screen automatically. Finishing the installation procedure of your Access Point After following chapter 4, you can finish the installation procedure: 1. Remove the UTP network cable from your computer. 2. Remove the UTP networking cable from the LAN port of your RG300EX(Lite). 3. Restart your computer. 4. Congratulations! You have now properly installed the RG300EX(Lite).
M S I R G 300 E X(L i t e ) 4.2 Configuring the RG300EX(Lite) signal booster (2) 1. Turn on your computer. 2. Open your internet browser (e.g. Internet Explorer, Netscape of Firefox). 3. Type ‘http://192.168.0.1’ in the address bar. 4. You will now be asked for a ‘Username’ and a ‘Password’. Fill in ‘admin’ in the‘Username’ field and ‘admin’ in the ‘Password’ field and press the enter key. 5. The login screen is shown. 6. Click ‘Network’ in the left menu.
M S I R G 300 E X(L i t e ) 7. Click ‘LAN/DHCP Server’. 8. Select ‘Stop’ at ‘DHCP Server’. 9. Click ‘Apply’ at the right side in the menu ‘DHCP Server’. 10. Type ‘192.168.0.200’ in the ‘LAN IP address’ field. 11. Type ‘255.255.255.0’ in the ‘Subnet mask’ field. 12. Click the button ‘Apply & Restart’. Note! If you wish to log in to your RG300EX(Lite) at a later point in time, you must assign a fixed IP address to your computer. 1. Click ‘Start’. 2. Double click ‘Network Connections’.
M S I R G 300 E X(L i t e ) 3. Right click the appropriate ’LAN Connection’. 4. Click ‘Properties’.
M S I R G 300 E X(L i t e ) 5. Select ‘Internet-protocol (TCP/IP)’. 6. Click ‘Properties’.
M S I R G 300 E X(L i t e ) 7. Select ‘Use the following IP Address’. 8. Enter ‘192.168.0.25’ in the ‘IP Address’ field. 9. Enter ‘255.255.255.0’ in the ‘Subnet mask’ field. 10. Click ‘OK’.
M S I R G 300 E X(L i t e ) 11. Enter ‘http://192.168.0.200’ in the address bar to log in to the RG300EX(Lite). 4.3Configuring your wireless router (1) When configuring the router and its security (paragraph 5.5), we assume you will be using the RG300EX (Lite) as a wireless router. Make sure your wireless router is connected to your computer using a UTP network cable. 1. Open your web browser (e.g. Internet Explorer, Opera or Firefox). 2. Type ‘http://192.168.0.1’ in the address bar. 3.
M S I R G 300 E X(L i t e ) 14. Click ‘Next’. 15. You will see a brief summary with the settings you have made so far. Click ‘Next’ to continue. 16. Choose ‘WPAPSK’ and click ‘Next’. 17. Choose ‘TKIP’ and click ‘Next’. 18. Fill in the same password in the field ‘Network Key’ you have chosen for your signal booster. 19. Click ‘Next’. 20. Click ‘Finish’. 21. The wizard will now save the settings and will close the screen automatically. 4.
M S I R G 300 E X(L i t e ) 9. Click ‘Wireless’ in the left menu. 10. Click ‘WDS Setup’ in the left menu. 11. Click ‘Search AP’ in the right screen. 12. A screen appears. A summary of found wireless networks will be displayed.
M S I R G 300 E X(L i t e ) 13. Double-click with the left mouse button on the name (SSID) of the signal booster. 14. Click ‘OK’. 15. Click ‘Add’ in the right screen. 16. Click ‘Save’ at the top of the right screen. 17. Click ‘OK’ to save the settings. 18. Close the window. Completing the installation of the signal booster 1. Type ‘http://192.168.0.200’ in the address bar to connect to the signal booster. 2. Click ‘Setup Tool’. 3. Click ‘Advanced Setup’ in the left menu. 4.
M S I R G 300 E X(L i t e ) 5.0 Configuring the wireless network on your computer Now that the router has been secured, you will need to configure the computer itself so it can recognize your secured wireless network and will be able to make a connection. Windows XP and Windows Vista are at this moment the most commonly used operating systems. We will now explain how to set up a wireless connection using these operating systems. 5.
M S I R G 300 E X(L i t e ) 6.0 Firewall & QoS settings The RG300EX(Lite) is equipped with an advanced firewall. This firewall allows you to open ports, allowing certain programs to gain access to the Internet. You can open these ports using the function ‘Port Forwarding’. In some cases you will want to block access to the Internet. If, for instance, you have children, you may want to block some explicit websites. You can do this using the built-in URL filtering method.
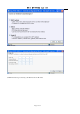
M S I R G 300 E X(L i t e ) 5. The login screen is shown. 6. Click ‘Setup Tool’. 7. Click ‘Advanced Setup’ in the left menu. 8. Click ‘Port Forwarding’ bellow ‘NAT/Routing’ in the left menu.
M S I R G 300 E X(L i t e ) 9. In the field ‘LAN IP-address you can fill in the IP-address of the computer for which you want to open the specific ports. 10. Select the correct protocol in the ‘Protocol’ field. 11. Fill in the necessary ports at the ‘External port’ field. Fill in the start or begin port in the first field. In the second field you can fill in the end port. In case you only need to open one ports, you can fill in the same port number in both fields. 12.
M S I R G 300 E X(L i t e ) Thanks to QoS (Quality Of Service) you can make sure that a specific program or computer gets priority above other programs. By using this feature, you are certain that you will not get ‘lag’ in games of hitches during video playback, in case one of the computers starts to download. Setting up Qos differs per situation. Therefore we will explain how to setup Qos in a general way. 1. Open your internet browser (e.g. Internet Explorer, Netscape or Firefox). 2. Type ‘http://192.
M S I R G 300 E X(L i t e ) 12. Click ‘Apply’ to activate these basic settings. Hint: If you do not exactly know the speed of your internet connection, please contact your Internet Service Provider. Your provider will usually speak in term of MB. This value is in Mbite. 1 MB=1024 Kbit. You can use both values in the webpage of the router. To set up a rule, use the following steps: 1. Choose ‘User Defined’ at the ‘QoS Setup’ field’. 2. Choose ‘Max Limit’ to set the maximum speed limit. 3.