
User`s manual


Chapter 6: Advanced Chassis Setup
6-9
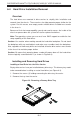
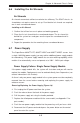
6-6 Installing the Air Shrouds
Air Shrouds
Air shrouds concentrate airfl ow to maximize fan effi ciency. The SC827 chassis air
shroud does not require screws to set up. Four identical air shrouds are required,
one in each serverboard drawer.
Installing an Air Shroud
1. Confi rm that all four fans are in place and working properly
2. Place the fi rst air shroud into the serverboard drawer. The air shroud sits
behind the system fans and goes over the top of the serverboard and its
components.
3. Repeat the procedure for the remaining three serverboard drawers.
6-7 Power Supply
The SuperServer 6026TT-HTF, 6026TT-HIBXF and 6026TT-HIBQF servers have
a single 1400 Watt power supply (you may add an additional power supply module
for redundancy). The power supply module has an auto-switching capability, which
enables it to automatically sense and operate at a 100V - 240V input voltage.
Power Supply Failure: Single Power Supply Module
If the power supply module fails, the system will shut down and you will need to
replace the module. Replacements can be ordered directly from Supermicro (see
contact information in the Preface).
As there is only one power supply module in the system, power must be completely
removed from the server before removing and replacing the power supply for
whatever reason.
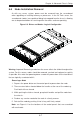
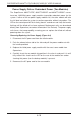
Removing/Replacing the Power Supply (Figure 6-8)
4. First unplug the AC power cord from the system.
5. Push the release tab on the back of the power supply.
6. Pull the power supply out using the handle provided.
7. Replace the failed power module with the same model (see Appendix C for
part number).
8. Push the new power supply module into the power bay until you hear a click.
9. Reconnect the AC power cord and depress the power button on the control
panel to restart the system.