NL Gebruiksaanwijzing en Instruction manual LE-427119MT
Gebruiksaanwijzing inhoudsopgave • Welkom en veiligheidwaarschuwingen • Belangrijke veiligheidsaanwijzingen • Installatie van de TV • Inhoud van de verpakking • Installatie van de TV • Montage van de TV aan een wand • Bedieningsorganen en aansluitingen • Aansluitingen aan de onder- en zijkant • Functietoetsen achterzijde • Afstandsbediening • Vervangen van de batterijen • Aansluiten van apparatuur • Installatie van de netwerkaansluiting • Omschrijving van de bediening • Bediening van het m
Gebruiksaanwijzing nL Geachte klant, Gefeliciteerd met de aankoop van dit kwaliteitsproduct. Lees de gebruiksaanwijzing zorgvuldig door zodat u optimaal gebruik kunt maken van deze 3D SMART TV. Veel kijkplezier. Belangrijke veiligheidsaanwijzingen • Onjuist gebruik kan brand of elektrische schokken veroorzaken. Om dit te voorkomen, dient u de richtlijnen te volgen voor het installeren, gebruiken en reinigen van dit apparaat.
Gebruiksaanwijzing Installeren van de TV U kunt beginnen met het installeren van de TV nadat u hem uit de doos hebt gehaald en de inhoud van de verpakking hebt geïnspecteerd. U kunt de TV op twee manieren installeren: • Op een vlakke ondergrond met de meegeleverde voet • Aan de wand, met een VESA muurbeugel (niet inbegrepen) 1. Leg de TV met het scherm naar beneden op een schone, vlakke ondergrond.
Gebruiksaanwijzing nL Bediening en aansluitingen Aansluitingen aan de onder- en zijkant VGA IN: PC AUDIO In: LAN: AV IN: RF(DVB-T/C), Digital out: YPBPR: HDMI (1, 2, 3): USB: APP USB(1,2): Aansluiten VGA kabel van computer. Aansluiten 3,5mm connector voor het geluid van de PC. Aansluiten ethernetkabel van thuisnetwerk. Aansluiten s-video/audio in Aansluiten RF/Coaxiaal connector van kabel of antenne.
Gebruiksaanwijzing Afstandsbediening 1 1. STANDBY: In- of uitschakelen van de TV. 2. MUTE: Druk hierop om de luidsprekeruitgang IN/UIT te schakelen. 3 4 3. SOURCE: Toets voor wijzigen ingangsbron. 7 4. PMODE: Druk hierop om de huidige beeldstand te wijzigen. 8 5. SMODE: Selecteer direct een andere geluidsstand. 6. SLEEP: Druk hierop om de tijd voor de slaapstand te wijzigen. 7. WWW.: Voor het snel invoeren van de letters “www.” in de Smart TV modus. 11 8.
Gebruiksaanwijzing nL Vervangen van de batterijen 1. Open het batterijvak. 2. Doe twee AA batterijen in de afstandsbediening. Zorg ervoor dat de (+) en (-) symbolen op de batterijen overeenkomen met de (+) en (-) symbolen in het batterijvak. 3. Sluit het batterijvak. • Gebruik uitsluitend batterijen van goede kwaliteit. • Het onjuist plaatsen van de batterijen kan leiden tot barsten lekkage dat brand of letsel kan veroorzaken.
Gebruiksaanwijzing Aansluiten via ethernet Het aansluiten op een netwerk via ethernet: 1. Zorg dat u het volgende hebt: • Een ethernetkabel die lang genoeg is om de TV te bereiken • Een router of modem met een vrije ethernetpoort • Een snelle Internetaansluiting 2. Sluit de ethernetkabel aan op de router en op de LAN-poort aan de linkerkant van de TV. 3. Gebruik van DHCP wordt aanbevolen om de TV te configureren. Verbinden met Wi-Fi Het verbinden met een draadloos netwerk: 1.
Gebruiksaanwijzing nL Programma bewerken Druk de / knop om Programma bewerken (Program Edit) te selecteren en druk dan de OK toets om naar het submenu te gaan. Deze optie heeft vijf functies. • Gebruik de rode toets om het huidige kanaal te verwijderen. • Gebruik de groene toets om het huidige kanaal te vergrendelen. Als het huidige kanaal al is vergrendeld, druk dan de groene toets nogmaals om het te ontgrendelen. • Gebruik de gele toets en de / pijltjestoetsen om het huidige kanaal te verplaatsen.
Gebruiksaanwijzing 3D Setup • Druk de • Druk de • Druk de • Druk de • Druk de / / / / / knop om Soort 3D (3D Type) te selecteren en druk dan de / toets om de keuze te selecteren. knop om Wisselen 3D L/R (Exchange 3D L/R) te selecteren en druk dan de / toets om de instellingen aan te passen. knop om 2D naar 3D (2D to 3D) te selecteren en druk dan de / toets om de keuze te selecteren. knop om 3D naar 2D (3D to 2D) te selecteren en druk dan de / toets om de keuze te selecteren.
Gebruiksaanwijzing nL • Druk de / toetsen om Automatisch Stand-by (Auto Standby) te selecteren en druk dan de OK toets om naar het submenu te gaan. Druk de / / / toetsen om de optie te selecteren. OSD Timer • Druk de / toetsen om OSD Timer (OSD Timer) te selecteren en druk dan de OK toets om naar het submenu te gaan. Druk de / toetsen om de optie te selecteren. (Beschikbare opties zijn: 5 sec, 10 sec, 15 sec, 20 sec, 25 sec, 30 sec).
Gebruiksaanwijzing Wanneer u in DTV modus kijkt zal de EPG functie beschikbaar zijn, met de EPG functie kunt u een programma gids bekijken van kanalen die EPG ondersteunen. Beeldverhouding • Druk de / toetsen om beeldverhouding en druk daarna de OK toets om naar het submenu te gaan. Druk de verhouding te selecteren. (De beschikbare opties zijn: Auto, 4:3, 16:9, Zoom1, Zoom2) Blauw Scherm • Druk de / toetsen om blauw scherm te selecteren en druk dan de OK toets om Aan of Uit te selecteren.
Gebruiksaanwijzing nL BEDIENING media • Videoformaten: AVI, MPEG 4, Xvid, H.264, TS, MKV, MOV, 3D split screen. • Audioformaten: MP3, WMA, AC, PCM, AC3, COOK. BEDIENING media • Opmerking: Sluit een USB apparaat aan voordat u het Mediamenu gebruikt en druk dan de SOURCE toets om de ingangsbron in te stellen op Media. • Druk de / toetsen om in het bronmenu media te selecteren en druk dan de OK toets om de keuze te bevestigen.
Gebruiksaanwijzing Installatie van Internet en Apps WELKOMSPAGINA • Druk de SOURCE toets om de ingangsbron in te stellen op Smart TV. • Druk HOME toets als u deze wizard wilt overslaan. • Als u deze wizard eenmaal hebt doorlopen, opent hij niet meer automatisch. Installatiepagina Instellen van de juiste tijdzone Selecteer soort netwerk Handmatig instellen tijd Als u uw netwerk niet wilt kiezen kunt u deze stap overslaan door “Overslaan” (Skip) te drukken.
Gebruiksaanwijzing Handmatig datum instellen nL Configuratie Druk de pijltjestoetsen / om het icoon te selecteren en dan de OK toets om naar het subscherm te gaan. Startscherm (Home) Menu icoon Korte omschrijving HOME Met dit scherm zal de Smart TV opstarten en deze zal opkomen bij gebruik van de "HOME" toets. APPS Hier vindt u al uw geïnstalleerde applicaties. BROWSER Hier vindt u het startscherm van de voorgeïnstalleerde webbrowser.
Gebruiksaanwijzing Instellingen Installatie instellingen Korte omschrijving Draadloos & netwerken • Wi-Fi, vink dit aan om Wi-Fi in te schakelen zodat u een verbinding met Wi-Fi netwerken tot stand kunt brengen; • Netwerk melding, vink dit aan om een melding te ontvangen wanneer een open Wi-Fi netwerk beschikbaar komt; • Opent een dialoogvenster waarmee u een Wi-Fi netwerk kunt toevoegen door het invoeren van de SSID (de naam die het uitzendt) en de toegepaste beveiliging.
Gebruiksaanwijzing nL Systeemherstel Als de Smart TV modus niet kan worden gestart, ga dan als volgt te werk: 1. Ontkoppel de opslagapparatuur, zoals SD-kaart, U-disk, mobiele HDD. 2. Ontkoppel de stroomvoorziening. 3. Druk de RECOVERY toets, sluit de stroomvoorziening aan en schakel de TV in; laat de RECOVERY toets los, waarna het volgende scherm verschijnt. 4. Gebruik de / toetsen om “fabrieksinstellingen herstellen” te selecteren. 5. Druk OK om de keuze te bevestigen. 6.
Gebruiksaanwijzing Het bekijken van Blu-Ray 3D inhoud Om Blu-Ray 3D inhoud te bekijken: 1. Zorg dat u de volgende apparatuur hebt: • MT Logic 3D HDTV. • 3D Blu-Ray speler met een Blu-Ray 3D disc (wordt apart verkocht) • MT Logic 3D brillen. • 3D-geschikte HDMI kabel (wordt apart verkocht) 2. Zorg ervoor dat u de 3D Blu-Ray speler aansluit op de TV met de 3D-geschikte HDMI kabel. 3. Schakel de 3D Blu-Ray speler uit. Druk de Power/Standby toets op de afstandsbediening om de TV in te schakelen. 4.
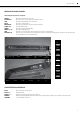
Gebruiksaanwijzing nL In dit voorbeeld zitten alle kijkers op de juiste afstand. Ze kijken recht naar de TV, dicht bij de ideale ooglijn. Ze ervaren goede 3D kwaliteit. In dit voorbeeld hebben de kijkers de TV aan een kantelbare beugel gemonteerd. Ze bevinden zich op de juiste afstand en kijken recht naar de TV, dicht bij de ideale ooglijn. Ze ervaren goede 3D kwaliteit. Probleemoplossing & technische ondersteuning De TV geeft weer: “Geen signaal.
Gebruiksaanwijzing Het beeld op het scherm dekt niet het hele scherm. • Zorg ervoor dat in de RGB-stand (computer) de horizontale en verticale positie op goed zijn ingesteld in het menu op het scherm. • Bij het gebruik van TV, AV of Component met een invoer van 480i, druk dan de BREED toets op de afstandsbediening om de schermstand te wijzigen. • De TV heeft beeldpunten die altijd donker of altijd verlicht zijn.
Gebruiksaanwijzing nL Instructies met betrekking tot de bescherming van het milieu Gooi dit apparaat aan het einde van de levensduur niet weg bij het huishoudelijke afval. Lever het apparaat in bij een inzamelpunt voor het recyclen van elektrische en elektronische apparatuur. Het symbool op het product, de gebruiksinstructies of de verpakking biedt informatie over de wijze waarop het product moet worden weggegooid. De materialen zijn recycleerbaar zoals door de desbetreffende markeringen wordt aangeduid.
Instruction Manual Table of Contents • Welcome and safety notes • Important safety instructions • Installing the TV • Package contents • Installing the TV • Installing the TV with a wall bracket • Controls and connections • Bottom and aside terminals • Back side function keys • Remote controller • Replacing the batteries • Connecting your devices • Setting up your network connection • Description of operation • Operation menu • Channel Menu • Picture Menu • Sound Menu • Time Men
Instruction Manual en Dear customer, Congratulations and thank you for purchasing this high quality product. Please read the instruction manual carefully so that you will be able to make the best possible use of the 3D SMART TV. Have fun watching. Important safety instructions • Incorrect usage will cause fire or electric shock. To prevent this, please do as required when you are installing, using and cleaning this machine.
Instruction Manual Installing the TV After removing the TV from the box and inspecting the package contents you can begin installing the TV. Your TV can be installed in two ways: • On a flat surface, using the included stand • On a wall, using a VESA-standard wall mount (not included) to install the TV stand: 1. Place the TV screen-down on a clean, flat surface. To prevent scratches or damage to the screen, place the TV on a soft surface, such as carpet, rug, or blanket. 3.
Instruction Manual en Controls and Connections Bottom and side terminals VGA IN: PC AUDIO In: LAN: AV IN: RF(DVB-T/C): Digital out: YPBPR: HDMI (1,2,3): USB: APP USB(1,2): Connect RGB cable from computer. Connect 3. 5mm connector from computer. Connect Ethernet cable from home network. Connect S-video/audio in. Connect RF/Coaxial connector from cable or antenna. 2 channel digital audio. Connect component (RGB) video. Connect HDMI devices.
Instruction Manual Remote Controller 1 1. STANDBY : Turn the TV on or off. 2. MUTE: Press to turn ON/OFF the speaker output. 3 4 3. SOURCE: Input source conversion button. 7 4. PMODE: Press to change the current picture mode. 8 5. SMODE: Select the different sound mode directly. 6. SLEEP: Press to shift sleep time mode. 7. WWW.: In Smart TV mode quickly input letters "www.". 11 8. COM: In Smart TV mode quickly input letters ".com". 9.
Instruction Manual en Replacing the Batteries 1. Open the battery cover. 2. Insert two AA batteries into the remote control. Make sure that the (+) and (-) symbols on the batteries match the (+) and (-) symbols inside the battery compartment. 3. Close the battery cover. • Use only good quality batteries. • Inserting the batteries incorrectly may result in cracking or leakage that may cause a fire or result in injury.
Instruction Manual Connecting to a Wired Network To connect to a wired network: 1. Ensure you have: • An Ethernet cable long enough to reach your TV • A router or modem with an available Ethernet port • A high-speed internet connection 2. Connect your Ethernet cable to the router and to the LAN port on the left of the TV. 3. Usage of DHCP is recommended to configure the TV. Connecting to a Wireless Network To connect to a wireless network: 1.
Instruction Manual en Program Edit • Press / button to select Program Edit, then press OK button to enter sub-menu. This option has five functions. • Use Red button to delete the current channel. • Use Green button to set the current channel to lock. if the current channel is already locked, pressing the green button again will unlock. • Use Yellow button and the / arrow button to move the current channel. • Use Dard Blue button to skip the current channel.
Instruction Manual Sound Menu Sound Menu • Press MENU button to display the main menu. Press / button to select Sound in the main menu, it will highlight the first option. 1. Press / button to select the option that you want to adjust in the SOUND menu. 2. Press / button to adjust. 3. After finishing your adjustment, Press MENU button to save and return back to the previous menu. Sound Mode • Press / button to select Sound Mode, then press OK button to enter sub-menu. Press / button to select.
Instruction Manual en Lock Menu Lock Menu • Press MENU button to display the main menu. Press / button to select LOCK in the main menu, it will highlight the first option. 1. Press / button to select the option that you want to adjust in the LOCK menu. 2. Press / button to adjust. 3. After finishing your adjustment, Press MENU button to save and return back to the previous menu. Lock System • Press / button to select Lock System, then press OK button to make the following 3 options valid.
Instruction Manual EPG Electronic program guide When watching in DTV mode will enable the function EPG with this function you can see the programming of all digital channels that are supporting EGP. Aspect Ratio • Press / button to select Aspect Ratio, then press OK button to enter sub-menu. • Press / button to select aspect ratio. (Available options are: Auto, 4:3, 16:9, Zoom1, Zoom2) Blue Screen • Press / button to select Blue Screen, then press OK button to select On or Off.
Instruction Manual en Photo viewer Photo viewer • Press / button to select PHOTO in the main menu, then press OK button to enter. • Press menu button to return back to the previous menu and exit menu to quit. Press / button to select drive disk you want to watch, then press OK button to enter. • Press / button to select return option to back to the previous menu. • Press / button to select the file you want to watch in the file selecting menu, then press media button to display picture.
Instruction Manual Install Internet and Apps WELCOME PAGE • P ress SOURCE button to set the Input Source to Smart TV. • If you want to skip this wizard, press HOME key. • If you have finished this wizard once, it will not auto-open again. Setup page Set up the correct Time Zone Select network type Setup time manually If you do not want to choose your network, you can skip this step by press “Skip”. You will also find the network settings in function “Settings”.
Instruction Manual Setup date manually en Configuration Press the arrow buttons / to select the icon and OK the sub-screen. app manager Menu icon description HOME This screen will be shown when the Smart TV starts and when you navigate here using the Home button.
Instruction Manual Settings Setup settings description Wireless & networks • Turn on Wi-Fi, and will give a list of available networks. • Wi-Fi notifications check to receive an alert when an open Wi-Fi network becomes available. • Opens a dialog where you can add a Wi-Fi network by ; entering its SSID (the name it broadcasts) and security key. Ethernet • Check to turn on Ethernet so you can connect to Ethernet networks; Configure Ethernet devices.
Instruction Manual en System restore If the Smart TV mode does not start successfully, please proceed as followed: 1. Unplug your storage devices, such as: SD card, U disk, mobile HDD 2. Unplug the power supply. 3. Press the RECOVERY button, then plug in the power and turn on TV; release the RECOVERY button until you see the screen as followed. 4. Use / to choose “wipe data/factory reset”. 5. Press OK to confirm. 6. Use / to choose “Yes --delete all user data” OK to confirm.
Instruction Manual Watching Blu-ray 3D Content To view Blu-ray 3D content: 1. Ensure you have the following equipment: • MT Logic 3D HDTV • 3D Blu-ray. player with a Blu-ray3D disc (sold separately) • MT Logic 3D Glasses • 3D-Ready HDMI cable (sold separately) 2. Ensure the 3D Blu-ray player and your TV are connected with the 3D-Ready HDMI cable. 3. Turn the 3D Blu-ray player off. Press the Power/Standby button on the remote to turn the TV on. 4.
Instruction Manual en In this example, the viewers are sitting at a good distance. They are viewing the TV straight-on, close to the ideal eye line. They will experience good 3D quality. In this example, the viewers have mounted the TV on a Tilt Mount. They are at the correct distance and they are viewing the TV straight-on, close to the ideal eye line. They will experience good 3D picture quality. Troubleshooting & Technical support The TV displays "No Signal".
Instruction Manual The display image does not cover the entire screen. • If you are in RGB mode (computer), ensure that H-Size and V-Position in the on-screen menu are set correctly. • If you are using TV, AV or Component with 480i input, press the WIDE button on the remote to change the screen mode. The TV has pixels (dots) that are always dark or always lit. • Your HDTV is precision-manufactured using an extremely high level of technology. However, sometimes pixels may not display correctly.
Instruction Manual en Instructions on environment protection Do not dispose of this product in the usual household garbage at the end of its life cycle; hand it over at a collection point for the recycling of electrical and electronic appliances. The symbol on the product, the instructions for use or the packing will inform about methods for disposal. The materials are recyclable as mentioned in its marking.
http://mtlogic.