
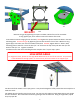
Manual

6
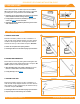
112
111 A
113 C
111 B
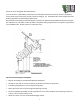
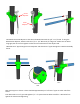
111: Aach one of the 3x5 rectangular tubes to the 4.5” pipe using the 3/4” x 5” bolts, large 5” square
plates and 3/4” split washers. Aach to the 2” pipe using the 1/2” x 4 1/2” bolts with 1/2” at washers
and split washers.
112: Install the remaining 5"x3" rectangular tube. Snug up all 4 bolts, but leave loose enough to allow for
some play when installing I-beams. Adjusng the Screw Adjuster as necessary, level the array in prepara-
on for I-Beam installaon.
113 A
114 A
114 B
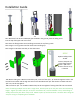
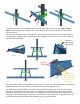
Notches in
I-beam ange
must face up.
113 B
Alignment
Set Bolts
Addional 1/2”
bolts for HD Series.
Standard Series will
not have holes for
these bolts.
113: Install center I-beams to the 3x5 tubes using the 3/4" x 2” bolts, 3/4” at washers & 3/4” split washers.
DO NOT TIGHTEN at this step. Install all I-beams with notches in the ange facing up.
114: Aach the two I-beam wings on the ends of the center beam using the 1/2” x 1 1/4” bolts and 1/2”
ange nuts. There will be 4 bolts per wing on the standard series and 8 bolts per wing on the HD Series.
The XHD Series ulizes 3/4” x 2” bolts instead. The Alignment Set Screws may be used to align the I-Beam
Center piece to the I-Beam Wings, if necessary. Once I-beams are level, make sure all alignment set screws
are touching the plate of the I-Beam wing and ghten the 1/2” bolts to 45 lbs.