Installation Manual Blade Series Top of Pole Mount www.mtsolar.us 844-MT-SOLAR (687-6527) 2019 V3.
Thank you for choosing MT Solar Pole Mounts. It is the installer’s responsibility to determine foundation parameters based on local site conditions, such as wind speed, snow load, soil type, exposure category, etc. Installations also must comply with local building regulations and requirements. We recommend consulting an engineer for a recommendation on foundation dimensions and pipe size and thickness.
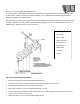
Installation Guide The Blade Series Top of Pole Mount does not come standard with the lifting bracket and chain hoist. If you choose to add this option, follow steps 101 to 104 to install the lifting assembly. 101 102 A 104 A 103 102 B 101: With the 4" Sch 40 or Sch 80 steel pipe installed in the ground, slide the pole cap over the pipe. 104 B 102: Place the lifting insert into the top of the pipe until it sits flush. Place the lifting bracket into the lifting insert with the eye facing south.
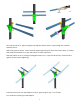
108 B 108 A 107 109 107: Slide one of the 2” pipes through the tilt adjuster and the other 2" pipe through the U Bracket Assembly sleeve. 108: Center pipes in sleeves. There should be equal length of pipe on either side of the sleeve. If needed, slide plastic shim between 2.5” pipe and sleeves to reduce movement. 109: Slide collars on the 2” pivot pipe and tighten with 1/2”x 1” square head set bolts. Hold collar firm against the sleeve when tightening. 110 111 110: Attach one of the 5 Ft.
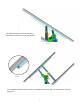
112: Align the bottom slot in the aluminum Rails with the 3 holes in the 5 Ft. Rail Adapter. 112 113 A 113 B 113: Install the Aluminum Rails to the 5 Ft. Rail Adapters using the 3/8” x 1” stainless bolts and 3/8” flange nuts.
114B 114: Install Solar Modules as per Mounting Rail and module manufacturer instructions using top clamps. 114A 115: Insert the 5/8" x 7” bolt over the top of the pole with the 5/8” flat washers and 5/8” nut. Securely tighten the 4 tension bolts in the back of the pole cap to 200 ft-lb. 116 115 Using an angle finder, adjust array to proper tilt. Installation is complete. 6 116: Remove the chain hoist and lifting bracket and place the 1 3/8” diameter round cap in place.