
Installation Guide


10 Section 3— ASSembly & Set-Up
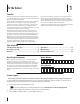
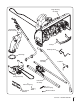
8. Secure the carriage in place with the two lock rods.
See Figure 3-8.
Figure 3-8
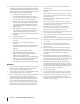
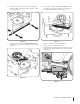
9. If your tractor is equipped with a Manual PTO, and the belt
keeper rod wasn’t removed from the tractor when the deck
was taken off, remove it before proceding to the next step.
See Figure 3-9.
NOTE: Retain the screw used to secure the belt keeper rod
to the tractor’s frame. Also, retain the belt keeper rod for
use when the mowing deck is remounted to tractor.
A
C
B
Figure 3-9
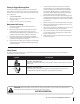
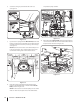
10. Route the carriage assembly’s belt around the engine
pulley (or electric PTO clutch, on models with an Electric
PTO) as shown in Figure 3-10.
NOTE: To relieve tension on the idler pulley, insert a ratchet
with a ⁄” drive into the square hole on the idler bracket
and pivot the pulley outward
Figure 3-10
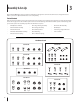
11. On models with a Manual PTO, install the new belt keeper
rod and secure it with the hex screw retained when the old
keeper rod was removed. See Figure 3-11.
Figure 3-11