
Installation Guide


8 Section 3— ASSembly & Set-Up
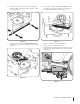
2. Secure the right carriage support bracket marked with
an “R” to the outside of the tractor’s frame with three hex
screws and flange lock nuts as shown in Figure 3-2.
IMPORTANT: The hex screws must be installed from the
OUTSIDE of the frame and secured on the INSIDE with the
flange lock Nuts. There are two different sized bolts in
689-00351. Use two ⁄” wrenches to secure the two larger
bolts in the outer holes of the bracket. Use a ⁄” wrench
(and an ⁄” wrench to hold the nut) to secure the smaller
bolt in the inner hole of the bracket.
⁄”
Wrench
⁄”
Wrench
⁄”
Wrench
Figure 3-2
NOTE: The carriage support brackets can remain attached to
the frame when the mowing deck is remounted to tractor.
3. Then secure the left carriage support bracket following the
instructions above.
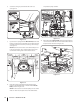
Mounting the Carriage Assembly
1. Remove the clevis pins and hairpin clips from the carriage
assembly. Retain the clips and pins, as they will be used to
attach components in later steps. See Figure 3-3.
Figure 3-3
WARNING! Before installing the attachment, place
tractor on a firm and level surface. Place the PTO in
the disengaged (OFF) position, set the parking
brake, shut engine off and remove key to prevent
unintended starting.
NOTE: References to LEFT and RIGHT indicate the left and
right sides of the tractor when facing forward in the operator’s
position. Reference to the FRONT indicates the grille end; to the
REAR the drawbar end.
Several components on your tractor must be removed prior to
mounting the snow thrower attachment. Refer to Deck Removal
in your tractor’s Operator’s Manual for detailed instructions. If
your tractor is equipped with any front-end accessory (i.e. front
bumper kit), it must also be removed.
Having a second person assist with assembly is not necessary,
but will aid in completing some of the steps.
Assembly
NOTE: If you engage your tractor’s cutting deck by using your
right hand to pivot a lever forward, your tractor has a Manual
PTO. If you engage your tractor’s cutting deck by pulling
outward on a small knob located on the tractor’s dash, your
tractor has an Electric PTO. Follow applicable instructions
throughout the assembly
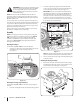
Mounting The Bumper
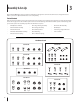
Use Hardware Bag 689-00354 to mount the bumper.
1. Using two ⁄” wrenches, secure the bumper to the tractor
frame with six hex screws and flange lock nuts.
See Figure 3-1.
Figure 3-1
Attaching the Carriage Support Brackets
Use Hardware Bag 689-00351 to attach the carriage support
brackets.
1. Place the deck height lever into the lowest mowing position.