
Installation Guide
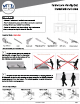

Counter top & sink installation
1
Under-mount sinks
2
Vessel over-mount sinks
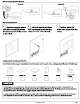
Under-mount sink/counter installation
1
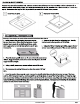
Please note: If your counter top arrived with pre-assembled sink please skip to Step 7.
1. Safely remove the packaging from your counter
top and place it on a flat surface facing down. If your
counter top is made of marble/natural stone, make
sure to place it on an evenly flat surface to avoid any
movements.
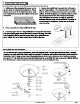
2. Remove the sink from its packaging box. Identify
the front and bottom portion of the sink(s).
3. Using the Silicone Sealant provided, apply a liberal
amount around the perimeter of the pre-cut sink hole.
4. Place the sinks upside down on the area where the sealant was
utilized. Apply moderate pressure to secure sink in place. DO NOT
apply excessive weight.
5. Using a cloth, remove any excess sealant around the area.
6. We recommend waiting 24-hours to allow the sealant to fully
cure.
7. Once the sealant has properly cured, remove the double sided tape strip that is located on top of the base
cabinet. Li the counter top in a vertical position & carefully place on top of the vanity cabinet. It is best to align
your counter top with your cabinet base from back to front. We recommend acquiring help to li & place counter
top to avoid any potential breakage that may occur during installation. Damages incurred during the installation
process are not covered under warranty.
Installation Guide
Page 3