
User guide


1 I
Engine—Follow engine manual for lubrication instruc
tions.
Transmission (Self-Propeiled Models Only)—The
transmission is pre-lubricated and sealed at the facto
ry. It does not require checking. If disassemijled for
any reason, fill with 2 ounces of Alvania grease, part
number 737-0168.
MAINTENANCE
____
A
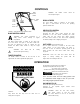
WARNING: Be sure to disconnect and
ground the spark plug wire before per
forming any repairs or maintenance.
NOTE: When tipping the unit, empty the fuel tank and
keep engine spark plug or air cleaner side up.
TROUBLE SHOOTING
Refer to page 10 of this manual for trouble i hooting
information.
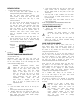
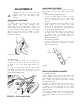
CUTTING BLADE
When removing the cutting blade for sharpening or
replacement, protect hands by using heavy gloves or
a rag to grasp the cutting blade. Remove the
I
jolt and
bell washer which hold the blade and adapter to the
engine crankshaft. Remove the blade and adapter
from the crankshaft.
If the blade or blade adapter needs replacing, remove
the two small bolts, lock washers and nuts wh ich hold
the blade to the adapter.
A
WARNING: Periodically inspect the blade
adapter for cracks, especially if you
strike a foreign object. Replace! when
necessary.
When sharpening the blade, follow the origin al angle
of grind as a guide. It is extremely important tf at each
cutting edge receives an equal amount of grinding to
prevent an unbalanced blade. An unbalanced blade
will cause excessive vibration when rotating at high
speeds, may cause damage to the mower ar d could
break, causing personal injury.
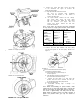
It is recommended that the blade always be removed
from the adapter for the best test of balance.
The blade can be tested by balancing it on a round
shaft screwdriver. Remove metal from the heavy side
until it balances evenly.
Before reassembling the blade and the blade adapter
to the unit, lubricate the engine crankshaft and the
inner surface of the blade adapter with I ght oil.
Lubricating the bolt holes, bolts and inner surface of
the nuts with light oil is also recommended. Engine oil
may also be used.
When replacing the blade, be sure to install the blade
with the side of the blade marked “Bottom” (or with
part number) facing the ground when the mower is in
the operating position.
Blade Mounting Torque
Center Bolt: 450 in. lbs. min., 600 in. lbs. max.
Blade Adapter Bolts: 200 in. lbs. min., 350 in. lbs. max.
To insure safe operation of your unit, all nuts and bolts
must be checked periodically for correct tightness.
DECK
The underside of the mower deck should be cleaned
after each use to prevent a buildup of grass clippings,
leaves, dirt or other matter. If this debris is allowed to
accumulate, it will invite rust and corrosion, and may
prevent proper mulching.
The deck may be cleaned by tilting the mower and
scraping clean with a suitable tool (make certain the
spark plug wire is disconnected).
ENGINE
Refer to the separate engine manual for all engine
maintenance instructions.
Maintain engine oil as instructed in the separate
engine manual packed with your unit. Read and follow
instructions carefully.
Service air cleaner every 25 hours under normal con
ditions. Clean every few hours under extremely dusty
conditions. Poor engine performance and flooding
usually Indicates that the air cleaner should be ser
viced. To service the air cleaner, refer to the separate
engine manual packed with your unit.
The spark plug should be cleaned and the gap reset
once a season. Spark plug replacement is recom
mended at the start of each mowing season; check
engine manual for correct plug type and gap specifi
cations.
Clean the engine regularly with a cloth or brush.
Keep the cooling system (blower housing area)
cleaned to permit proper air circulation which is
essential to engine performance and life. Be certain to
remove all grass, dirt and combustible debris from
muffler area.
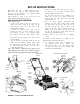
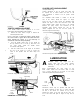
BELT REMOVAL AND REPLACEMENT
(Self-Propelled Models Only)
1. Place shift lever in third speed (six speed models
only).
2. Disconnect the spark plug wire and ground it
against the engine.
3. Drain the fuel tank or place a piece of plastic
beneath the cap to prevent gasoline leakage.
4. Remove the transmission belt cover by removing
three bolts. See figure 11.
5. Tip the mower on its side. Block securely.