
Manual


SECTION3: ASSEMBLINGYOURLAWNMOWER
Unpacking
• Remove staples, break glue on top flaps, or cut
tape at carton end and peel along top flap to open
carton.
• Remove loose parts if included with unit (i.e.,
owner's manual, etc.).
• Cut along corners and lay carton down flat.
• Remove packing material.
• Roll or slide unit out of carton. Check carton
thoroughly for loose parts.
ToolsRequired
1. Pair of Pliers
2. Funnel
NOTE: This operator's manual covers various models
of lawn mowers. Follow only those instructions which
pertain to your unit.
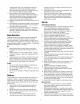
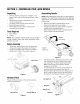
BeforeAssembly
• Disconnect spark plug wire from the spark plug,
and ground it against the engine. See Figure 1.
• If engine is equipped with a rubber boot, attach
rubber boot to a bolt on the engine to ground.
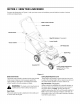
AssemblingHandle
NOTE: Stand behind the mower as if you were going to
operate it. Your right hand corresponds to the right side
of the mower; your left hand corresponds to the left side
of the mower.
• Remove any packing material which may be
between the upper and lower handles.
• Pull up and back on the upper handle to raise the
handle into the operating position.
• Make certain the lower handle is seated securely
into the handle mounting brackets.
Tighten
hand knob
/
Tighten
hand knob
/i
Spark Plug
/
Figure 1
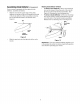
HardwarePack
Please identify each piece of the hardware pack as
shown in Figure 2 here.
Wing Nut (2) Carriage Bolt (2)
Figure 2
Figure 3
• The upper handle is attached to the lower handle
with a handle knob and a carriage bolt on each
side. See Figure 3. Tighten these hand knobs.
Make sure that each carriage bolt is seated
properly on the handle.
• Locate hairpin clip in one hole on the weld pin on
each side of the lower handle. See Figure 4.
• Remove hairpin clip from this hole. Using a pair of
pliers, insert the hairpin clip into the other hole on
the weld pin. See Figure 4. Repeat on other side.
,\
Carriage
Wing Nut
Hairpin
Weld
Figure 4