Operator's Manual 22" Self-Propelled Mower Model Series 260 th ru 269 IMPORTANT: READ SAFETY RULES AND INSTRUCTIONS CAREFULLY Warning: This unit is equipped with an internal combustion engine and should not be used on or near any unimproved forestcovered, brush-covered or grass-covered land unless the engine's exhaust system is equipped with a spark arrester meeting applicable local or state laws (if any), If a spark arrester is used, it should be maintained in effective working order by the operator
TABLEOFCONTENTS Content Page 3 6 7 Important Safe Operation Practices Slope Gauge Assembling Your Lawn Mower Know Your Lawn Mower 8 9 Operating Your Lawn Mower Content Maintaining Your Lawn Mower Trouble Shooting Illustrated Parts List Warranty Page 11 14 16 20 FINDINGMODELNUMBER This Operator's Manual is an important part of your new lawn mower. It will help you assemble, prepare and maintain the unit for best performance. Please read and understand what it says.
SECTION1: IMPORTANT SAFEOPERATION PRACTICES WARNING: This symbol points out important safety instructions which, if not followed, could endanger the personal safety and/or property of yourself and others. Read and follow all instructions in this manual before attempting to operate this machine. Failure to comply with these instructions may result in personal injury. When you see this symbol - heed its warning.
complete stopbefore removing thegrass catcher or doorways, shrubs, trees, or other objects that may unclogging thechute. Thecutting bladecontinues to obscure your vision of a child who may run into the mower. rotate forafewseconds aftertheengine isshutoff.Never placeanypartofthebodyinthebladeareauntilyouare Keep children away from hot or running engines. They can suffer burns from a hot muffler. surethebladehasstopped rotating. 6. Never allow children under 14 years old to operate a 20.
3. Check thebladeandengine mounting boltsatfrequent intervals forproper tightness. Also,visually inspect blade fordamage (e.g.,bent,cracked, worn)Replace blade withtheoriginal equipment manufacture's (O.E.M.) blade only,listedinthismanual. "Useofpartswhichdonot meettheoriginal equipment specifications mayleadto improper performance andcompromise safety!" 4. Mower blades aresharpandcancut.Wrapthebladeor weargloves, anduseextracaution whenservicing them. 5.
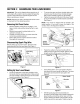
| o E I 91 SIGHT AND HOLD THIS LEVEL WITH A VERTICAL TREE t- 191 I O >, ........ ~ "" ~ ~ .. ~ tm i n,91 i I ml'l I_' o A POWER POLE _1' ml_ Im'! A CORNER OF A BUILDING i "11 "- - ". QLoo^, OR A FENCE POST I r- o a I ~ ~ ._'!VGA ".._ 09 o _6 t>, E (.o o >, II to9 o 15° o ,_ 03 o t- 0t-..co WARNING Do not mow on inclines with a slope in excess of 15 degrees (a rise of approximately 2-1/2 feet every 10 feet). A riding mower could overturn and cause serious injury.
SECTION3: ASSEMBLING YOURLAWNMOWER IMPORTANT:This unit is shipped without gasoline or oil in the engine. Be certain to service engine with gasoline and oil as instructed in the separate engine manual before operating your mower. NOTE: Reference to right or left hand side of the mower is observed from the operating position, RemovingUnitFromCarton • • • • Remove staples, break glue on top flaps, or cut tape at carton end and peel along top flap to open carton. Remove loose parts if included with unit (i.
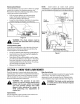
RemovingChuteRetainer The chute deflector on your mower is held in an upright position by a retainer for shipping purposes only. Remove the retainer by following steps below, before running the mower for the first time. • • Push the chute deflector up and towards the engine. Holding the deflector in this position, remove the retainer. See Figure 6. Lower the chute deflector carefully to its operating position keeping your fingers out of the way.
RecoilStarter - Blade Control Handle The recoil starter is attached to the right lower handle. Stand behind the unit and pull the recoil starter to start the unit. See Figure 8. Handle CuttingHeightAdjustmentLevers Mulching Plug Starter Cutting Height Adjustment Lever These levers are located on each wheel and they are used to adjust the cutting height. All four levers have to be at the same relative position to ensure a uniform cut. See Figure 8.
• • Iftherearwheelstendtolockup,theclutchmay notbereleasing completely. Donotstarttheengine untilcorrections havebeenmade. Checkthedrivecableforseverebends,kinks,or binding.Alsocheckforgrassbuild-uparoundthe belt. Mulching For effective mulching, do not cut wet grass because it tends to stick to the underside of the deck, preventing proper mulching of grass clippings. New or thick grass may require a narrower cut. The ground speed should be adjusted to the condition of the lawn.
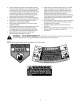
EngineAdjustments See the separate engine manual packed with your unit for adjustments to the engine. Nuts Handle Handle Bracket Assemblies" Figure 10 SECTION6: MAINTAININGYOURLAWNMOWER Customer Responsibilities o_ MAINTENANCE SCHEDULE _o _ _ .# ,_ ,_..e,. SERVICE DATES %" %' q7 _ -u Lubricate Wheels F-- © Lubricate Blade Control Clean Deck rr a_ Blade Care Check Oil Change Oil Replace Air Filter _7 Clean Engine U.
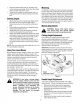
BladeControlHandleandDriveClutchControl: Lubricate the pivot points on the blade control handle Beck The underside of the mower deck should be cleaned and the drive clutch control at least once a season with light oil. These handles must operate freely in both directions. See Figure 11. Wheels: Lubricate the wheels at least once a season after each use to prevent a buildup of grass clippings, leaves, dirt, or other matter.
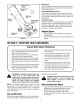
• • • • Slide the blade adapter onto the engine crankshaft. Place the blade on the adapter. Be certain the blade is aligned and seated on the blade adapter flanges. Place blade bell support on blade. Make sure the notches on the blade bell support are aligned with small holes in the blade. Loosen this screw Shoulder Replace hex bolt and tighten hex bolt to torque: 450 in. Ibs. min., 600 in. Ibs. max.
Off-SeasonStorage • The following steps should be taken to prepare your lawn mower for storage. • • Clean and lubricate mower thoroughly as described in the lubrication instructions. • We do not recommend the use of a pressure washer or garden hose to clean your unit. Refer to engine manual for correct engine storage instructions. • Coat mower's cutting blade with chassis grease to prevent rusting. Store mower in a dry, clean area. Do not store next to corrosive materials, such as fertilizer.
NOTES 15
SECTION8: PARTSLISTFORMODELSERIES260 THRU269 4 \ / 6 7 / \ 8 / 20 13 \ 18 23 56 51 26 28 39 43 54 16
ModelSeries260 thru269 Ref. No. 1. 2. 3. Ref. No. Part No. Drive Control Handle 29. 748-04016A Blade Adapter, One Piece Blade Control Handle 30. 31. 742-0742A Mulching Blade 22" 736-0524B Bell Blade Support 32. 710-1044 Part No. 747-1214 747-1161A 749-1092A Part Description Part Description 4. 746-04048 Upper Handle Drive Control Cable 5. 746-1113 Blade Control Cable - 37.75" 33. 712-0431 Hex Cap Screw 3/8-24 x 1.5 Lock Nut 3/8-16 746-1132 Blade Control Cable - 40.75" 34.
NOTES 18
NOTES 19
MANUFACTURER'S LIMITED WARRANTY The limited warranty set forth below is given by MTD LLC with respect to new merchandise purchased and used in the United States, its possessions and territories. "MTD"warrants this product against defects in material and workmanship for a period of two (2) years commencing on the date of original purchase and will, at its option, repair or replace, free of charge, any part found to be defective in materials or workmanship.