
Manual


Lower Notch
Handle .........
Figure 11
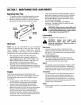
• Remove the starter rope from the rope guide.
• Remove the upper handle by removing the hand
knobs and carriage bolts. Lay the upper handle out
of the way, being careful not to bend or kink cables.
• Remove the hairpin clips from the weld pins on the
handle brackets. Press outward on the legs of the
lower handle, and remove it from the mower.
• Turn the lower handle around so the notches on the
bottom of the lower handle are facing forward as
shown in Figure 11. Reassemble, placing the
bottom holes in the handle over the weld pins in the
handle mounting bracket.
• Reassemble the upper handle.
• Place the hairpin clips in the inner holes in the weld
pins and attach the starter rope as instructed in the
assembly instructions.
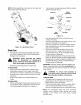
CuttingHeight
An adjusting plate and thumb lever at each wheel
position provides cutting height adjustment. Each
adjusting plate has nine height positions. Height of cut
will be changed when the thumb lever is moved from
one hole to another.
• Simply depress the lever towards wheel and move
wheel and lever assembly to desired position. All
wheels must be placed in the same relative
position. See Figure 12.
I! _i\\ Height
Figure 12
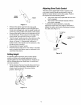
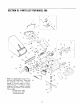
AdjustingDriveClutchControl
The drive clutch adjustment wheel is located on the
drive clutch control handle housing and is used to
tighten or loosen tension on the drive cable. Perform
this adjustment if the following exists.
a. The mower does not propel itself with the drive
clutch engaged.
b. The mower's drive wheels hesitate with the
drive clutch engaged.
To resolve the above problems, rotate the
adjustment wheel with your fingers: clockwise to
tighten the cable, and counter-clockwise to loosen
the cable. See Figure 13.
To tighten
! cable
/ ,l_ t Adjustment
.......... ............Wheel
To loosen
cable
Figure 13
12