
Manual

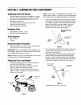


Insert post on cable ties into holes provided on the
lower handle. Pull the cable tie tight and trim the
excess. See Figure 4.
Cable Tie
Post _
Hole on \
Lower
Handle
Figure 4
After you have moved the hairpin clips as shown in
Figure 2, place one carriage bolt (found in the
hardware pack included with your unit) in the upper
hole of the right handle mounting bracket from the
inside outward. See Figure 5. Secure with one
plastic wing nut. Repeat process on the left side.
Carriage
Bolt
\
Hairpin (_lip
Figure 5
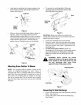
AttachingGrassCatcherToMower
NOTE: The mulching baffle is already in place on the
mower for shipping purposes. Your lawn mower is
equipped with both a mulching baffle and a mulching
plug. While the mulching baffle is located at the rear of
the mower, the mulching plug is located on the right
side of the cutting deck. Do not remove the mulching
plug from the mower even when you are not mulching
the grass,
To remove the mulching baffle, lift the rear
discharge door on the mower. Remove the
mulching baffle. See Figure 6.
Mulching
Baffle
Deck
/I
Figure 6
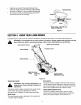
IMPORTANT: Make sure cables are routed to the
outside of the handle so they are not in the way when
attaching the grass catcher,
• Lift the rear discharge door on the mower.
• Place the hooks, found on both sides of the grass
catcher frame, over the chute door pivot rod at the
rear of the mower. See Figure 7. Release the rear
discharge door.
To remove the grass catcher, lift the rear
discharge door on the mower. Lift the grass catcher
up and off the pivot rod, Reinstall the mulching
baffle and release the rear discharge door. See
Figure 7.
WARNING: Never operate the mower
unless the hooks on the grass catcher are
firmly seated on the chute pivot rod, and
the rear discharge door rests firmly
against the top of the grass catcher.
Discharge Door
J
Grass Bag
Figure 7
ConvertingToSideDischarge
Lift the rear discharge door and install the mulching
baffle. See Figure 6.
• On the side of the mower, lift the mulching plug.
See Figure 8.