
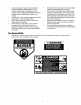
Manual

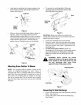


• Slidethetwohooksofthesidedischargechute
underthehingepinonthemulchingptugassembly
asshownin Figure 8. Lower the side mulching plug.
* Do not remove the side mulching plug at any time,
even when you are not mulching.
Hinge Pil
Mulching Plug
,, HOO_
IV i/ j
t
/- j
(Slide hooks under t
aides of hinge pin)
Figure 8
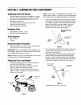
SECTION4: KNOWYOURLAWNMOWER
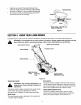
Compare Figure 9 with your lawn mower to familiarize yourself with the location of controls and adjustments.
WARNING: The operation of any lawn mower can result in foreign objects being thrown into the
eyes, which can result in severe eye damage. Always wear safety glasses or eye shields.
Drive Clutch Control_ Blade Control Handle
Recoil Starter
Throttle Control
i\
Grass Catche_
,\
Chute Mulching_
Plug
Figure 9
BladeControlHandle
WARNING: This control mechanism is a
safety device. Never attempt to bypass its
operations.
The blade control handle is located on the upper handle
of the mower and must be depressed in order to
operate the unit. Release it to stop engine and blade,
RecoilStarter
The recoil starter handle is attached to the handle and
GrassCatcher
The grass catcher, located at the rear of the mower, is
used to bag the grass clippings for disposal at another
site. Once the bag is full, it has to be removed from the
mower and emptied before any further mowing.
CuttingHeightAdjustmentLever
This lever, located at each wheel, lets you adjust
cutting height of the grass. Remember to put all four
levers at the same height to avoid uneven cut.
is used to start the engine.