
User`s manual


23
AXIS 216FD/FD-V/MFD/MFD-V - Audio
When using Half-duplex, the Send the sound from the active client to all other clients
option transmits the audio signal from the client that is talking to other clients.
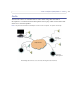
Audio Input
Audio from an external microphone or
a line source can be connected to the Audio in the
connector of the network camera. The audio source must be set to Microphone or Line
depending on the connected device.
Note:
To prevent unauthorized listening, the internal microphone can be disabled by inserting a plug in the Audio
in connector.
The Enable microphone power option provides DC power for an external microphone. If
using a small electret condenser microphone such as a clip-on microphone or a PC
microphone, enable this option.
Note:
To use a high impedance dynamic microphone, do not enable DC power. DC power will not harm the micro-
phone; if you are uncertain, try switching it off and on. The default value is DC power enabled. To use a pro-
fessional microphone requiring 48V phantom power, you need an external power supply and a
balanced-unbalanced converter (audio transformer) in between.
If the sound input is too low or too high, adjust the input gain for the microphone attached
to the network camera.
Select the desired audio Encoding format, AAC, G711, G726.
Depending on the selected encoding,
set the desired audio quality (Bit rate). The settings
affect the available bandwidth and the required audio quality.
The network camera can be set to trig
ger an event if the incoming sound level rises above,
falls below, or passes the set value. The Alarm level is set between 0-100%.
Audio Output
If the sound from the speaker is too
low or too high, adjust the output gain for the active
speaker attached to the network camera.
When satisfied with the settings, click Save, or click Rese
t to revert to previously saved
settings.
Note:
To receive synchronized video in MPEG-4 and audio, it is recommended that the time settings in the camera
and client PC are synchronized with an NTP Server. This is enabled in the camera under System Options >
Date & Time. Please refer to the help pages for more information.