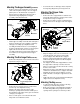
OPERATOR’S MANUAL Chipper Shredder Model Series 462 thru 465 Model 465 Shown IMPORTANT: READ SAFETY RULES AND INSTRUCTIONS CAREFULLY Warning: This unit is equipped with an internal combustion engine and should not be used on or near any unimproved forestcovered, brush-covered or grass-covered land unless the engine’s exhaust system is equipped with a spark arrester meeting applicable local or state laws (if any).
TABLE OF CONTENTS Content Page Important Safe Operation Practices................................................................... 3 Assembling Your Chipper Shredder................................................................... 5 Know Your Chipper Shredder ............................................................................ 7 Operating Your Chipper Shredder .................................................................... 7 Maintaining Your Chipper Shredder ..............................
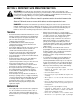
SECTION 1: IMPORTANT SAFE OPERATION PRACTICES WARNING: This symbol points out important safety instructions which, if not followed, could endanger the personal safety and/or property of yourself and others. Read and follow all instructions in this manual before attempting to operate this machine. Failure to comply with these instructions may result in personal injury. When you see this symbol - heed its warning.
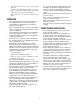
• (e.g. furnace, water heater, space heater, clothes dryer, etc.) • To reduce a fire hazard, keep machine free of grass, leaves, or other debris build-up. Clean up oil or fuel spillage and remove any fuel soaked debris. • • • Allow machine to cool at least 5 minutes before storing. • OPERATION • • • • • • Do not put hands and feet near rotating parts or in the feeding chambers and discharge opening. Contact with the rotating impeller can amputate fingers, hands, and feet.
WARNING: - YOUR RESPONSIBILITY: Restrict the use of this power machine to persons who read, understand and follow the warnings and instructions in this manual and on the machine. NOTE: Not all safety labels shown may apply to your chipper shredder. SECTION 2: ASSEMBLING YOUR CHIPPER SHREDDER Disconnecting Spark Plug Wire IMPORTANT: This unit is shipped without gasoline or oil in the engine.
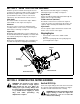
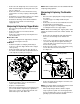
Attaching The Hopper Assembly (All Models) • • • Remove six hex nuts and washers from the weld studs on the impeller housing. Leave the support plate in place on the weld studs. See Figure 2. Place hopper assembly into position in front of impeller housing, aligning holes in hopper assembly collar with weld studs.
SECTION 3: KNOW YOUR CHIPPER SHREDDER Read this operator’s manual and safety rules before operating your chipper shredder vacuum. Compare the illustrations in Figure 5 with your unit to familiarize yourself with the location of various controls and adjustments. Save this manual for future reference. Material can be raked into hopper assembly by lowering the hopper assembly. See Figure 5. Bag (Not Shown) Collects shredded or chipped material fed through the chipper chute or hopper assembly.
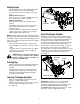
Starting Engine • • • • • Attach spark plug wire to spark plug. Make certain the metal cap on the end of the spark plug is fastened securely over the metal tip on the spark plug. Engines with choke lever: Move choke lever on engine to CHOKE position. (A warm engine may not require choking). Engines with primer: Prime engine as instructed in separate engine manual. The throttle control lever is located on the engine. Move engine throttle control lever to FAST or START position.
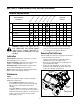
SECTION 5: MAINTAINING YOUR CHIPPER SHREDDER PRODUCT SCHEDULE Be for e MAINTENANCE ea ch us e Ev er y2 5h ou rs Ev er y5 0h ou Ev rs er y1 00 ho ur On s ce as ea so Be n for es tor ag e Customer Responsibilities SERVICE DATES Lubricate Release Bracket Lubricate Hopper Assembly Lubricate Discharge Chute Check Chipper Blade ENGINE Check Oil Change Oil Clean Air Filter Clean Engine Check Spark Plug WARNING: Always stop engine, disconnect spark plug, and ground against engine before cleaning, lubric
• • • • Remove the two hairpin clips from each clevis pin which extend through the housing and remove the pins. See Figure 8. Remove the flail screen from inside the housing and clean the screen by scraping or washing with water. Reinstall the screen, making certain to reassemble the flail screen with the curve side down. Reattach the discharge chute with the hardware previously removed and connect the bag (if equipped) to unit.
• • Storing Your Chipper Shredder An unbalanced blade will cause excessive vibration when rotating at high speeds and may cause damage to the unit. The blade can be tested by balancing it on a screwdriver or nail. Remove metal from the heavy side until it is balanced evenly. When reassembling the blade, tighten center bolt to between 550 and 700 in.-labs. and the two out bolts to between 250 and 350 in.-labs. • • • • Clean the equipment thoroughly. Wipe equipment with an oiled rag to prevent rust.
Model Series 462 Thru 465 3 4 1 2 5 7 9 17 10 7 8 6 15 8 16 13 21 22 14 23 25 26 11 24 12 37 19 15 36 8 20 30 18 48 23 31 21 49 27 40 38 39 32 28 23 29 23 32 20 33 41 34 42 35 43 29 56 57 56 55 54 52 53 44 45 51 63 59 46 58 60 50 60 56 56 61 62 60 47 59 60 56 56 59 57 61 56 64 60 65 12
Model Series 462 Thru 465 Ref. No. 1. 2. 3. 4. 5. 6. 7. 8. 9. 10. 11. 12. 13. 14. 15. 16. 17. 18. 19. 20. 21. 22. 23. 24. 25. 26. 27. 28. 29. 30. 31. 32. 33. Part No. 728-0175 731-1899 735-0249 781-0633 681-0095 681-0068A 710-0751 712-3027 710-0106 736-0173 736-0242 712-3010 749-1004 710-0106 714-0149B 681-0048 681-0094 711-0835 781-0457 726-0211 750-0793 712-3027 712-3004A 736-0119 681-0184 710-0805 736-0170 681-0117 710-3008 710-0157 781-0490 710-1054 681-0030 Ref. No.
NOTES 14
MANUFACTURER’S LIMITED WARRANTY FOR: The limited warranty set forth below is given by MTD PRODUCTS INC (“MTD”) with respect to new merchandise purchased and used in the United States, its possessions and territories. MTD warrants this product against defects in material and workmanship for a period of two (2) years commencing on the date of original purchase and will, at its option, repair or replace, free of charge, any part found to be defective in material or workmanship.