OPERATOR'S MANUAL Chipper Shredder Model Series 462 thru 465 Model 465 Shown IMPORTANT: READ SAFETY RULES AND INSTRUCTIONS CAREFULLY Warning: This unit is equipped with an internal combustion engine and should not be used on or near any unimproved forestcovered, brush-covered or grass-covered land unless the engine's exhaust system is equipped with a spark arrester meeting applicable local or state laws (if any).
TABLEOFCONTENTS Content Page Important Safe Operation Practices ................................................................... 3 Assembling Your Chipper Shredder ................................................................... 5 Know Your Chipper Shredder ............................................................................ 7 Operating Your Chipper Shredder .................................................................... 8 Maintaining Your Chipper Shredder ......................
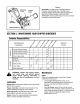
SECTION 1: IMPORTANT SAFEOPERATION PRACTICES WARNING: This symbol points out important safety instructions which, if not followed, could endanger the personal safety and/or property of yourself and others. Read and follow all instructions in this manual before attempting to operate this machine. Failure to comply with these instructions may result in personal injury. When you see this symbol - heed its warning.
j. Toreduceafirehazard,keepmachine free ofgrass,leaves,orotherdebrisbuild-up. Cleanupoilorfuelspillageandremoveany fuelsoakeddebris. k. Allowmachinetocoolatleast5 minutes beforestoring. OPERATION 1. 2. 3. 4. 5. 6. 7. 8. 9. Do not put hands and feet near rotating parts or in the feeding chambers and discharge opening. Contact with the rotating impeller can amputate fingers, hands, and feet.
understand follow the warnings and instructions and on the WARNING: -and YOUR RESPONSIBILITY: Restrict the useinofthis thismanual power machine to machine. persons who read, NOTE: Not all safety labels shown may apply to your chipper shredder. SECTION2: ASSEMBLING YOURCHIPPERSHREDDER IMPORTANT: This unit is shipped without gasoline or oil in the engine. Be certain to service engine with gasoline and oil as instructed in the separate engine manual before operating your machine.
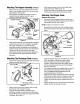
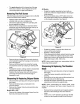
AttachingTheHopperAssembly(A,Models) Remove six hex nuts and washers from the weld studs on the impeller housing. Do not remove the support plate. See Figure 2. Place hopper assembly into position in front of impeller housing, aligning holes in hopper assembly collar with weld studs. Impeller Housing Bracket Place second spacer over hex bolt inside other hinge and secure with hex lock nut. Secure both sides of discharge chute to impeller housing using wing knobs previously removed.
AttachingTheBag(All Models) To attach the bag, place the opening of the bag completely over the discharge chute. Pull on the drawstring until the bag is tight around discharge chute opening. Clip the drawstring back on itself, tight against the discharge chute to secure into position. Clip Discharge Chute C_htpper Bag SECTION3: KNOWYOURCHIPPERSHREDDER Read this operator's manual and safety rules before operating your chipper shredder.
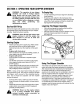
SECTION4: OPERATING YOURCHIPPERSHREDDER shredder in foreign objects WARNING: can The result operation of any chipper being thrown into the eyes, which can damage your eyes severely. Always wear the safety glasses provided with this unit or eye shields before chipping or shredding and while performing any adjustments or repairs. GasAndOilFill-Up Service the engine with gasoline and oil as instructed in the separate engine manual packed with your chipper shredder. Read instructions carefully.
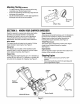
Figure 7 Discharge Chute IMPORTANT: The flail screen is located inside the Chipper Chute housing in the discharge area. If the flail screen becomes clogged, remove and clean as instructed in SECTION 5: MAINTAINING YOUR CHIPPER SHREDDER. For best performance, it is also important to keep the chipper blade sharp. Assembly Model 465 Shown SECTION5: MAINTAININGYOURCHIPPERSHREDDER CustomerResponsibilities MA,NTENANOE SCHEDULE FO a 0 ¢f n .J ..z..o_ e _,_ ,e_ Lubricate Release Bracket _ .
Thesparkplugshouldbecleanedandthegap resetoncea season.Checkenginemanualfor correctplugtypeandgapspecifications. All Models Rotate the impeller assembly by hand until you locate one of the two chipper blades in the chipper chute opening. Remove the blade using a 3/16" allen wrench on the outside of the blade and an adjustable wrench on the impeller assembly. See Figure 9.
removetheflailscreenandinserta pieceofwood intothechuteopening. Removethetwooutsidescrewsontheblade,using a 3/16"allenwrenchanda 1/2"wrench. SeeFigure10. G Discharge NOTE: Use caution when removing the blade to avoid contacting the weld studs on the housing. When sharpening the blade, follow the odginal angle of grind as a guide. It is extremely important that each cutting edge receives an equal amount of grinding to prevent an unbalanced blade.
SECTION6: TROUBLESHOOTING Problem Engine fails to start Cause 1. 2. 3. Remedy Spark plug wire disconnected. Fuel tank empty or stale fuel. Throttle control lever not in correct 1. 2. 3. Connect wire to spark plug. Fill tank with clean, fresh gasoline. Move throttle lever to FAST position. 4. Move choke to CHOKE position. 5. 6. Prime engine. Clean fuel line. 5. 6. starting position. (If Equipped) Choke not in CHOKE position. (If Equipped) Engine not primed. Blocked fuel line. 7.
ModelSeries462 Thru465 /10 17 / 37 15/ _ 36 48 r _ a 27 23 23 35 ( 57 44 56 / / \ 61 _ \ '64 'k56 \ \ 6O "65 13 .
ModelSeries462 Thru465 Refl No. Part No. Ref. No. Part Description Part Description Part No. 1. 2. 728-0175 731-1899 Pop Rivet Chipper Chute 37. 38. 719-0329 711-6833B Flail Blade Clevis Pin 3. 735-0249 Chute Flap 39. 715-0166 Pin 4. 781-0633 Chute Flap Strip 40. 736-0247 Flat Washer 3/8 x 1.25 5. 681-0095 Chipper Chute t 41. 742-0571 Shredder Blade 6. 681-0068A Chipper Chute Assembly 42. 710-1254 Hex Cap Screw 3/8-24 x 2.25 7. 710-0751 Hex Cap Screw 1/4 -20 x.620 43.
Notes 15
MANUFACTURER'S LIMITED WARRANTY The limited warranty set forth below is given by MTD LLC with respect to new merchandise purchased and used in the d. United States, its possessions and territories. MTD LLC warrants this product against defects for a period of FOR: MTD LLC does net extend any warranty for products sold or exported outside of the United States, its possessions and territories, except those sold through MTD LLC's authorized channels of export distribution. e.