
Manual


Thesparkplugshouldbecleanedandthegap
resetonceaseason.Checkenginemanualfor
correctplugtypeandgapspecifications.
RemovingTheFlailScreen
If the discharge area becomes clogged, remove the flail
screen and clean area as follows:
Stop the engine and make certain the chipper
shredder has come to a complete stop.
Disconnect spark plug wire from spark plug and
ground against the engine.
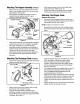
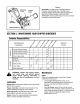
Remove the two wing knobs on each side of the
discharge chute and lift the discharge chute up to
keep it out of the way. See Figure 8.
Clips
Wing Knobs
Figure 8
Remove the two hairpin clips from each clevis pin
which extend through the housing and remove the
pins. See Figure 8.
Remove the flail screen from inside the housing
and clean the screen by scraping or washing with
water.
Reinstall the screen, making certain to reassemble
the flail screen with the curve side down.
Reattach the discharge chute with the hardware
previously removed and connect the bag (if
equipped) to unit.
SharpeningOrReplacingChipperBlades
Disconnect the spark plug wire and ground against
the engine.
Remove the flail screen as instructed in the
previous section.
Remove the chipper chute by removing three hex
nuts and washers.
Models 463 or 465
Remove the chipper chute support brace from the
frame by removing the hex bolts.
All Models
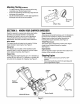
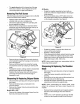
Rotate the impeller assembly by hand until you
locate one of the two chipper blades in the chipper
chute opening.
Remove the blade using a 3/16" allen wrench on
the outside of the blade and an adjustable wrench
on the impeller assembly. See Figure 9.
Screw
Figure 9
Rotate the impeller to expose other blade and
remove in the same manner.
Replace or sharpen blades.
When sharpening the blade, protect hands by using
gloves and follow the original angle of grind. Also,
make sure to remove an equal amount from each
blade and torque to 250 - 300 in. Ibs.
NOTE: Make certain blades are reassembled with the
sharp edge facing upward.
SharpeningOrReplacingTheShredder
Blade
Disconnect the spark plug wire and ground against
the engine.
Lower the hopper assembly and block up the
housing.
Remove the six hex lock nuts and flat washers from
the weld studs on the flail housing.
Separate the hopper assembly from the impeller
assembly and remove the support plate.
NOTE: When reassembling the support plate, make
certain the embossed tab faces inward towards the
impeller.
Remove the two wing knobs and cupped washers
that secure the discharge chute and raise the
chute.
Insert a 1/2" or 3/4" diameter pipe through the flail
screen into the impeller to keep it from turning or
10