
Manual
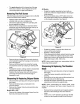
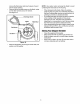


removetheflailscreenandinsertapieceofwood
intothechuteopening.
Removethetwooutsidescrewsontheblade,using
a3/16"allenwrenchanda 1/2"wrench.
SeeFigure10.
G
Flat Screw.
Hex Bolt-----"
Discharge Chute
Blade Weld Stud
o --
Figure 10
Remove the blade by removing the center bolt, lock
washer, and flat washer.
NOTE: Use caution when removing the blade to avoid
contacting the weld studs on the housing.
When sharpening the blade, follow the odginal
angle of grind as a guide. It is extremely important
that each cutting edge receives an equal amount of
grinding to prevent an unbalanced blade.
An unbalanced blade will cause excessive vibration
when rotating at high speeds and may cause
damage to the unit. The blade can be tested by
balancing it on a screwdriver or nail. Remove metal
from the heavy side until it is balanced evenly.
When reassembling the blade, tighten center bolt to
between 550 and 700 in.-Ibs, and the two out bolts
to between 250 and 350 in.-tbs.
StoringYourChipperShredder
Clean the equipment thoroughly.
Wipe equipment with an oiled rag to prevent rust.
Refer to engine manual for correct engine storage
instructions
Store unit in a clean, dry area. Do not store next to
corrosive materials such as fertilizer.
11