
Manual


SECTION4: OPERATINGYOURCHIPPERSHREDDER
WARNING: The operation of any chipper T0
shredder can result in foreign objects
being thrown into the eyes, which can
damage your eyes severely. Always wear
the safety glasses provided with this unit
or eye shields before chipping or shred-
ding and while performing any
adjustments or repairs.
GasAndOilFill-Up
Service the engine with gasoline and oil as instructed in
the separate engine manual packed with your chipper
shredder. Read instructions carefully.
WARNING: Never fill fuel tank indoors with
engine running or until the engine has
been allowed to cool for at least two
minutes after running.
StartingEngine
Attach spark plugwire to spark plug. Make certain
the metal cap on the end of the spark plug is
fastened securely over the metal tip on the spark
plug.
Engines with choke lever:
Move choke lever on engine to CHOKE position. (A
warm engine may not require choking).
Engines with primer:
Prime engine as instructed in separate engine
manual.
The throttle control lever is located on the engine.
Move engine throttle control lever to FAST or
START position.
Grasp starter handle and pull rope out slowly until
engine reaches start of compression cycle (rope
will pull slightly harder at this point).
NOTE: A noise will be heard when finding the start of
the compression cycle. This noise is caused by the fails
and fingers, which are part of the shredding mecha-
nism, and it should be expected until the impeller
reaches full speed.
Pull rope with a rapid, continuous, full arm stroke.
Keep a firm grip on starter handle. Let rope rewind
slowly.
Repeat the previous steps until engine fires. When
engine starts, move choke control (if equipped)
gradually to RUN position.
WARNING: Never run the engine indoors
or in a poorly ventilated area. Engine
exhaust contains carbon monoxide, an
odorless and deadly gas.
EmptyBag
Un-clip drawstring and loosen bag from discharge
chute opening.
Empty bag and reattach to the discharge chute
opening. Pull on the drawstring until the bag istight
around the chute opening and clip the drawstring
tight against the discharge chute.
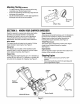
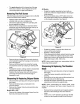
LoweringTheHopperAssembly
With one hand grasp the handle at the top of the
hopper assembly and lift slightly.
With the other hand pull out on the release rod and
lower the hopper assembly to the ground.
See Figure 6.
opper Release
Assembly Rod
Figure 6
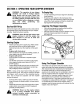
UsingTheChipperShredder
Yard waste such as leaves and pine needles can be
raked up through the hopper assembly for shredding.
After material has been shredded by the flail blades on
the impeller assembly, it will be discharged out of
opening or into catcher bag. Do not attempt to shred or
chip any material other than vegetation found in a
normal yard (i.e. branches, leaves, twigs, etc.) Avoid
fibrous plants such as tomato vines until they are
thoroughly dried out. Twigs and small branches up to 3"
in diameter on models 463 thru 465 and 2" in diameter
on models 462 can be fed into the chipper chute. If
equipped, use the tamper plug to push material into the
chipper chute. See Figure 7.