
Operator`s manual


SECTION3: ASSEMBLINGYOURLAWNMOWER
IMPORTANT:This unit is shipped without gasoline or oil
in the engine. Be certain to service engine with gasoline
and oil as instructed in the separate engine manual
before operating your mower,
NOTE: Reference to right or left hand side of the mower
is observed from the operating position.
RemovingUnitFromCarton
• Remove staples, break glue on top flaps, or cul
tape at carton end and peel along top flap to open
carton.
Remove loose parts ifincluded with unit (i,e..
operator's manual, etc.}
• Cut along corners, lay carton down flat, and remove
packing material.
Roll or slide unit out of carton and check carton
thoroughly for loose parts,
HardwarePack
This lawn mower is shipped with following loose parts in
the hardware pack for attaching the wheels:
RearWheels
• Two lock nuts 3/8-16
• Two spring washers
Front Wheels
• Two shoulder screws 3/8-16
• Two cupped washers .401 ID x .870 OD
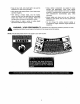
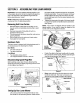
DisconnectingSparkPlugWire
Before setting up your lawn mower, disconnect the
spark plug wire from the spark plug and ground to a bolt
on the engine, See Figure 1.
Bolt
Spark/
PlugWire Spark Plug '
Figure 1
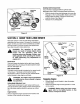
etting UpYourLawn Mower
Lift up and pull back on the upper handle to raise
the handle into the operating position, Make certain
the lower handle is seated securely into the handle
bracket assemblies. To secure the upper and lower
handle, tighten the wing nuts near the toe of lower
handle (carriage bolts must be seated properly into
the handle).
Tighten the wing nuts at the end of the lower handle
to secure the handle to handle bracket assemblies.
See Figure 2.
NOTE: Your mower is shipped with the handle in the
higher position. If you wish to lower the height of the
handle, refer to the Adjustment Section.
Lower 1
-_Handle
Nuts
Handle
Bracket /
Assemblies
Figure 2
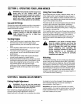
Fasten the cable to the lower handle with the cable
tie found on the lower handle. Pull the cable tie tight
and trim off the excess. See Figure 3.
Cable Tie.
Handle
Figure 3
Move rope guide to the first hole above the lower
handle on right side. The wing nut loosens and
secures the rope guide to handle. See Figure 4.
Starter \
Rope
Nut
Rope
Guide
\ Lower
Handle
Figure 4
7