
Operator`s manual


Mulching
Baffle
Side Discharge"
Chute Hooks
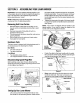
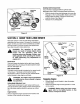
Installing SideDischargeChute
Ifyour mower isequippeo with the optional side
discharge chute, install it following these instructions:
Slide the hooks of the side discharge chute over the
hinge pinon the mulching baffle, Make sure that the
hooks snaps intoplace, locking the chute firmly
onto the mower. See Figure 9.
Release the mulching baffle.
Figure 9
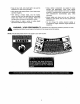
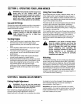
SECTION4: KNOWYOURLAWNMOWER
Read this operator's manual and safety rules before
operating your lawn mower. Compare the illustration in
Figure 10 with your lawn mower to familiarize yourself
with the location of various controls and adjustments.
Save this manual for future reference.
A
WARNING: The operation of any lawn
mower can result in foreign objects being
thrown into the operator's eyes and
causing severe eye damage. Always wear
safety glasses while operating the mower,
or while performing any adjustments or
repairs on it.
RecoilStarter
The recoil starter isattached to the right lower handle
Stand behind the unit and pull the recoil starter to start
the unit. See Figure 10.
Blade Control Handle
The blade control handle is located on the upper handle
of the mower, The blade control handle must be
depressed in order to operate the unit. Release blade
control handle to stop engine and blade.
,_ WARNING: This blade control mechanism
is a safety device. Never attempt to bypass
its operations.
Cutting HeightAdjustmentLever
These levers are located on each wheel and they are
used to adjust the cutting height, All four levers have to
be at the same relative position to ensure an uniform
cut.
Engine Controls
See the separate engine manual for the location and
function of the controls on the engine.
Blade Control
Handle ___
Mulching_
Plug
i Discharge
/ Chute
Starter
Height
Adjustment
Mulching
Plug
/
Discharge/
Chute
Figure 10
StoppingEngine
Release blade control handle to stop the engine
and the blade.
• Disconnect spark plug wire and ground it to a bolt
on the engine.
,_ WARNING: Before using your lawn mower,
again refer to the Safety Section in this
manual. Always be careful.
9