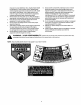
OPERATOR'S MANUAL 21" Rear & Side Discharge Mulching Mower Model Series 540 \ IMPORTANT: READ SAFETY RULES AND INSTRUCTIONS CAREFULLY Warning: This unit is equipped with an internal combustion engine and should not be used on or near any unimproved forestcovered, brush-covered or grass-covered land unless the engine's exhaust system is equipped with a spark arrester meeting applicable local or state laws (if any).
TABLEOFCONTENTS Content Page Important Safe Operation Practices ................................................................... 3 Slope Gauge ...................................................................................................... 6 Assembling Your Lawn Mower ........................................................................... 7 Know Your Lawn Mower .................................................................................... 9 Operating Your Lawn Mower ............
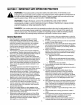
SECTION1: IMPORTANTSAFEOPERATION PRACTICES WARNING: This symbol points out important safety instructionswhich, if not followed, could endanger the personal safety and!or property of yourself and others. Read and follow all instructions in this manual before attempting to operate this machine. Failure to comply with these instructions may result in personal injury. When you see this symbol - heed its warning.
unclogging thechute.Thecutting bladecontinues to rotateforafewseconds aftertheengine isshutoff. Never placeanypartofthebodyinthebladeareauntil youaresurethebladehasstopped rotating. 20. Never operate mowerwithout proper trailshield, discharge cover, grasscatcher, bladecontrol handle or othersafetyprotective devices inplaceand working. obscure your vision of a child who may run into the mower. 5. 6. Never operate mower with damaged safety devices. Failure to do so, can result in personal injury. 21.
4. 5. 6. 7. 8. intervals forproper tightness. Also,visually inspect blade fordamage (e.g.,bent,cracked, worn)Replace blade withtheoriginal equipment manufecture's (O.E.M.) blade only,listedinthismanual. "Useofpartswhichdonot meettheoriginal equipment specifications mayleadto improper performance andcompromise eafetyF Mower blades aresharp andcancut.Wrapthebladeor weargloves, anduseextracaution whenservicing them. Keepallnuts,bolts,andscrews tighttobesurethe equipment isinsafeworking condition.
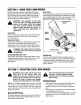
SIGHT AND HOLD THIS LEVEL WITH A VERTICAL TREE A POWER POLE ! A CORNER OF A BUILDING ! OR A FENCE POST I I £0 15° .,,.,I _WARNING t_ Q.-JC t 3 ;:3 63 o Do not mow on inclines with a slope in excess of 15 degrees (a rise of approximately 2-1/2 feet every 10 feet). A riding mower could overturn and cause serious injury. If operating a walk-behind mower on such a slope, it is extremely difficult to maintain your footing and you could slip, resulting in serious injury.
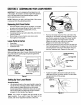
SECTION3: ASSEMBLING YOURLAWNMOWER IMPORTANT: This unit is shipped without gasoline or oil in the engine. Be certain to service engine with gasoline and oil as instructed in the separate engine manual before operating your mower. NOTE: Reference to right or left hand side of the mower is observed from the operating position. RemovingUnitFromCarton • • • • Remove staples, break glue on top flaps, or cut tape at carton end and peel along top flap to open carton. Remove loose parts if included with unit (i.
Attaching StarterRope • The rope guide is attached Discharge Door to the right side of upper handle. Loosen the wing nut which secures the rope guide. See Figure 5. Starter Rope Nut Rope/ Guide Lower Handle Figure 5 Figure 7 With the spark plug wire disconnected and grounded, hold the blade control handle against the upper handle, and pull the starter rope out of the engine. Release the blade control handle. Slip the starter rope into the rope guide.
SECTION4: KNOWYOURLAWNMOWER Read this operator's manual and safety rules before operating your lawn mower, Compare the illustration in Figure 9 with your lawn mower to familiarize yourself with the location of various controls and adjustments. Save this manual for future reference. GrassCatcher The grass catcher, Iocat_,dat the rear of the mower, is used to bag the grass clippings for disposal at another site, Once the bag is full, it has to be removed from the mower and emptied before any further mowing.
Standbehindthemowerandsqueezetheblade controlhandleagainsttheupperhandle. Grasprecoilstarterhandleandpullropeoutslowly untilenginereachesthestartofcompression cycle (ropewillpullslightlyharderatthispoint).Letthe roperewindslowly.Pullropewitha rapid, continuous, fullarmstroke.Keepinga firmgripon thestarterhandle,lettheropereturntothestarter slowly. designed to be operated at full throttle to give you the best cut and do the most effective job of mowing or mulching.
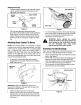
IMPORTANT:All wheels nust be placed in the same relative position. For rough or uneven lawns, move the height adjustment lever to a higher position. This will help stop scalping of the grass. Height Adjustment , Lever EngineAdjustmenls See the separate engine manual packed with your unit for adjustments to the engine. Figure 11 SECTION7: MAINTAININGYOURLAWNMOWER GeneralRecommendations * • Always observe safety rules when performing any maintenance.
Lubrication Rear Discharge plug wire before cleaning, lubricating or Always stop engine and disconnect spark doing any kind of service work on the lawn mower. Handle Bracket \ Blade Control: Lubricate the pivot points on the blade control handle and the brake cable at least once a season with light oil. The blade control must operate freely in both directions. See Figure 12.
• Remove the blade and the adapter from the crankshaft. • • Blade • • Blade Bell _Supporl Slide the blade adapler onto the engine crankshaft. Place the blade on the adapter. Be certain the blade is aligned and _._eatedon the blade adapter flanges. Place blade bell support on blade. Make sure the notches on the blade bell support are aligned with small holes in the blade. Replace hex bolt and tighten hex bolt to torque: 450 in. Ibs. min., 600 in. Ibs. max.
SECTION8: TROUBLESHOOTING Problem Cause Remedy Engine fails to start 1. 2. 3. 4. 5. 6. Blade control handle disengaged. Spark plug wire disconnected. Fuel tank empty or stale fuel. Blocked fuel line. Faulty spark plug. Engine flooded 1. 2. 3. 4. 5. 6. Engage blade control handle. Connect wire to spark plug. Fill tank with clean, fresh gasoline. Clean fuel line. Clean, adjust gap, or replace. Wait a few minutes to restart, but do not prime. Engine runs erratic 1. 2. Spark plug wire loose.
Notes 1,5
ModelSeries540 1 \ ! 6 52 17 57 57. ,20 30 \\\\\ \ \ 56 89 55 81 59 71 76 \ 70 63Yl 53 54 ! \33 % \ 72 16
ModelSeries540 Ref. No. Part No. 747-0824 1, 647-0004 Ref. No. Part Description Part No. Control Handle Assembly Deluxe Control Handle 50. 17488A 17489A 51. 782-5002 52. 712-0397 53. 782-5003 Part Description Pivot Bar - RH Pivot Bar - LH Front Baffle 3. 710-1205 720-0279 4. 710-1174 Rope Guide Handle Knob Curved Hd. Bolt 5/16-18 x 2" 5. 712-0324 Hex L-Nut 1/4-20 Thd. 54. 710-1017 6. 720-0314 Hand Knob 55. 710-0896 "[orx Mach. AB-Tap Scr. Flex Washer Screw 1/4-14 x .625 56.
MANUFACTURER'S LIMITED WARRANTY The limited warranty set forth below is given by MTD PRODUCTS INC ("MTD") with respect to new merchandise purchased and used in the United States, its possessions and territories. MTD warrants this product against defects in material and workmanship for a period of two (2) years commencing on the date of original purchase and will, at its option, repair or replace, free of charge, any part found to be defective in material or workmanship. This limited warranty shall only c.